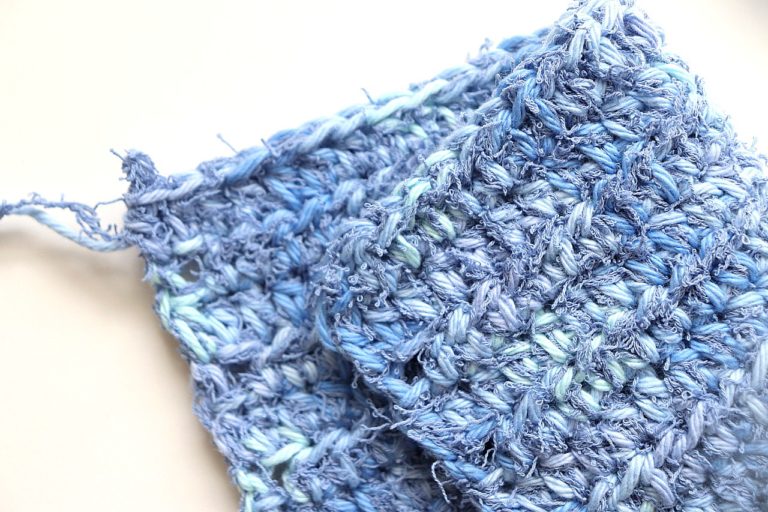
How to Read and Understand Crochet Diagrams
If you’re looking at a crochet diagram for the first time, you’re probably thinking it looks like gibberish. It makes no sense, am I right? The same with written crochet patterns, you’ll need to memorize a few things. With Crochet diagrams, it will be the symbols. Today we’re going to go over what a crochet diagram is, how to read them, and the benefits of knowing how to read them. Let’s get you learning how to read and understand crochet diagrams.
What is a Crochet Diagram, anyway?
A crochet diagram, or chart, is a pattern using symbols instead of words. When you don’t know what you’re looking at, it looks like a giant mess of overwhelming confusion. Don’t worry, we’re going to go over it and by the end of this post you’ll look at them in a whole new light.
A diagram can be used to read a crochet pattern in its entirety or even just to show a stitch repeat. Sometimes they are paired with a written pattern and other times it could be there on its own. Diagrams can be created for patterns that are worked row by row and in the round.
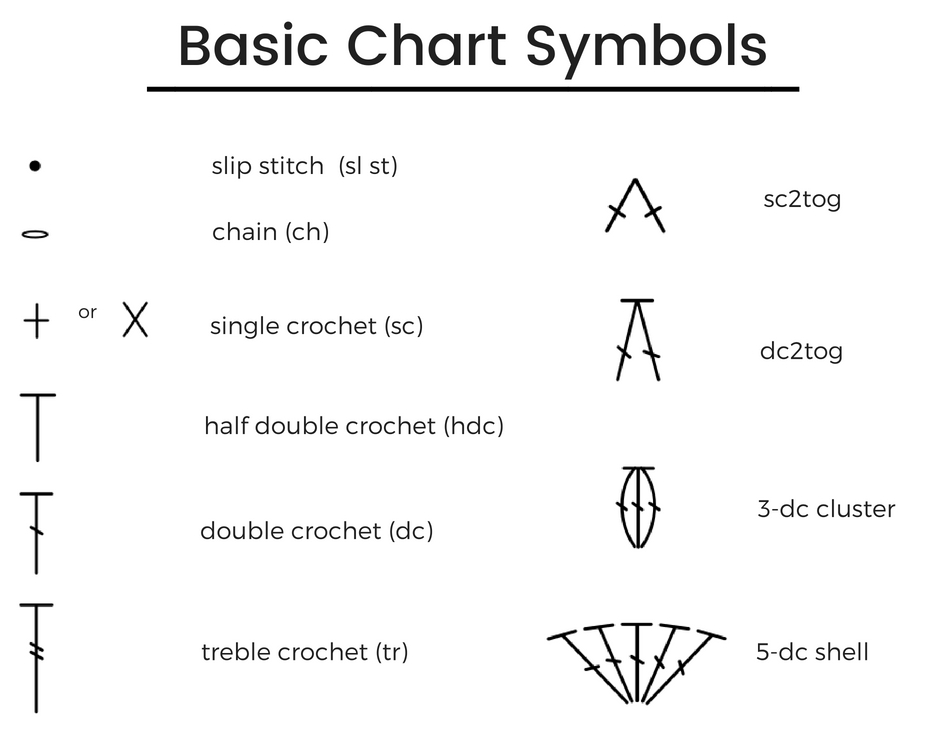
One of the most important things for you to do first is to get familiar with the symbols used. I’ve listed a few of the basic symbols below, but you can find a list of these symbols over at the Craft Yarn Council.
Bookmark it on your computer or print them out for easy reference! If you don’t have their list of symbols handy, there is almost always a key within the diagram that states what each symbol means.
One way to remember what each symbol represents is by understanding why they look the way they look. For example, the slip stitch is represented by a black dot because it is small and unnoticeable in the pattern
The chain stitch is represented by an oval because the chain stitch looks like an oval! The symbol for a dc (double crochet) has one diagonal line in the center. This shows that you will yarn over once before inserting your hook.
The symbol for the tr (treble crochet) has two diagonal lines for two yarn overs. As for the sc2tog and dc2tog (single crochet 2 together/double crochet 2
Why Follow a Crochet Diagram?
As you know, there are many different types of crochet patterns out there. Some easy, some a little more difficult. Sometimes when you’re reading a written pattern, the wording can be confusing. A crochet diagram is meant to correct that.
Instead of writing an intricate pattern that could come out sounding complex or confusing, a diagram would make those patterns a lot easier to read by showing you exactly what to do. Diagrams show you every step to take from start to finish. They also give you a general idea on what your work is supposed to look like once it’s complete.
If you’re new to reading diagrams, I highly suggest starting out with a pattern that has both a diagram and written instructions. By using both you can easily reference one or the other when you’re having trouble to ensure you’re following the pattern correctly
Another really great thing about learning to read crochet diagrams is that the chart symbols are the same in every language.
Let’s say you really like a Japanese pattern, but you can’t read Japanese. A lot of Japanese crochet patterns are written with diagrams. This means you can still follow the Japanese pattern through the diagram provided without needing to understand the written language!
Isn’t that amazing?
How to Read and Understand Crochet Diagrams
Before we get started using our hooks, I wanted to go over a few tips when working row by row and in the round.
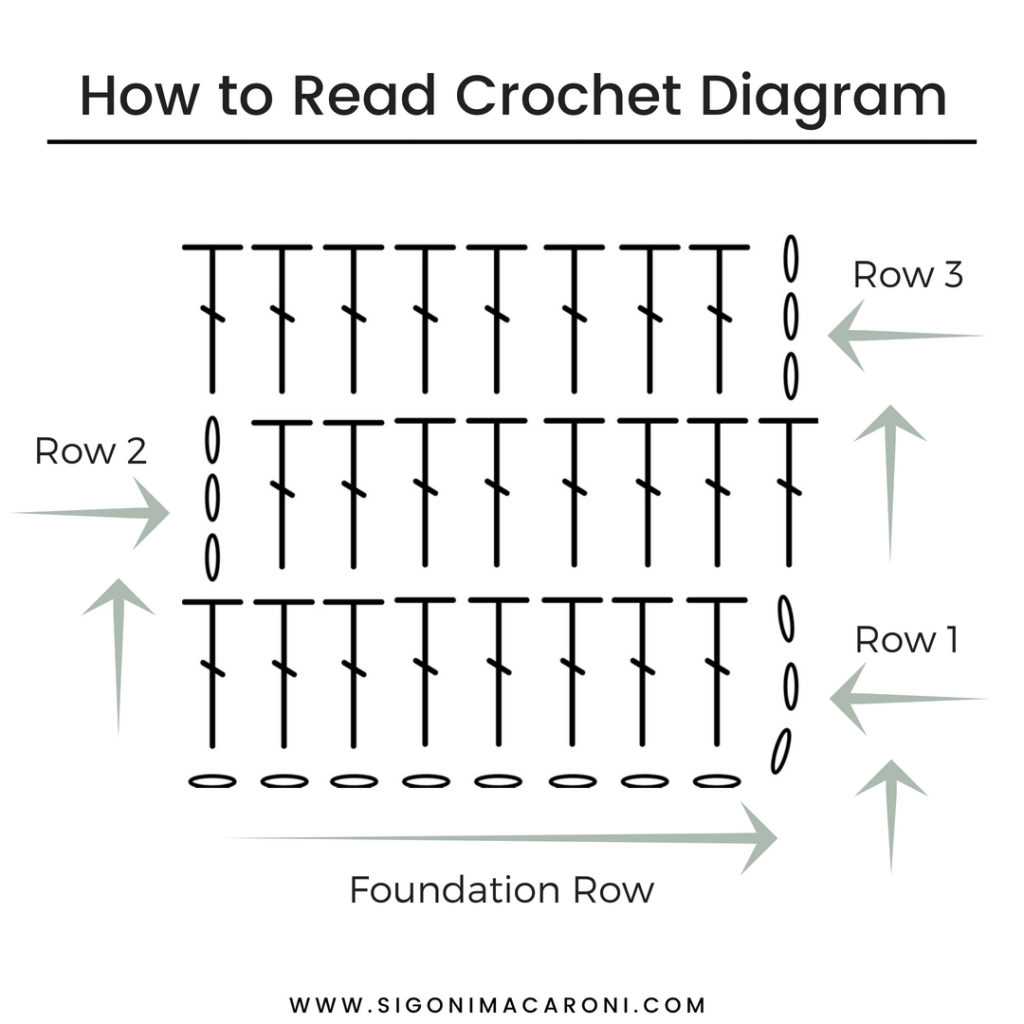
Reading a Diagram Row by Row
When you look at a crochet diagram that is worked in rows, you will start at the bottom with the foundation row and work upwards in an “S” formation. You will also be following the tops of the stitches in order. I explain this further in the video tutorial that I’ve linked to at the bottom of this post!
As I stated above, a crochet diagram is essentially the layout of what our project will look like when it’s complete. Because of this, you won’t physically see that we’ve turned our work through the diagram.
You will notice though that the chains at the beginning of each row switch sides after every row. This is because we are reading the pattern in an “S” formation, but physically we will be turning our work after each row.
Below is a simple diagram that I put together in order to give you a visual representation of what I’m talking about.
Crocheting a Diagram Row by Row
Go ahead and grab a hook and some yarn and follow along while I explain how you will crochet this diagram.
First things first, notice which symbols are being used in this diagram. The oval is represented by the chain stitch and the “T” with one dash in the center is represented by the double crochet stitch.
Again, when reading a diagram row by row you will start at the bottom. To start we will chain 11 because there are 11 ovals. As you can see, there are 3 ovals that are facing vertical rather than horizontal. This is showing us that those chains count as a double crochet.
Next is the double crochet symbol. The placement of this symbol is telling us to double crochet into the 4th chain from the hook.
As you can see, the rest of the row shows a double crochet in each chain. Once you reach the last double crochet, you will chain three (because of the three ovals shown on top). Because the chain 3 at the beginning of the row counts as a double crochet, you will double crochet into the next stitch and each stitch down the row.
This is a basic example of a chart and I hope it helps you start to understand a little more. Now let’s go over reading a diagram in rounds.
Reading a Diagram in the Round
When you’re looking at a crochet diagram that’s being worked in the round, you will almost always be reading it counter-clockwise. In some cases though, it could be the other way around.
The way to know for sure is to look for where the symbol for the slip stitch is. If it is on the right side of the chain, you will know you’re reading it counter-clockwise. If it’s on the left side you will be reading it clockwise.
When looking at this chart you’re probably thinking, “Where do I even begin?” Let’s think about when we’re physically working on a project. When you’re crocheting in the round, you start small and it gradually turns into a circle/hexagon/granny square, right? So naturally, you will start reading the graph from the center.
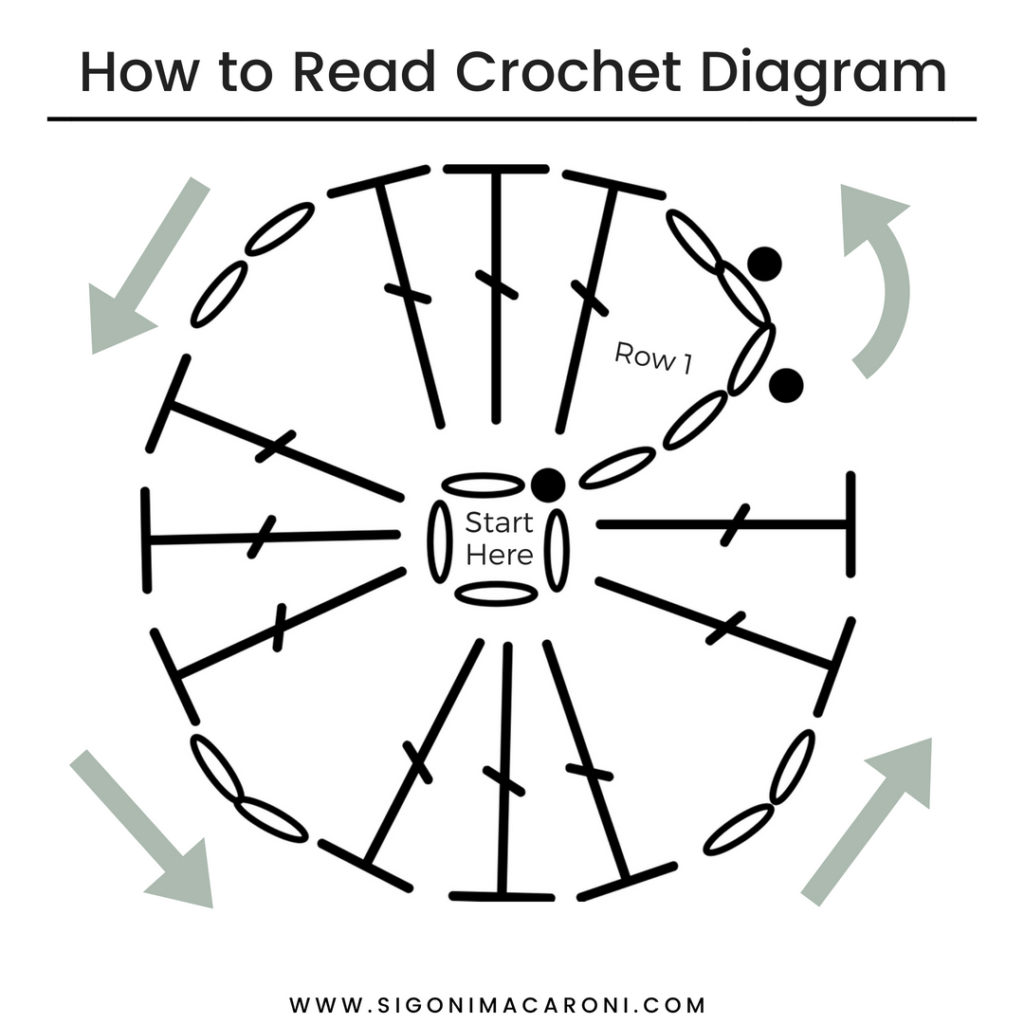
Crocheting a Diagram in the Round
As you can see in the diagram above, there are 4 chains in the center of the circle. The dot is symbolized by a slip stitch. This means you will chain 4 and sl st to the first ch to form a circle.
To begin row 1, you will chain 5 as indicated by the 5 ovals. The next symbol we see represents a double crochet. These 3 dc symbols are telling you to place 3dc in the center of your newly formed circle. Next comes two more ovals, or chains. 3dc into the circle, chain 2, 3dc into the circle, ch 2.
The end of the round is going to be a little different. Dc two more times into the circle. The black dot is indicating that you sl st into the third chain from the bottom of your chain 5 from the beginning of the round. The next dot is telling you to sl st into the next ch-sp. After you complete round 1, you will continue onto each row continuously in the same direction.
How To Read Crochet Diagrams Video Tutorial
If you’re more of a visual learner, I explain each of the above steps in the video below!
How are you feeling about diagrams now? Is there anything I didn’t cover that you’re still unsure about? Let me know in the comments and I will answer your questions!