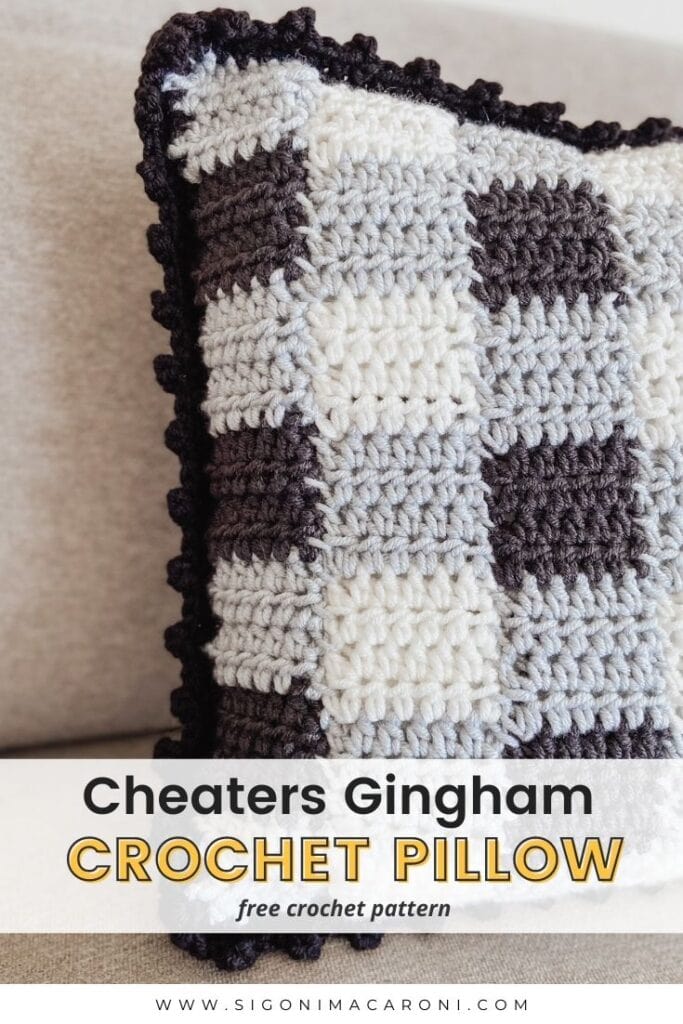
Simple Gingham Crochet Pillow Cover | FREE PATTERN
There are tons and tons of crochet pillow cover patterns on the web, but this simple crochet pillow cover pattern is a bit different. Today I’m going to help you make a simple gingham crochet pillow cover! Did I mention that it’s worked up a lot differently than a normal pillow? I took the Cheaters Gingham Blanket and turned it into a simple gingham crochet pillow cover! This easy pillow cover is quick to work up and it will be the one of the most interesting ways you’ve ever made a pillow. After you fall in love with your new gingham style pillow, why not make a blanket to match?
Some of the links below are affiliate links. Please see my disclaimer for details.
Simple Gingham Crochet Pillow Cover Back Story
In October I hosted my very first CAL and I was astounded by how many people showed up for this event – Over 600!
Many people were excited that I was sharing a new way to take on the crochet gingham stitch. If you’re just starting out (or even if you’ve been crocheting for a while) it can be frustrating when you can’t get the hang of a stitch you really love the look of.
I shared in that post that I royally messed up my nephew’s baby blanket using the traditional crochet gingham stitch and because of that, I decided to cheat my way through it. I came up with the Cheaters Gingham Blanket – although I had never made a blanket like that before so I’m glad it worked out! – and the rest is history.
This way of crocheting the gingham stitch is so fun and quite addicting. So I decided to design this simple crochet pillow cover and I’m pretty sure I’ll be making a few other projects using this method.
Before we get started on the pattern, here are some general tips on how to crochet this chunky pillow cover pattern.

Before You Start
If you haven’t already made yourself a Cheaters Gingham Blanket, this technique might be new to you.
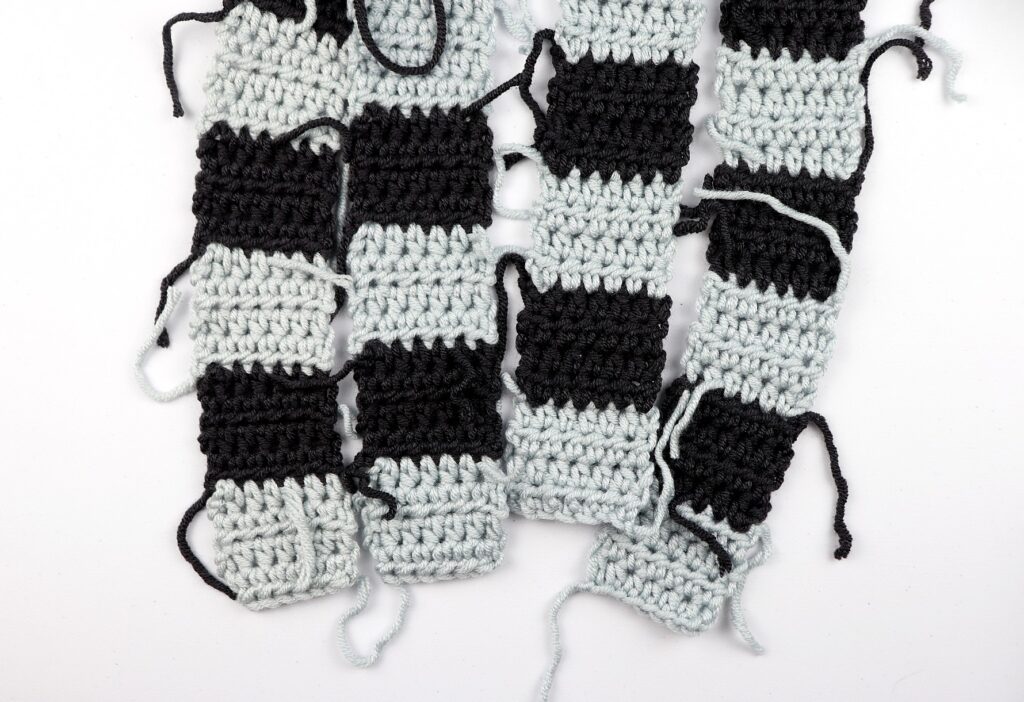
One of the more popular ways to crochet a pillow is to create two separate panels and sew them together to form the pillow cover. This is basically what we’re doing, but the front panel consists of 7 rectangle strips that we’ll sew together to form the front panel.
Be sure to grab some stitch markers so that each of your smaller panels line up equally. It sounds like it could be complicated, but it’s really not. Plus there’s a video tutorial included!
The back panel is strictly half double crochet because we want all of our attention on the front side. However, if you’d like both sides to have the gingham pattern, I bet that would look great!
One more thing to note is that I used a 18″ x 18″ pillow insert to stuff inside of my crochet pillow cover. I personally didn’t think the pillow I used was fluffy enough and if I didn’t already sew it up, I would have added some extra polyfil. If you feel the same way about your pillow, stuff it up some more with some polyfil or maybe even some yarn scraps you have laying around.
If you came from the Marly Bird and Friends event, thanks so much for taking the time to hang out with me today! If you don’t know me, my name is Sigoni and I teach beginners how to crochet like pros. If you’d like to receive the best of the best crochet tips and join my new project, Limitless Crochet Everyday, subscribe to my newsletter!
I’m so excited to share that I’m a part of the 24 Days of Quickies with Marly Bird and Friends event!
Yarn Substitutions
The yarn I used for this simple gingham crochet pillow cover pattern is Lion Brand’s Color Made Easy. This is a chunky (#5) yarn and it is my absolute favorite at the moment.
You can use any bulky weight yarn that you have on hand it should fit around your 18″ x 18″ pillow insert even if your gauge is off slightly.
Here are some yarn substitutions that I think would be great for this simple crochet pillow cover:
Simple Gingham Crochet Pillow Cover – Free Pattern
- Get the ad-free, large print, printable PDF pattern (on Etsy) HERE.
- Add to your Ravelry Queue HERE.
- PIN this pattern to your Pinterest boards for later HERE.
SIGN UP FOR MY NEWSLETTER TO RECEIVE DISCOUNTS ON THE PDF DOWNLOAD FOR EACH NEW PATTERN.. & A WHOLE LOT MORE 😉
Materials
- Lion Brand’s Color Made Easy (Bulky #5; 100% acrylic; 247yds/7oz.)
- 1 ball Shade
- 1 ball Birch
- 2 balls Coal
- 8mm Crochet Hook
- 18″ x 18″ Pillow insert
- Locking Stitch Markers
- Tapestry Needle
- Scissors
Abbreviations
*All Sigoni Macaroni patterns are written in standard US terms *
- Ch – Chain
- Sc – Single Crochet
- Hdc – Half Double Crochet
- St – Stitch
| US TERMS | UK TERMS |
| single crochet (sc) | double crochet (dc) |
| half double crochet (hdc) | half treble crochet (htr) |
Special Stitches
- Picot St – Ch 3, insert hook into back loop and left leg of sc, yarn over pull through those two loops and the loop on your hook
Gauge
- 6st x 4 rows = 2.5″ square
Helpful Tutorials
- Single Crochet Tutorial
- Half Double Crochet Tutorial
- Cheaters Gingham Blanket Crochet Pattern
- Simple Gingham Crochet Pillow Cover Video Tutorial
Notes/Tips
- Ch 2 at beginning of row does not count as a stitch
PERMISSIONS & COPYRIGHT
Please do not publish or share this pattern as your own. You may make items to sell with this pattern. In exchange, please link back this post. Do NOT use my photos as your own sales photos.
Simple Gingham Crochet Pillow Cover Instructions
Front Panel 1 (make 4)
Starting with Shade,
Row 1: Ch 8, hdc into 3rd ch from hook and each ch down. (6)
Rows 2-4: Ch 2, turn. hdc into each st across (6)
Switch to Coal
Rows 5-8: Ch 2, turn. hdc into each st across (6)
Switch to Shade
Rows 9-12: Ch 2, turn. hdc into each st across (6)
Repeat Rows 5-12 four more times, switching colors every 4 rows
You should have 7 squares total, 4 squares of Shade and 3 squares of Coal. Each square should have 4 rows and 6 stitches.
Front Panel 2 (make 3)
Starting with Birch,
Row 1: Ch 8, hdc into 3rd ch from hook and each ch down. (6)
Rows 2-4: Ch 2, turn. hdc into each st across (6)
Switch to Shade
Rows 5-8: Ch 2, turn. hdc into each st across (6)
Switch to Birch
Rows 9-12: Ch 2, turn. hdc into each st across (6)
Repeat Rows 5-12 four more times, switching colors every 4 rows
You should have 7 squares total, 4 squares of Birch and 3 squares of Shade. Each square should have 4 rows and 6 stitches.
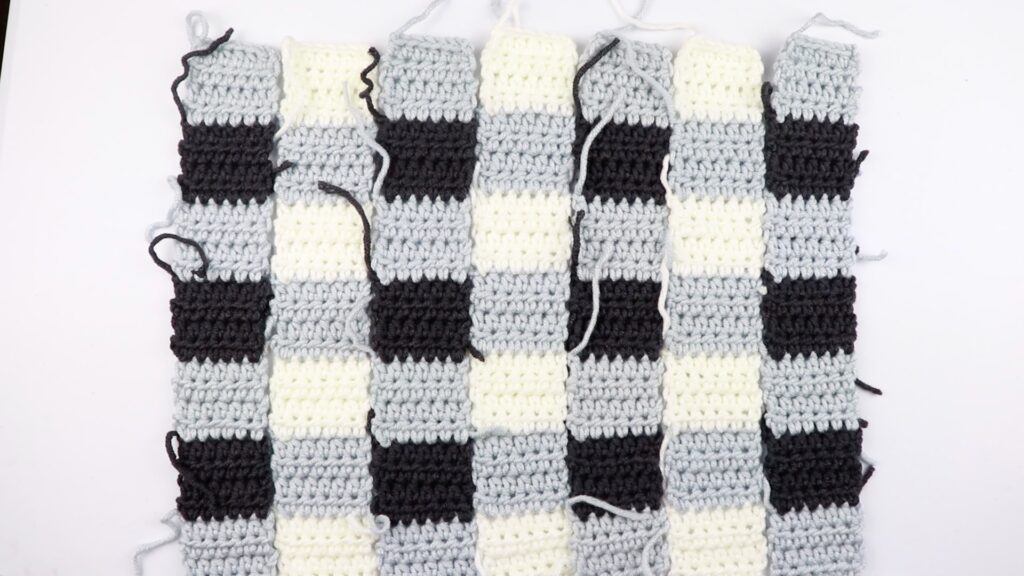
Joining The Front Panels
A few notes before you get started:
- I used the color Shade to seam my panels since there is a gray square in each row. You can use whichever color you’d like.
- When you’re lining up your panels, make sure that the stitches on each panel are facing the same direction.
- Use locking stitch markers to line up your panels and hold them in place. I marked the last row of every other square – I like to use bulb safety pins because they’re more flexible.
- If you prefer to seam your panels together a different way you can do that too! Whatever works best for you.
Step 1:
Line up 2 panels and use locking stitch markers to match up each square to hold the panels in place – the gray and black panel on the left, the white and gray panel on the right
**See the Notes section above for additional tips on making sure your panels are positioned correctly.
Make sure that your panels are facing right side up and then fold them in half. Both of the right sides should be facing each other.
Step 2:
To sew the panels together, you’ll need a strand of yarn that’s almost three times the length of the panels. You can do this with the yarn still attached to the ball, or you can measure it out and cut accordingly.
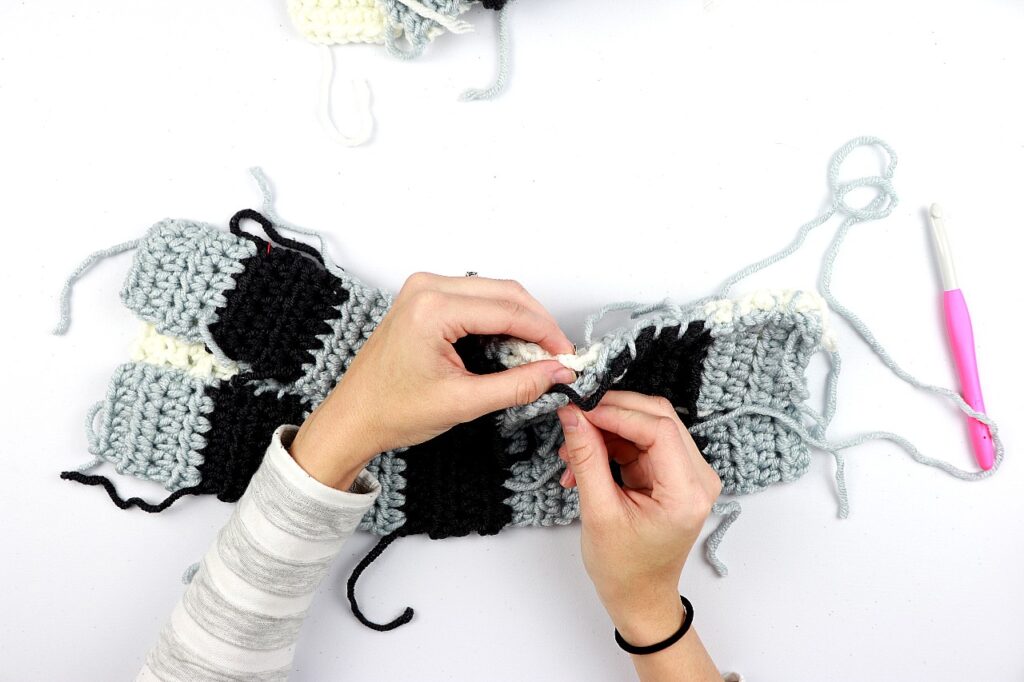
Step 3:
Thread your tapestry needle and starting from the bottom, whip stitch your way to the top, taking out the stitch markers as you reach them.
When finished, cut off your yarn a few inches and weave in your ends. Make sure they’re nice and secure! I like to weave my ends in three different directions.
Step 4:
Grab the next panel and repeat steps 1-3!
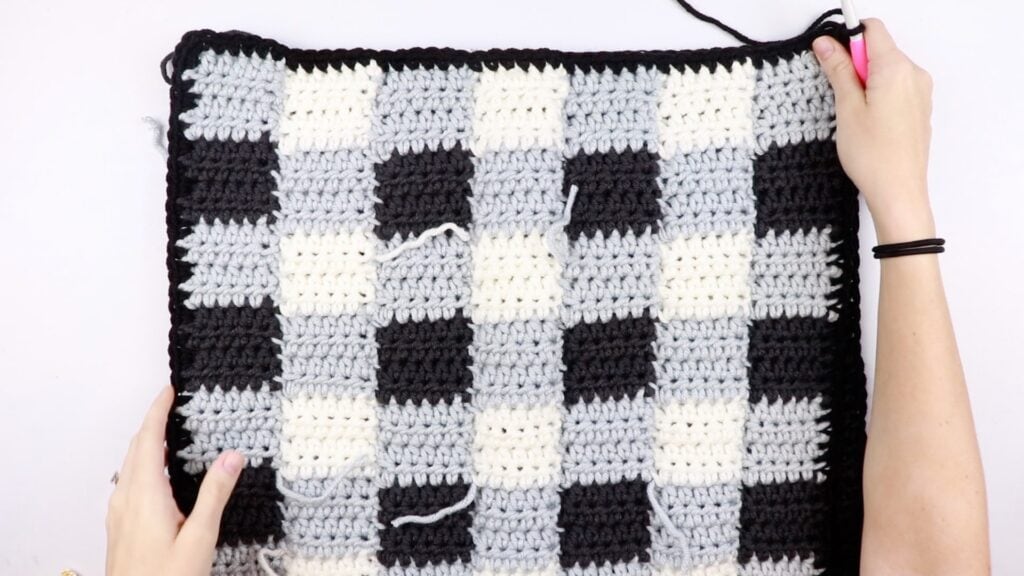
Border
Once you have all of your panels sewn together, attach Shade into the top right corner and create a single crochet border with 4 stitches in each corner. On the sides you should have 36 stitches, not including the 4 stitches in each corner. Slip stitch to the first single crochet, do not tie off your work.
Back Panel
With Coal,
Row 1: Ch 45, hdc into 3rd ch from hook and each ch down. (42)
Rows 2-__: Ch 2, turn. hdc into each st across (42)
Tie off and weave in ends.
Border
Reattach yarn in top right corner and create a single crochet border the same way you did with the gingham side of the pillow. The side we just made is slightly larger than the first so it won’t even out. Try to evenly space out 36 stitches across the edge so that it lines up with the other side.
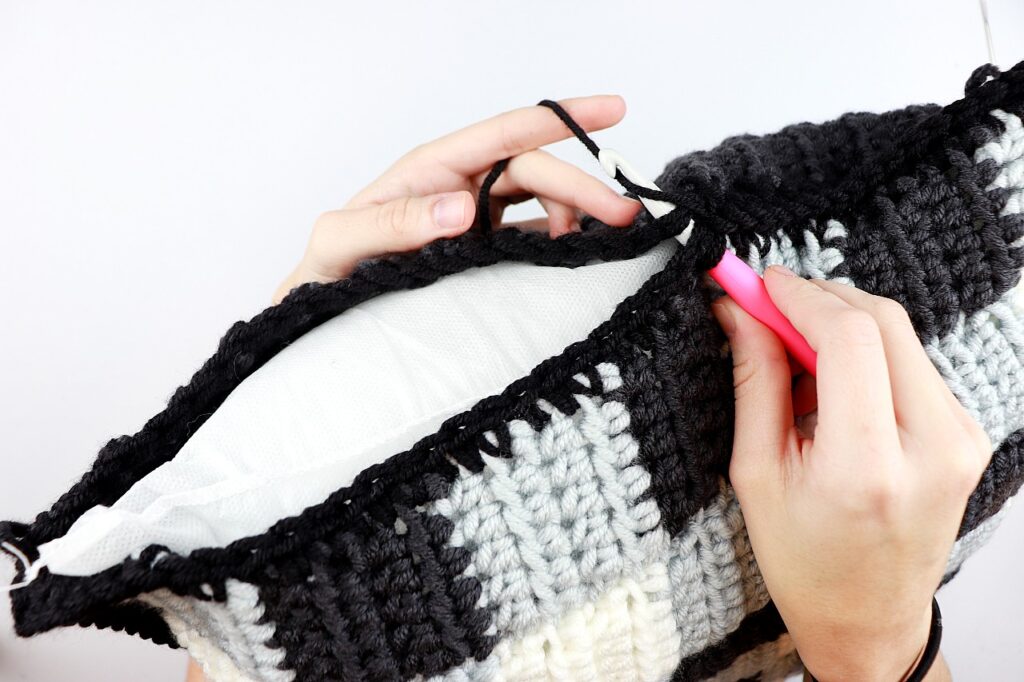
Joining Panels to Form Pillow
Place the gingham side of your pillow on top of the back side of the pillow.
Starting from where you left off on the gingham side,
Round 1: Ch 1, sc in each st around making sure that you are inserting your hook into both stitches from the front and back panels. You can use stitch markers to ensure everything is lining up evenly along the way. Stop before you sew the final edge shut and stuff your pillow insert inside. Sc the last edge shut. Sl st to first st.
You can stop here if you prefer – maybe add some tassels or pom poms to give it some added texture. Or you can keep going with the picot edging.
Picot Edging
Round 2: Ch 1, sc next, picot next, [sc next 3 st, picot next st]. Rep [ ] to last st. Sc next st. Sl st to join.
Tie off and weave in all ends.
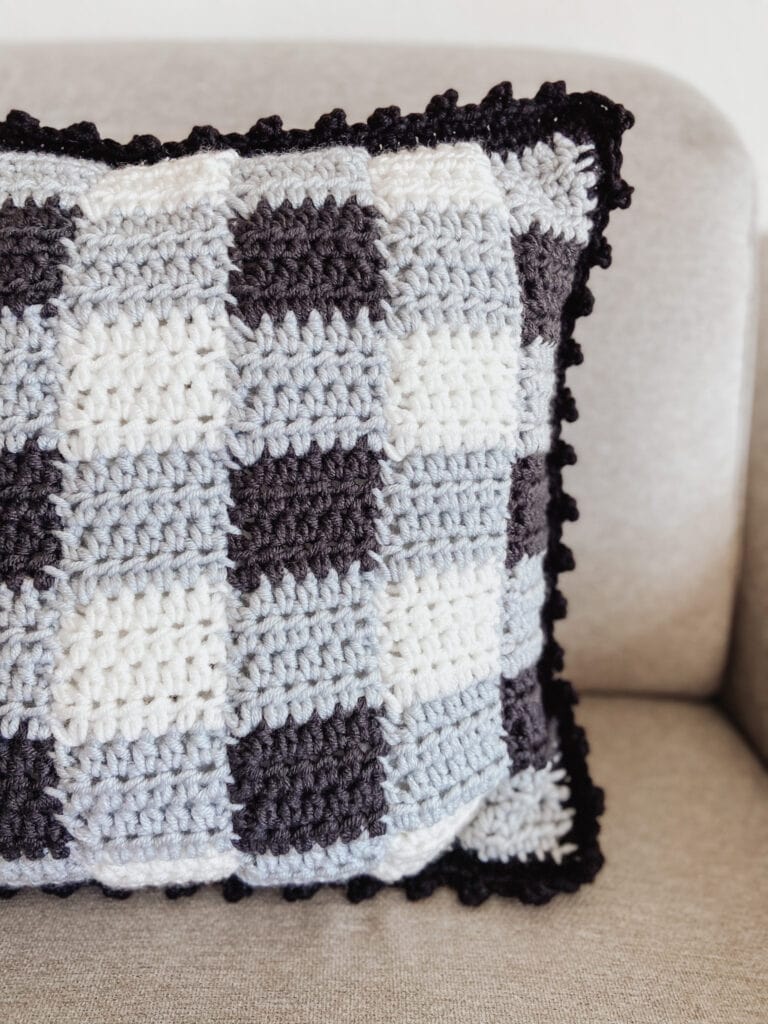
I hope you love the way your simple gingham crochet pillow cover turned out! Please let me know if you have any questions by leaving them in the comments below.
If you came from the Marly Bird and Friends event, thanks so much for taking the time to hang out with me today! I hope you enjoy this pattern and maybe even make yourself a Cheaters Gingham Blanket as well. If you don’t know me, my name is Sigoni and I teach beginners how to crochet like pros. If you’d like to hear beginner tips and join my new project, Limitless Crochet Everyday, subscribe to my newsletter!
Please do not publish or share this pattern as your own. You may make items to sell with this pattern. In exchange, please link back this post. Do NOT use my photos as your own sales photos.


I am doing the Marly Bird 24 days And thank you for this pattern It will be my first Pillow I love it
You’re welcome! It’s a very different way to make a pillow so if you ever have any questions just ask!
Happy holidays,
Sigoni