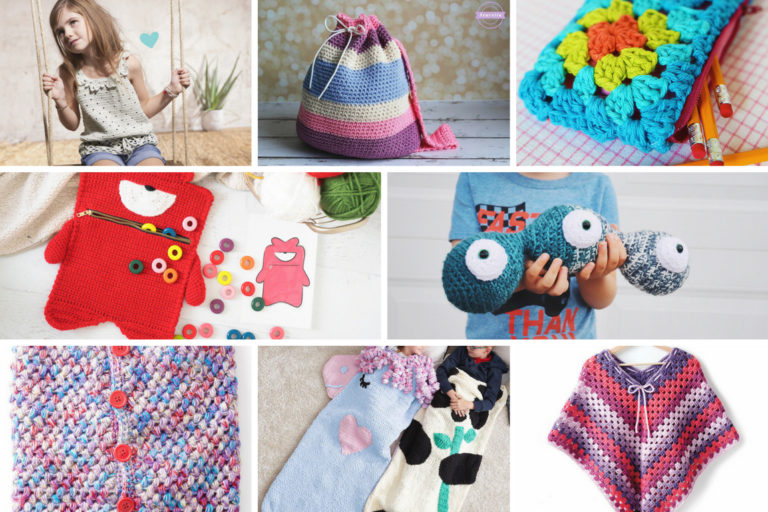
THIS is How to Crochet Straight Edges Once and for All
Are you tired of having wonky edges in your crochet? You might not even know what’s causing your edges to be wavy. Today I’m going to share why you have uneven edges in the first place and how you’re going to crochet nice straight edges by the end of this post.
I can feel the frustration welling up inside you. I know you’re tired of thinking, “Why are my crochet edges not straight?!” or “Why is my blanket curving?” It’s maddening when you can’t figure out the problem.
But I know for a fact that I can teach you how to finally overcome this struggle once and for all.
HOWEVER, before you get too excited, I want you to know it’s going to take just a little bit of work. And this is important
You can’t read part of this post. You have to read the whole thing.
Keeping your edges straight sounds like it would be pretty straight forward right? But there’s actually a lot that goes into it.
What I mean by that is… if there’s something that doesn’t make sense, whether that’s turning chains or counting stitches or tension. It’s because you don’t have the full picture. This blog post I’m sharing with you today paints the ENTIRE picture.
It’s not just one thing that will keep your edges straight – although the first tip will pretty much ensure it every time – but working with all of these things together will give you the best results.
So first let me tell you why your edges are not straight. Then I’ll tell you how we’re going to keep straight edges in crochet every time.
There are a number of reasons it happens but it’s important for you to figure out which one is affecting you personally. It could be just one of these reasons or it could be several.
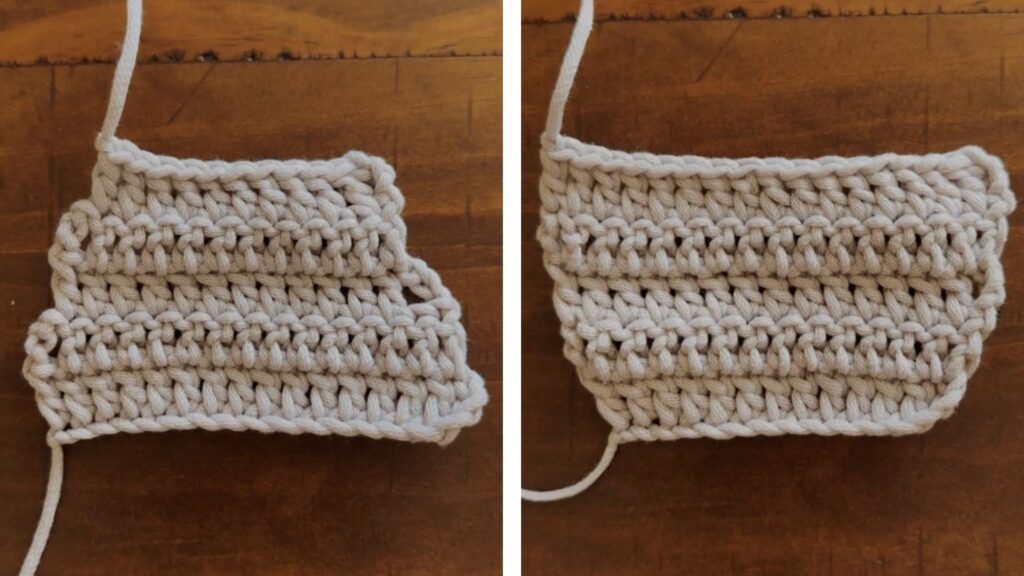
This is why you have wonky edges 👇🏼
- You added a stitch where it wasn’t supposed to go
- You missed a stitch in the middle of your work or at the end of the row
- Inconsistent tension
- You’re getting mixed up when changing colors
- You don’t fully understand turning chains
And this is how you will escape the dreaded trapezoid shape👇🏼
This post may contain affiliate links, please view my disclosure policy for details.
10 Ways to Crochet STRAIGHT Edges Every Time
I’m so excited to share these tips for you because I know they’re going to help immensely!
Here are 10 ways you can fix your wonky crochet edges. This is just a quick reference list, but I’m going to bo into greater detail below.
- Count your stitches
- Use stitch markers to mark your first and last stitch
- Understand the difference between US and UK terms
- Understand turning chains and how they work (this is a big one)
- Know where to place the first and last stitch in the row
- Learn how to fix the gap
- Substitute a stacked single crochet as a turning chain
- Understand tension and how to adjust it
- Block your work
- Know where to put your first and last stitch when crocheting in the round *BONUS*
After I talk more about these 10 tips, I’m going to share some bonus tips at the end of this post that will be perfect for those of you who are absolute beginners just starting out. So keep reading!
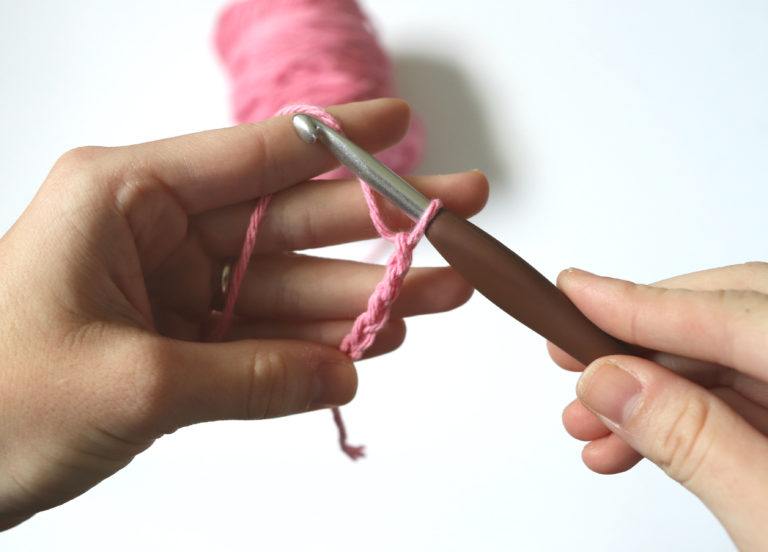
1. Count. Your. Stitches.
The number one way to keep your edges straight is to count your stitches!
I know that counting your stitches seems tedious and annoying and “takes too much time”. But in reality, you’re wasting more time if you don’t count your stitches.
Why? Because you have to frog your work and start over several times. Not only is this more wasteful of time, but it’s also causing you to be beyond frustrated. We don’t want either of those things!
Counting your stitches is so important, especially when you’re first starting out with crochet.
If your stitch count is correct, then you will know that it’s your tension that needs to be worked on. We’ll talk more about that later.
This post will teach you how to recognize the anatomy of a stitch so you can better count them.
2. Stitch Markers are your BEST FRIENDS
This is probably the BEST little trick I’ve ever tried and that’s why I’m sharing it first. Plus I’ve gotten so much feedback from other crocheters saying that THIS one trick has completely fixed their wonky edge problem.
This is so helpful if you are brand new at crochet, but even I use this technique when I’m working on a more difficult stitch!
The trick is to mark your first and last stitch with a stitch marker. Doing this means you will know exactly where to place your first and last stitch of each row. No more guessing or having to frog your work and fix your mistake.
Watch this video tutorial where I show you how to do this for all three of the basic stitches.
BUT BEFORE YOU GO! Make sure you read through the rest of this post first or at least come back when you’re finished with the video.
Some things in that video are explained further in this post and it will help you further understand why you have uneven edges in the first place.
By the way, these are my favorite stitch markers!
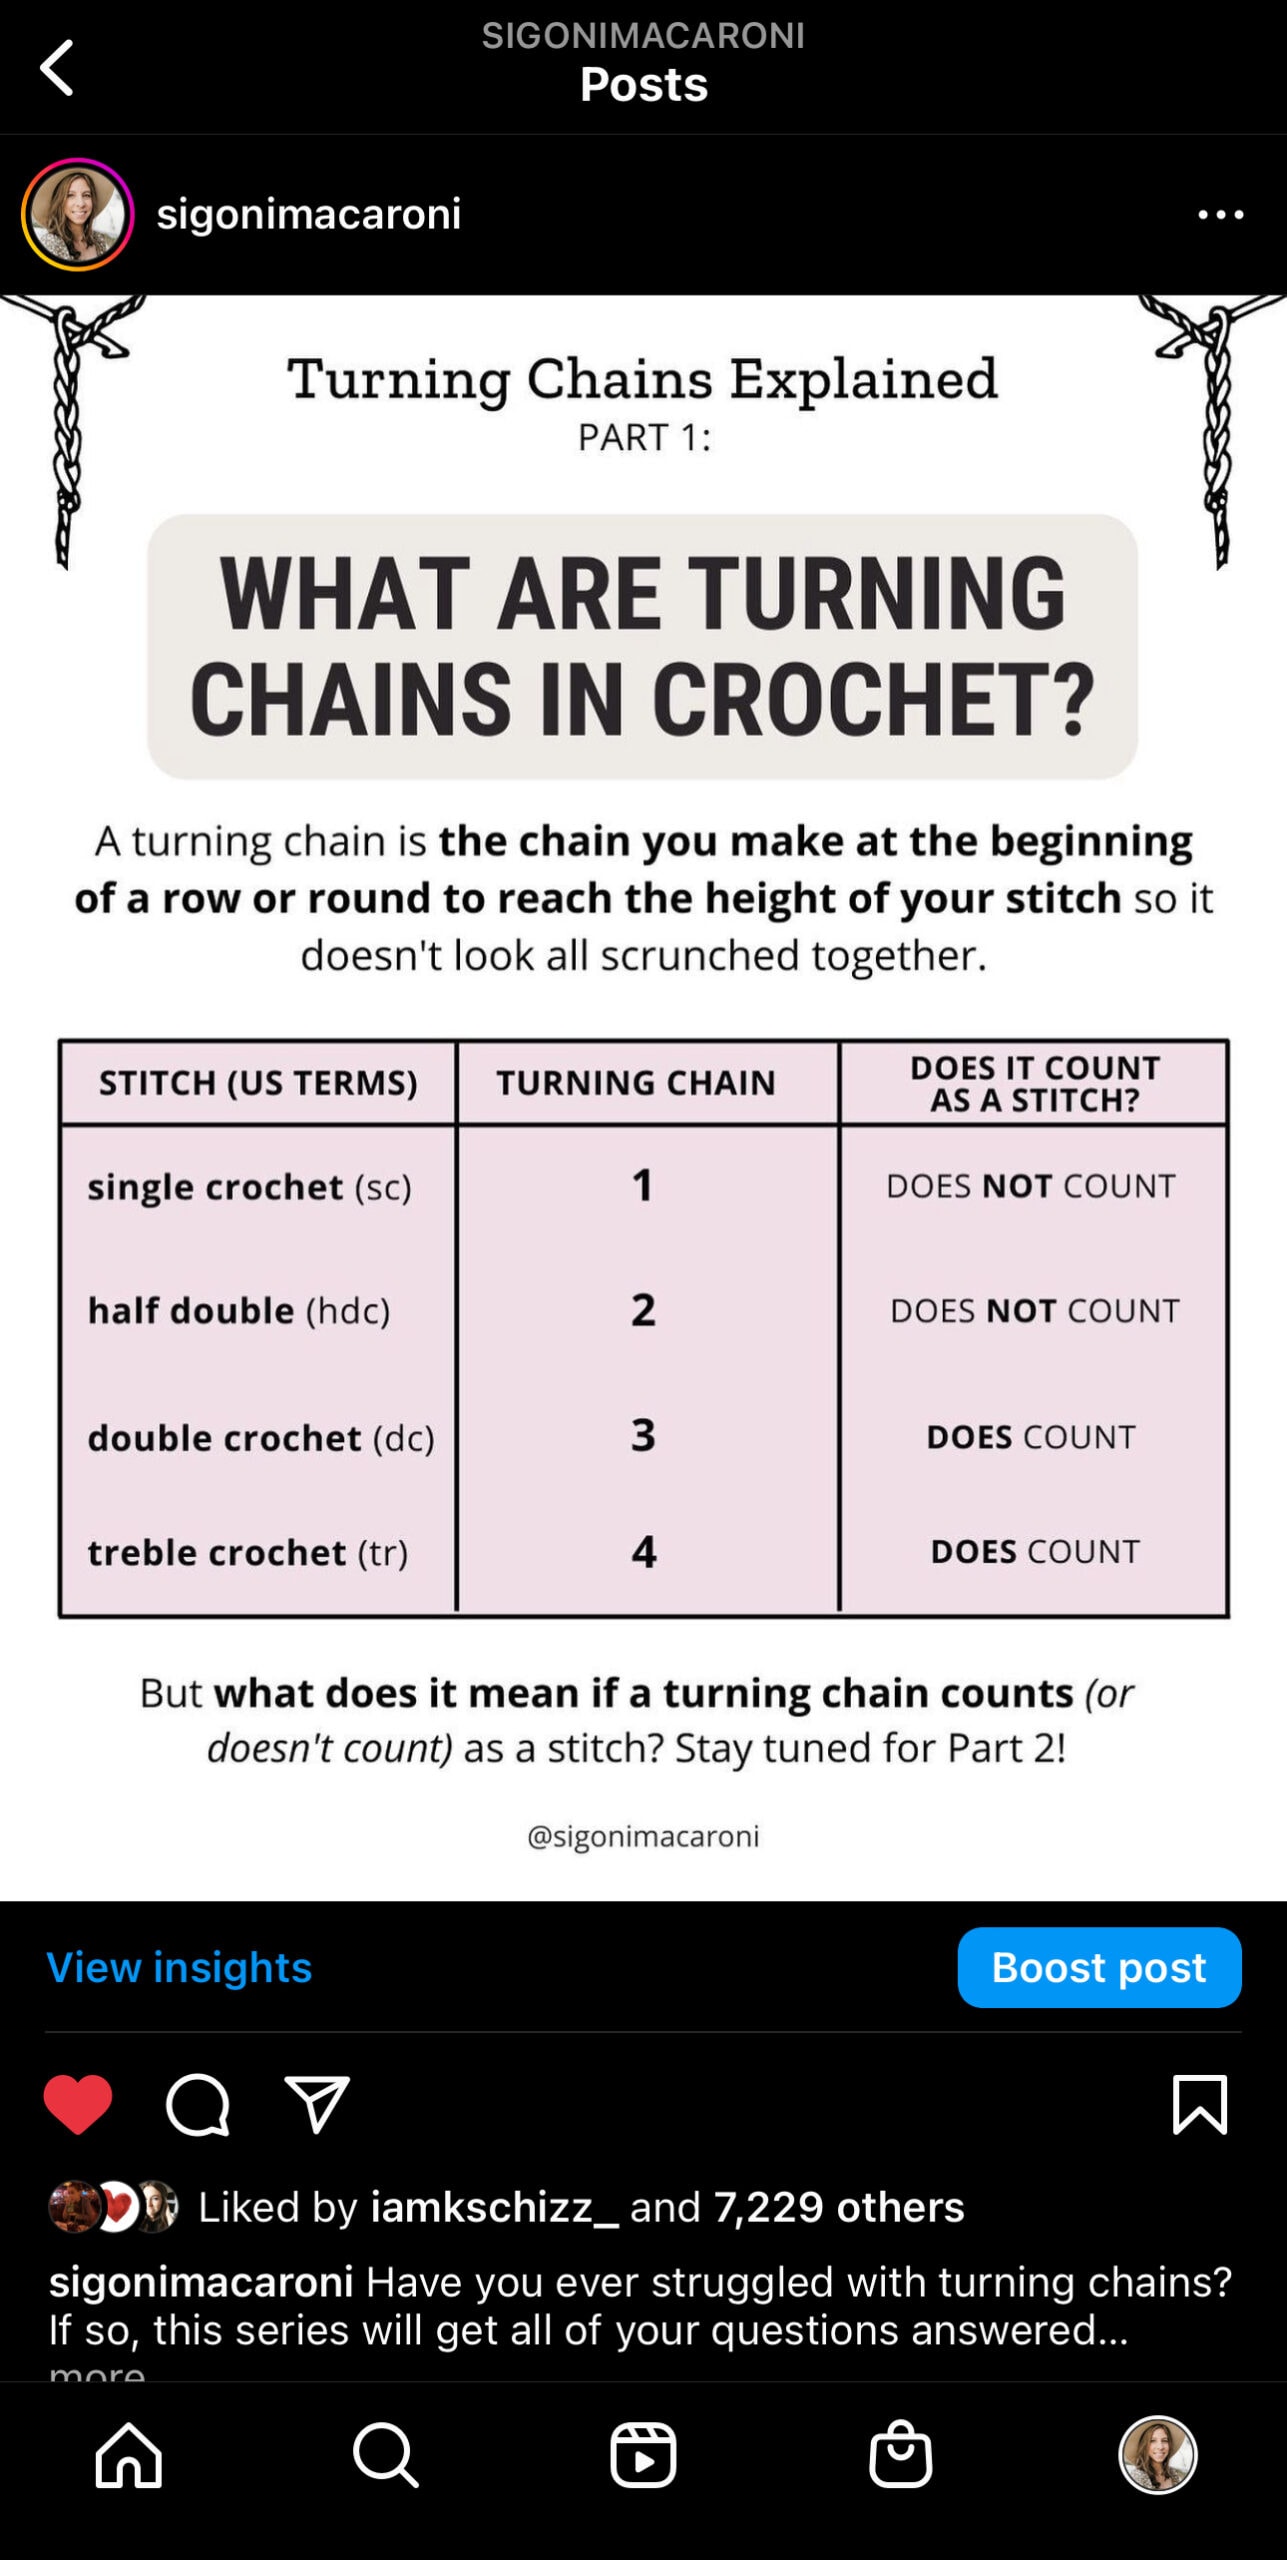
3. US vs. UK terms
Did you know there was a difference between US and UK terms? This is such an essential thing to understand because it can completely throw your project off.
It doesn’t relate directly to straight or wonky edges, but it will clear up a lot of confusion if this is something you’re unfamiliar with. And using the wrong stitch could contribute to why your edges are not straight.
The chart below shows the difference between US and UK terms. The stitches created are the same. It’s just the names that are different.
*Note that the treble crochet can also be referred to as triple crochet.
| US TERMS | UK TERMS |
| single crochet (sc) | double crochet (dc) |
| half double crochet (hdc) | half treble crochet (htr) |
| double crochet (dc) | treble crochet (tr) |
| treble crochet (tr) | double treble (dtr) |
>>>>> Related: 15 Crochet Tips to Set You Up for SUCCESS
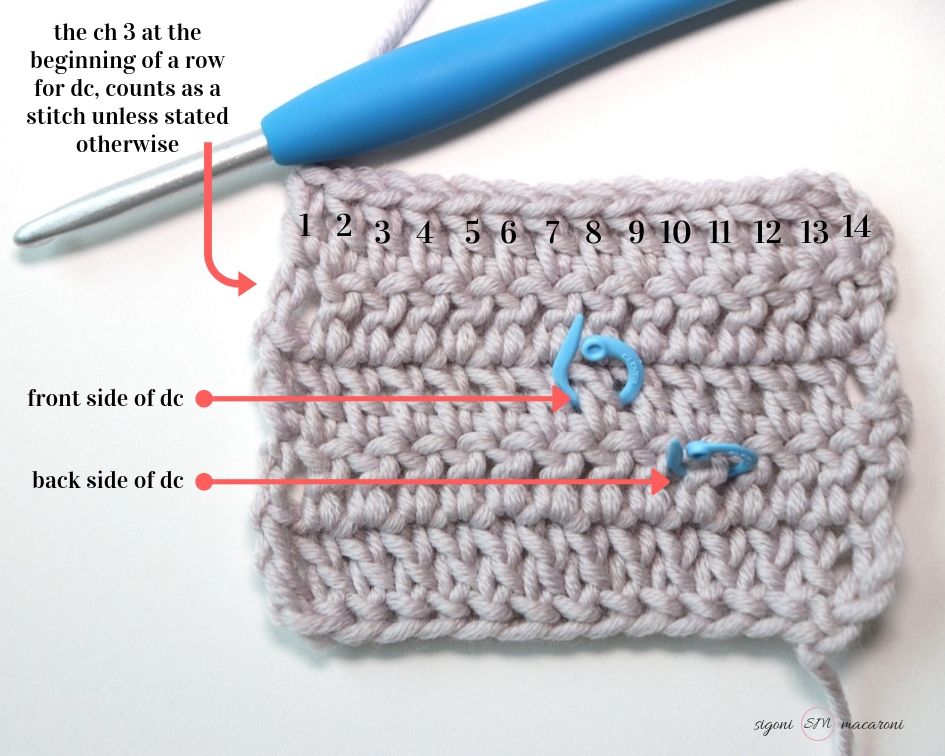
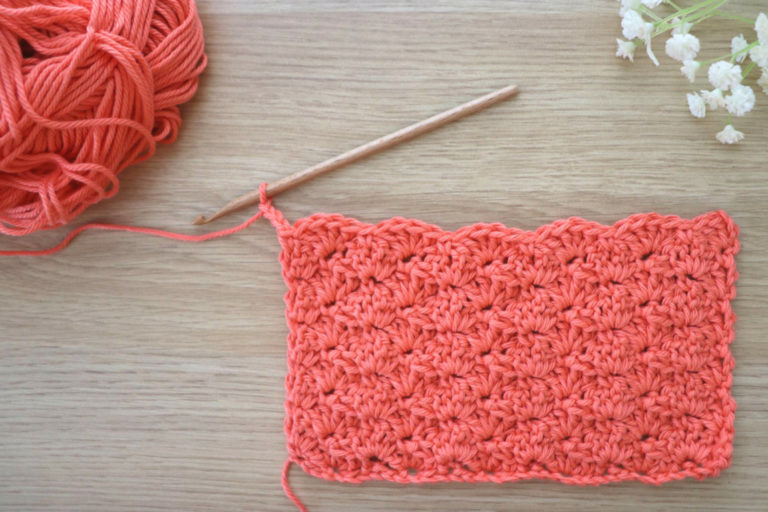
4. Turning Chains Explained
Turning chains are one of the most frustrating and confusing things for beginner crocheters and even the more experienced crocheter.
When I was first learning, it confused me to no end. That’s why I’ve created so many tutorials on this specific frustration.
If you follow me on Instagram, I just shared a series last week talking all about turning chains.
I highly recommend reading through all 4 parts to see the visuals.
Plus I’m always sharing tips and behind the scenes there so make sure you’re following along!
If you’re not on Instagram, here’s an overview of turning chains.
Anytime you move onto another row, you will use a turning chain to reach the height of the stitch you’re using. These turning chains are used so the sides of your work don’t look all scrunched together.
You can read all about turning chains in this post if you need more detail.
The chart above shows all of the technical “rules” to turning chains, like how many chains to use for each stitch. However, that’s not all.
The reason why this can be so confusing is because all patterns are different and can seem contradicting. This is because the designer holds all control.
The designer decides whether they choose for a turning chain to count as a stitch or not because it’s all personal preference.
This is why it’s so so important to understand turning chains. If you don’t understand them then you won’t know how to count your stitches.
5. The first and last stitch of each row
This goes hand and hand with turning chains as well. If you don’t understand turning chains then you won’t know where the right places are for the first and last stitch of the row.
So how do you know where to put the FIRST stitch at the beginning of a row?
If the turning chain does count as a stitch, you will skip the very first stitch of the row and place your first stitch into the NEXT stitch. This is because the chain is acting as if it were a stitch.
If the turning chain does not count as a stitch, you will place your first stitch into the very first stitch.
This goes for any stitch you’re using.
Okay, so how do you know where to put the LAST stitch at the end of a row?
For the last stitch, if the turning chain counts as a stitch you will work into the top chain of the turning chain from the previous row.
If the chain does not count as a stitch then you will work into the last stitch of the row, ignoring the turning chain.
For more of a visual, I have a video tutorial on my Youtube channel as well.
6. Fix the gap
While I shared each of the standard turning chains above, a lot of crocheters hate the gap that the standard turning chain creates in their work. So this is how most people fix the gap.
- For single crochet, use a chain 1 turning chain (or none)
- For half double crochet, use a chain 1 turning chain
- For double crochet, use a chain 2 turning chain
- For treble crochet, use a chain 3 turning chain
Test out each of these options and see which version you like about this. One thing I love about crochet is that it’s all personal preference!
PRO TIP: The most important thing to note is that whichever option you choose, the number of stitches you have in each row should match up with the pattern you’re working on.
You can also use a stacking single crochet in place of your double crochet turning chain, which brings me to the next tip.
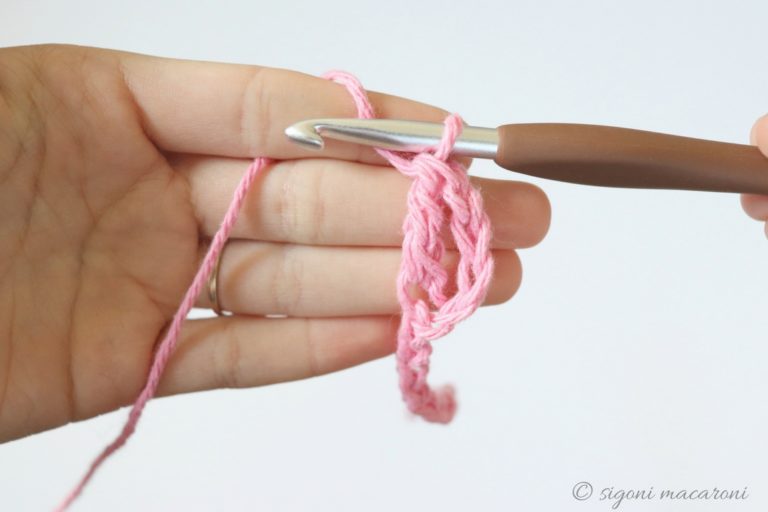
7. Stacked single crochet
This is a little more on the advanced side, but it’s simple enough once you give it a try.
Instead of creating a turning chain you will essentially be creating two single crochets stacked on top of each other when you start a new row.
Once you reach the next row you will repeat the same process. This will give you a near perfect straight edge.
I don’t have a crochet tutorial for this myself, but I did find this one on Youtube that is super helpful.
8. Learn to Understand Tension
If you’ve counted your stitches and you know they’re correct, tension might be the culprit.
Sometimes tension can make our work look wonky because one row is super tight and the next is more loose. Each row could even get more and more loose as you work, making it look even crazier. 🤪
If this is what you’re struggling with it’s so important to understand tension and how it works.
There are several tools you can use to fix your tension trouble and lots of different ways you can adjust your tension.
This blog post here talks about 7 different ways you can improve your tension.
And this post here talks about 3 different ways you can hold your yarn based on how you crochet.
I hope you find those posts helpful!
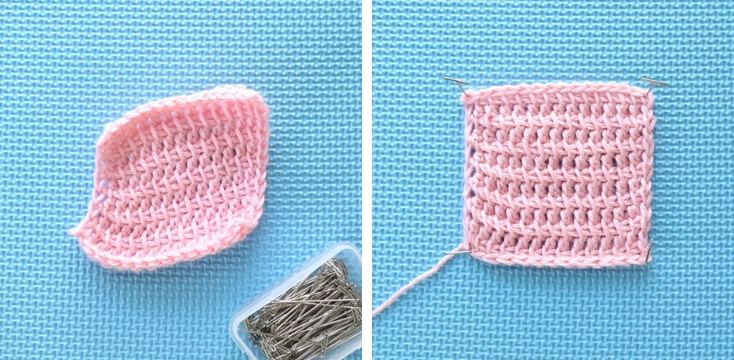
9. Block your work
This tip will help in two different scenarios.
Scenario 1: Tension is the main culprit of your wonky edges. Blocking your work will aid in making it look like your edges really are straight.
Scenario 2: You’ve finished making a scarf or blanket so frogging is out of the question. BUT you still want to make your edges look neater.
Here’s how to block your work:
All you need are:
- some foam boards
- t-pins (make sure they don’t rust!)
- and a spray bottle.
- Lay your project out on the boards and pin it to the desired shape. For example, pinning the wavy edges sit more straight.
- Spray your project with water until it is damp.
- Let it dry overnight in that same spot.
- Unpin it in the morning.
There are other ways to block your work so feel free to look up some other options. Some options are better for different yarn fibers, but this is the way I’ve always done it and it always works for me!
10. Know your FIRST and LAST Stitch when Crocheting in the Round
This is kind of a bonus because it doesn’t relate strictly to crocheting straight edges. But I wanted to share it as a bonus because I know this is another struggle and it’s sort of relatable.
If you want to learn more about crocheting in the round, I have a full tutorial here.
We’ve been talking a lot about crocheting in rows, but it’s important to understand how it works for crocheting in the round too.
The turning chain rule applies here as well when it comes to crocheting in the round. But first, a little disclaimer.
When crocheting in the round we deal with lots of increases.
As I’ve said before, different designers have different preferences so it really depends on the pattern you’re working on. However, I’m going to share some of the best examples I could come up with using double crochet stitches.
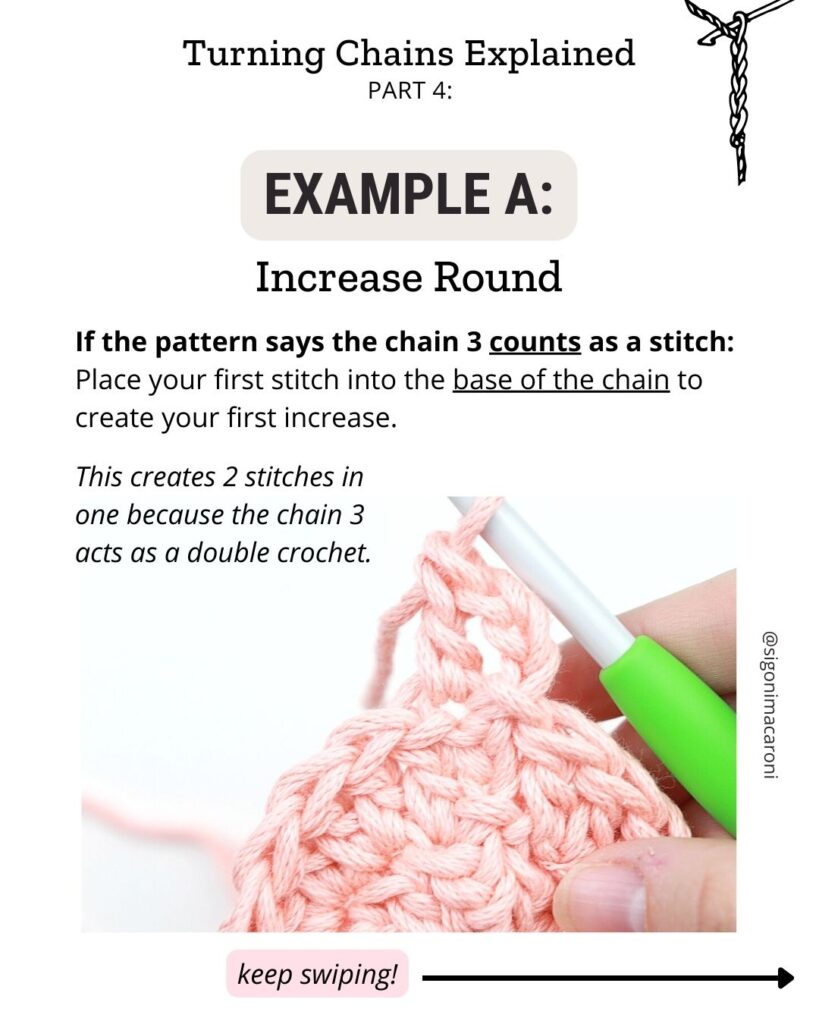
Example A: Increase round
If the patterns says the chain 3 counts as a stitch:
Place your first stitch into the base of the chain to create your first increase.
This creates 2 stitches in one because the chain 3 acts as a double crochet.
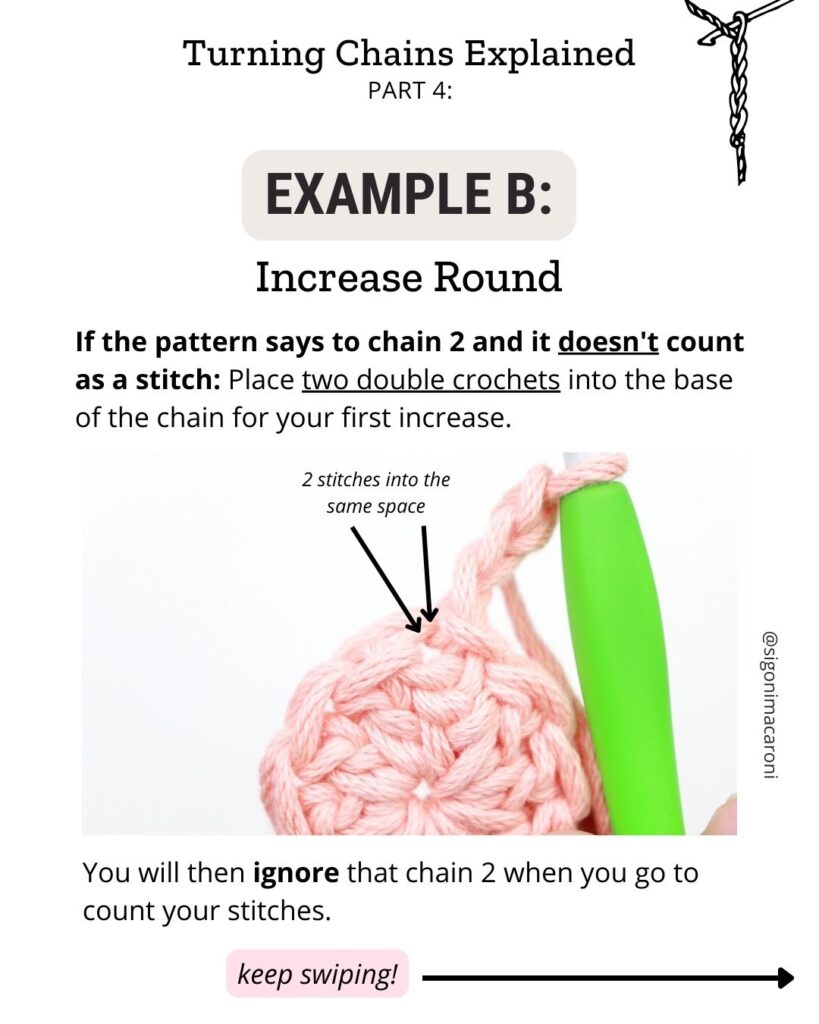
Example B: Increase Round
If the pattern says to chain 2 and it doesn’t count as a stitch:
Place 2 double crochets into the base of the chain for your first increase.
You will then ignore that chain 2 when you go to count your stitches.
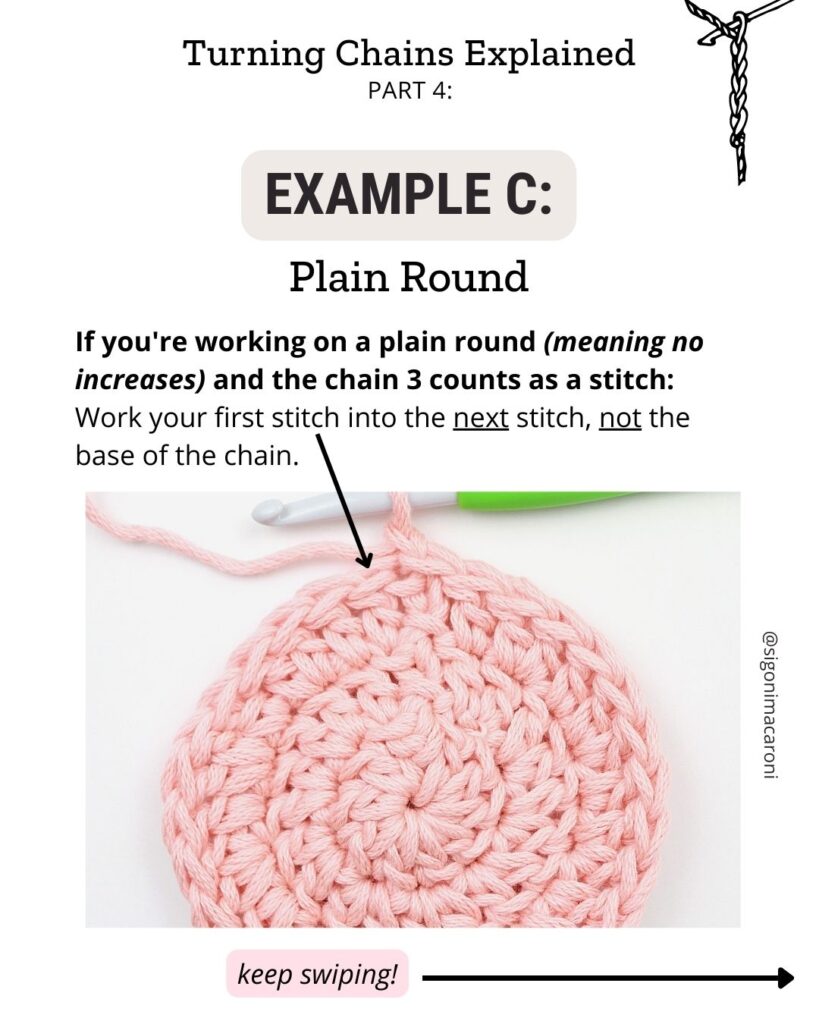
Example C: Plain round
If you’re working on a plain round (meaning no increases) and the chain 3 counts as a stitch:
Work your first stitch into the next stitch, not the base of the chain.
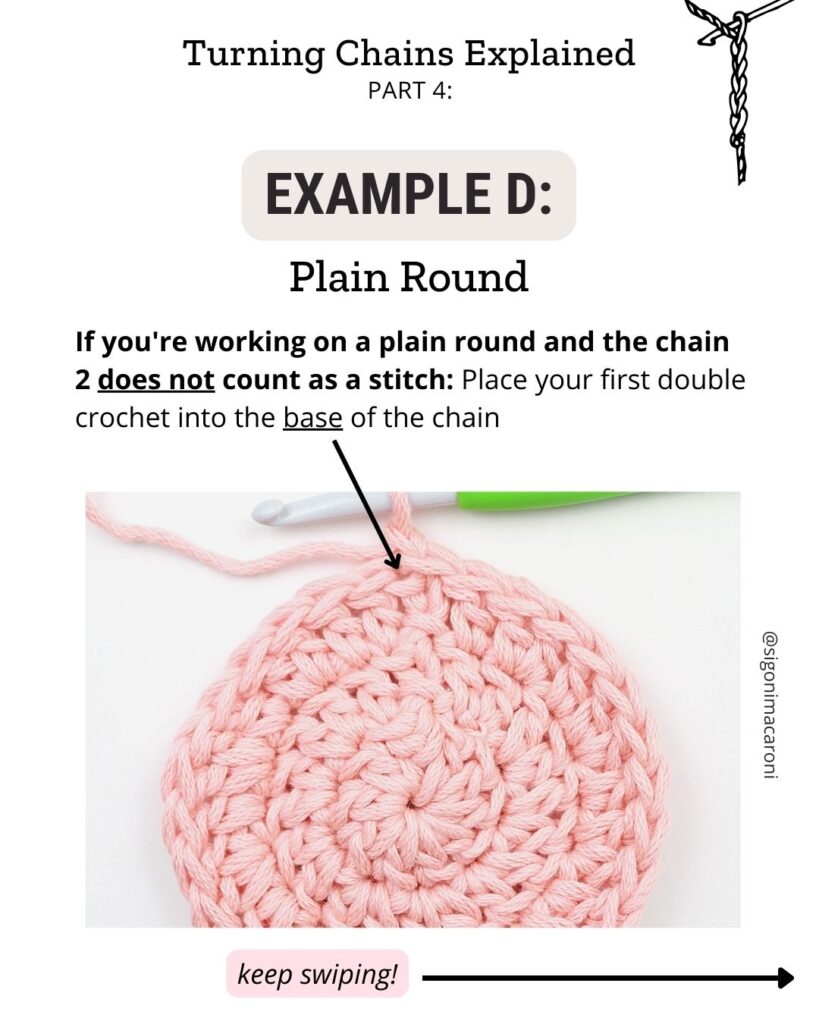
Example D: Plain round
If you’re working on a place row and the chain 2 does not count as a stitch:
Place your first double crochet into the base of the chain.
Bonus Tip(s) for Absolute Beginners
If you’re new to crochet, these bonus tips will make your first few projects feel a lot more doable!
1. Make sure you’re using the right tools
Make sure you’re using a lighter colored yarn and it’s a bonus if it has great stitch definition. This will make it much easier to see and count your stitches.
Here’s a list of my favorite yarn for blankets. Most of these yarns are great for beginners!
On each yarn label there is a recommended hook size. When you’re first starting out I highly recommend using the recommended size or one size larger. The looser your stitches, the easier it is to count.
Aluminum hooks are great when you’re first starting out, but if you’re struggling with tension, here are two of my all-time-favorites.
2. Work on a crochet project with a taller stitch
Taller stitches are easier to count (because there’s more space in between each post) and you’ll finish your project quicker.
Here are 30+ beginner friendly double crochet patterns.
3. Work on a crochet project with a shorter chain
Crocheting into a long chain can be difficult. There are ways to make it easier (I’m planning on creating a post on that soon), but for now try something simpler.
Projects like blankets and infinity scarves have longer chains.
Instead of working on one of these right now, try a scarf, washcloth, or coaster!
Here is a free pattern for my V-Stitch Scarf which also has a video tutorial to help you along ensuring your crochet edges are always straight!
If you’re looking for some easy beginner friendly crochet projects, here are some of my favorites!
How to Crochet Straight Edges Wrap Up
This was a long post, but I know for a fact that once you implement one or several of these crochet tips you will learn to have a perfectly straight edge with every project.
First we talked about WHY your edges are wonky in the first place. Then we talked about HOW to fix it. Here’s a recap if you sped through:
- Count your stitches
- Use stitch markers to mark your first and last stitch
- Understand the difference between US and UK terms
- Understand turning chains and how they work (this is a big one)
- Know where to place the first and last stitch in the row
- Learn how to fix the gap
- Substitute a stacked single crochet as a turning chain
- Understand tension and how to adjust it
- Know where to put your first and last stitch when crocheting in the round
- Block your work
Which crochet tip was the best way you’ve found to keep your edges straight?
Let me know in the comments!
And please share this post to anyone you know who is struggling with keeping their edges straight. You can even share it with some friends in a crochet group. Let’s help each other out!


Stitch markers have been my saviour! I only started back in November 22 following your 14 day masterclass and I’m progressing to make a cardigan. My first foundation chain was way too tight so I frogged all the way back and started over and I’ve used stitch markers from the beginning and so far so good. Thank you for your lessons and informative tutorials – very helpful x
Stitch markers are the BEST. I’m so glad I’ve been able to help you along! Can’t wait to see your finished cardigan!
I use stitch markers all the time now. They really do make my crochet projects easier – especially if the turning chain counts as a stitch. The top of that chain can be a little tricky to find sometimes.
And, since I’m not a fan of the 3 chain turning chain for a dc, I do love the stacked sc as an alternative. I substitute with the stacked sc at every opportunity. It makes for a much nicer edge to a project such as a blanket where you are not adding a border.
Love all the tips! I’ve been crocheting for years and years, but I always find a good reminder or something useful.
I’m really having trouble with my current project, with the width getting narrower even though my tension is visibly looser later on. The project has lots of turning chains that also double as chains of the row, those are the worst culprits, and putting a last stitch, also a part of a chain does not straighten the turning chain below. The width of my work can be a whole cm narrower than the first row, even being mindful crocheting way looser than the first row! I have tried using a smaller hook for the chain and first row, but I still have the problem with turning chains that are MEANT to be, and look like chains!
Hi Nika! I’m sorry you’re having trouble with this. I would love for you to either send me an email at [email protected] or join my Facebook group, The Crochet’dy Bunch, so we can help you with this! Seeing a photo would be great and then we can talk about what can be the problem.