How to Read Crochet Patterns for Beginners – Part 2
Hello again! Welcome back to How to Read Crochet Patterns for Beginners Part 2! In How to Read Crochet Pattern Part 1, we learned all about the important information you can find before the actual pattern. Today in part 2 we will talk about how to read the pattern and take action.
Before we get to the pattern though, you’ll need to know a couple of things in order to understand the pattern fully. First, if you haven’t learned the basic stitches yet, head over to the Learn to Crochet the Easy Way Series and start there!
After you’ve learned the basic stitches it will make it easier to read a pattern. The first thing we’ll cover is figuring out if you will be crocheting in the round or row by row. The second bullet point is whether or not the chains at the beginning of a row or round count as a stitch. After we discuss chains, we will dive right into the pattern!
How to Read Crochet Patterns for Beginners Part 2
Round vs. Row
When you’re reading a crochet pattern, you will first notice that your project will be completed either in rounds or rows.
Working in the round is exactly how it sounds. It means you are crocheting continuously in a circle. If you’d like to learn more about crocheting in the round, you can find my tutorial here.
When you’re working in rows, you will be crocheting back and forth. At the end of each row, you will chain however many the pattern tells you, turn your work around and crochet back down the row you just worked.

Starting the Pattern
Whether you’re crocheting in the round or in rows, you will have to start with a slip knot. The pattern doesn’t always tell you this because it assumes you know. The only exception is when you’re creating
If you’ve never made a slip knot, you can learn how to tie a slip knot the easy way with two different methods here. After you’ve tied your slip knot onto your hook, you will chain however many stitches the pattern tells you. It could look like this:
Row 1: Ch 20; dc in 4th ch from hook and in each ch across.
-OR-
Ch 20
Row 1: Dc in the 4th ch from your hook and in each ch across.
Both of these mean the same thing. It’s telling you that after you create your slip knot, you will chain 20 and start working your first row of double crochet stitches. (Click here for a chain stitch refresher).
The example pattern above says after you make your chains, to ‘dc in the 4th ch from your hook’. The slip knot on your hook does not count as a chain stitch.
Count your stitches at the end of your first row and you should have 17 stitches. Why 17 when you chained 20? Those first three chains that you skipped, counts as a double crochet stitch.
Most patterns will have the total number of stitches needed at the end of each row. They could look like any of these examples below.
: 17 dc.
(17 dc).
—17 dc.
There are times when I don’t feel like counting my stitches because I feel like I’m doing a great job. Lo and behold, my work starts looking wonky! Then I realize I’ve missed a stitch or even made the wrong stitch because I wasn’t paying attention. That’s why counting your stitches is so important!
*PRO TIP: You could always count as you go or use stitch markers to mark every 10 stitches or so, depending on your project.
Now let’s move on to Row 2. After you’ve completed the first row, you will see something along the lines of, “Ch 3, turn” and the pattern will proceed
Make your chain stitch first and then turn your work towards you and to the left so that you are now looking at the back of your work. Leave your crochet hook in place.
Very Important:
Chains Counting… Not Counting? What?!
That’s probably what you’re thinking right now. When I first learned how to crochet, this is the thing that confused me the most and I know I’m not the only one.
When you’re crocheting just to crochet, this isn’t something that you would really worry about until it starts to mess up your count or make your edges wonky. It ended up frustrating me every time I came across a note that said this because I couldn’t find any answers and that is what I’m here to explain!
If you’ve gone through the Learn to Crochet the Easy Way Series, you might already know this but I’m going to walk you through creating a typical stitch. As I stated above, we don’t count the chain 1 at the beginning of a row of single crochets as a stitch.
However, we do count the chain stitches at the beginning of a row when you’re using any stitch taller than a single crochet. For example; half double crochet, double crochet, treble crochet, etc. If you need the tutorial for these stitches, head over here.
For now I’m just going to explain what I mean by the chains counting as stitches.
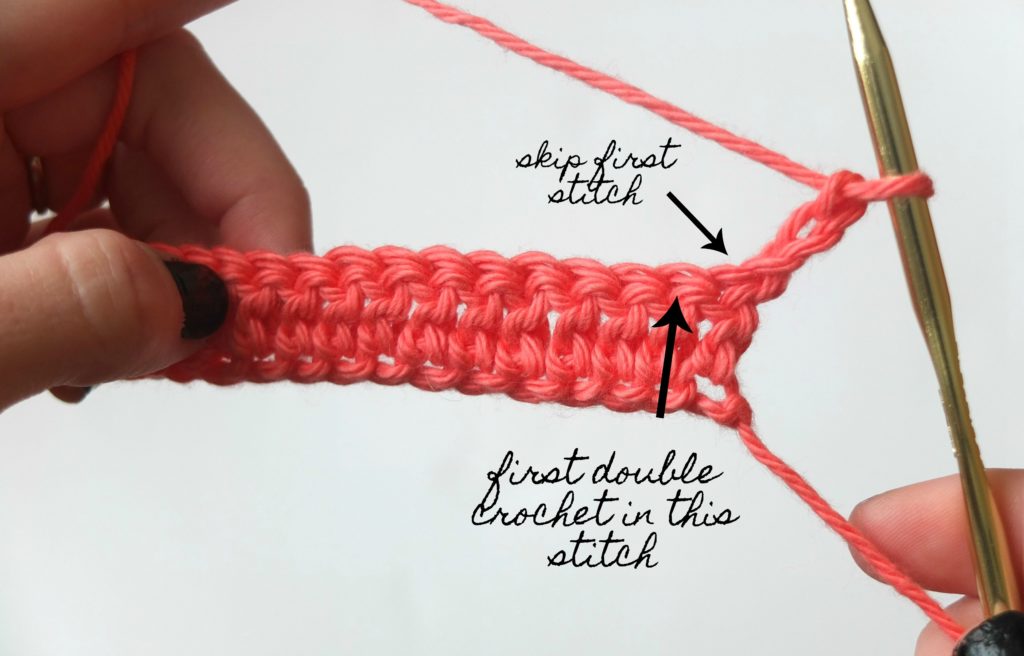
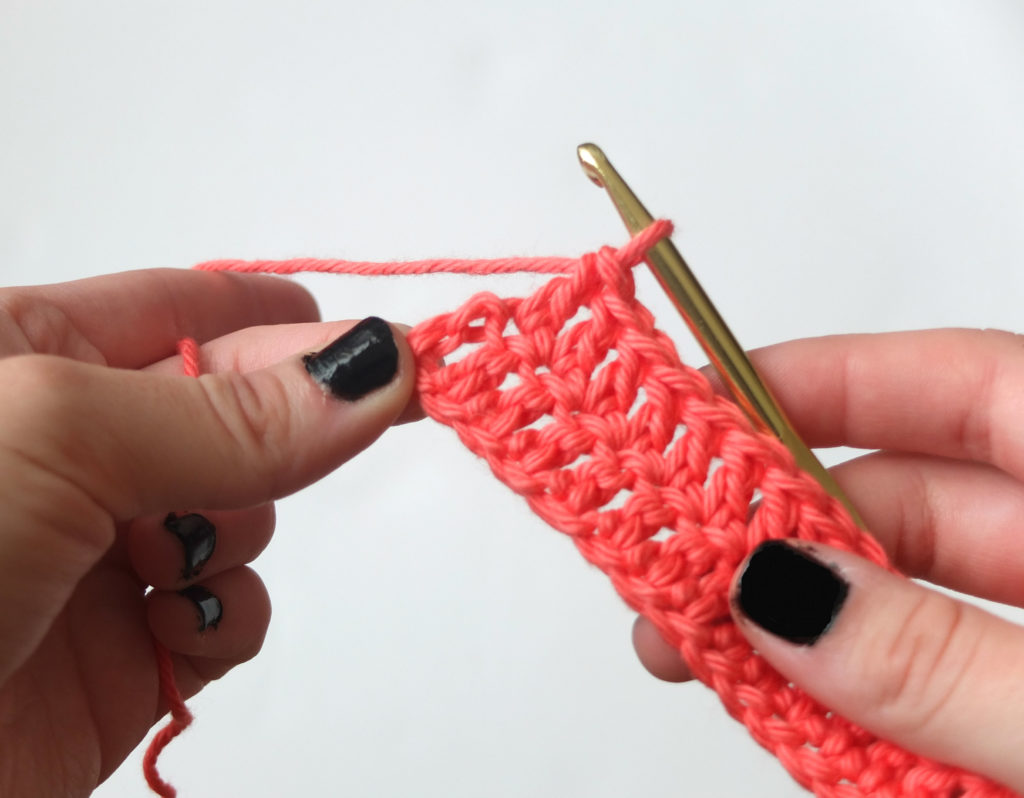
Let’s take double crochet for example. After you chain and work your double crochets into your foundation chain, you will chain 3 (to reach the height of a double crochet) and turn your work.
The chain 3 that you just worked counts as a double crochet, unless otherwise stated in the pattern. Because this chain 3 counts as a stitch, you will not place a double crochet in that stitch (also known as the base of the chain).
You will skip it and double crochet into the very next stitch as you can see in the photo below. The same goes for any stitch taller than a single crochet.
This particular note will most-likely be listed under the “Notes” section of the pattern.
Examples:
If the designer wants you to work into the base of the chain, they will state in that section something like “Ch 3 at the beginning of row does not count as st.“
This means you will chain 3 and then crochet into the base of that chain or the very first stitch. You will then continue crocheting down that row as normal.
When you start your next row you will do the same thing. When you reach the end of that row, your last stitch will go into the first stitch you made in the previous row. You will completely ignore the chain 3.
If the note says, “Ch 3 at the beginning of row does count as st“ then you will chain 3, skip that very first stitch, and crochet into the next stitch. Then continue down the row as the pattern reads. When you start your next row you will do the same thing.
When you get to the end of your row, you will crochet into the top chain of the chain 3 from the previous row.
Parentheses and Asterisks and Brackets, oh my!
Parentheses can be used to tell you how many stitches you should have at the end of
[2
In this
Another example could be,
Row 3: Hdc in next 5 sts; *ch 1, skip next st,
This is saying the same thing, only using asterisks rather than brackets. Sometimes there will be two asterisks telling you the exact pattern you should follow between those two asterisks. Other times they will just have one and you will follow everything after the asterisk until the pattern tells you to stop.
The Suzette Baby Blanket Crochet Pattern has a super simple pattern repeat that utilizes these brackets. It is a great blanket pattern to follow for beginners and might get you familiar with reading crochet patterns!
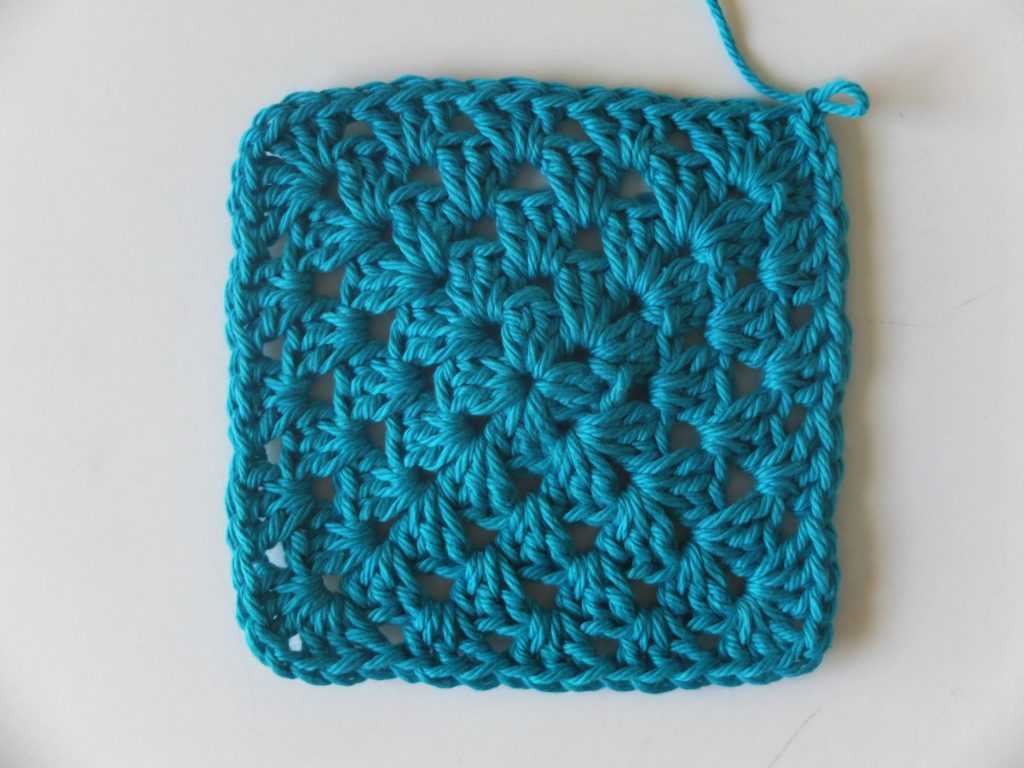
Working in Chain Spaces
A chain space is formed when you work a stitch, then a chain stitch, skip the next stitch, and work a stitch into the next. The space created by chaining and skipping a stitch is your chain space.
For example, in the granny square below, there is a ch-2 space in each corner. When you’re going through the tutorial it tells you to work a cluster into that corner ch-2 space. Sometimes chain spaces can consist of two, three, or even more chains.
There you have it! You should be a pattern reading pro by now! How to Read Crochet Patterns for beginners is a series I wanted to create to explain everything I could about reading patterns
In Part 1 of How to Read Crochet Patterns for Beginners, we learned about all of the important information listed before the pattern. In Part 2 we talked about how to read the pattern and take action!
If there is anything I didn’t cover or something you’d like more information on, feel free to post your questions in the comments below.
Also, if you haven’t heard, I created a Facebook Group just for you! We call ourselves the Crochet’dy Bunch and I would love for you to join.
In this group, we talk about all things crochet, dive deeper into tutorials and share tons of laughs on Chit Chat Fridays! Join us and make some new crochet besties!