CROCHET GAUGE 101: Everything You Need To Know
One of the most common crochet questions that I receive is “what is gauge in crochet and why is it important?” If you’ve been in the crochet game for a while, you’ll know that gauge is a bad word. A lot of people roll their eyes at the thought of gauge, thinking it’s something tedious and unnecessary. It’s okay if that’s you because I felt the same way in my early days. But now that I understand gauge, I want to share my experience. In today’s lesson we’re going to cover Crochet Gauge 101: Everything You Need To Know. We’ll talk about what gauge is, why it’s important, and a few more important tips to know.
Crochet Gauge 101: Everything You Need To Know
Before we get too deep into gauge talk, if you haven’t been practicing enough to have your tension figured out, pin this post for later and come back to it once you have it down.
If you’re brand new at crochet, gauge isn’t something you have to learn right away. Also if you don’t have the hang of your tension, then you won’t be able to accurately measure your gauge.
If you’re struggling with tension, here are some tips that will help.
After I talk about gauge and why it’s important, we’ll cover:
- how to calculate and measure your gauge
- how to understand and adjust your gauge
- PLUS 12 additional tips on measuring gauge
If you want all of the answers now, watch the video that goes along with this post. If you’re more of a visual person, that video is for you. Now let’s talk about gauge, what it is, and why it’s important.
- Crochet Gauge 101: Everything You Need To Know
- What is gauge in crochet?
- Why is gauge important?
- How to Measure & Calculate a Crochet Gauge Swatch
- How To Adjust Your Crochet Gauge Measurement
- How to Measure Crochet Gauge for a Certain Stitch Pattern
- 12 Additional Tips for Measuring & Adjusting Your Crochet Gauge
What is gauge in crochet?
Gauge is a measurement of stitches and rows you have in a swatch. But that alone isn’t enough to explain gauge so I’m going to let Annies Catalog trump me on that one. This definitely makes gauge easy to understand in just two sentences.
Gauge means the number of stitches per inch and rows per inch that result from a specified yarn worked with a specified-size hook. Since everyone crochets differently—some loosely, some tightly, some in-between—the measurements of individual work can vary greatly when using the same-size hook and yarn.
Annies Catalog – The Importance of Gauge
In a nutshell, that is what gauge is, and there are many reasons why it’s important.
Why is gauge important?
I’ll start by saying gauge isn’t always important. But before I explain that, let me explain a little more about why we take measurements in the first place.
When we calculate gauge, we do this to make sure our finished project turns out with the same measurements as the designer’s finished project.
If your gauge doesn’t match, your finished project could end up:
- too big
- too small
- too stiff
- too loose
- or you could run out of yarn
None of that sounds fun, does it?
Remember when I said gauge isn’t always important? Well, it’s not important for things like blankets, baskets, bags, rugs, or anything like that. If your gauge was off for any of those projects, you would (for example) just end up with a blanket that’s a little bit bigger or a little bit smaller than the original.
Not too bad right?
On the other hand, gauge is SUPER important when it comes to sizing. If you’re making a project that you have to physically wear, then you want to make sure you match gauge. These wearable projects are things like hats, cardigans, or any other types of garments.
If you don’t match gauge, your project won’t fit and that’s a lot of time and energy wasted. And THAT’S why gauge is important.
How to Measure & Calculate a Crochet Gauge Swatch
First, we’re going to create a practice swatch for you to measure.
Here’s the pattern for the gauge swatch I created if you want to duplicate it and match your gauge to mine. I used a 6mm crochet hook and medium weight yarn.
Row 1: Ch 20, hdc in 3rd ch from hook and each chain down.
Row 2: Ch 2, turn. Hdc each st across.
Rows 3-13: Repeat Row 2
My gauge for this swatch is 13hdc x 10 rows = 4″ (10cm) – that is the gauge you will try to match.
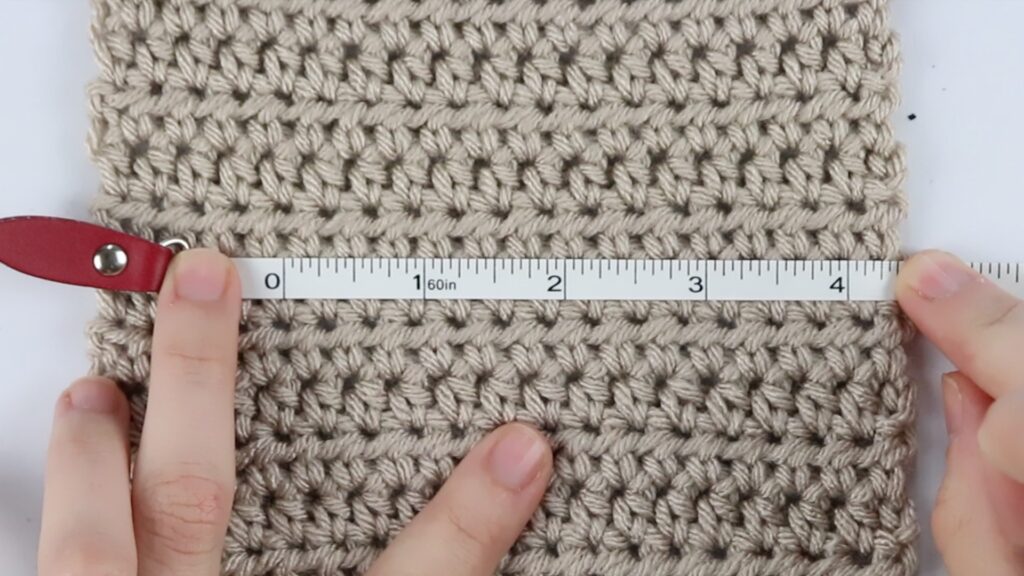
Now that you’ve made your practice swatch, it’s time to measure.
Grab a tape measure or a straight ruler and measure the inside 4 inches of your swatch. Be sure to line the edge of your stitch and row up with the “0” line on your ruler.
You can also get one of these handy dandy gauge rulers!
How many stitches do you have in 4 inches? Write that down.
How many rows do you have in 4 inches? Write that down.
Than write down your gauge measurement as follows:
__ stitches x __ rows = 4 inch (10cm) square
And that’s how you measure and calculate your gauge!
How To Adjust Your Crochet Gauge Measurement
To adjust your stitch gauge, follow these steps:
- If you have too few stitches in your swatch, your gauge is too loose –> Go DOWN a hook size.
- If you have too many stitches in your swatch, your gauge is too tight –> Go UP a hook size.
To adjust your row gauge, follow these steps:
- Intentionally make your stitches taller. After you insert your hook into the stitch and pull up a loop, pull the loop up taller than you normally would. Then finish making the stitch.
- Replace your stitches with extended stitches. This may be a little trickier, but it’s an option. It will take some playing around and maybe some math to figure out. BUT if you’re using one of the basic stitches for the entire project, it shouldn’t be too difficult.
Adjusting your row gauge is a little more difficult than adjusting stitch gauge. I’ve demonstrated both ways of adjusting row gauge inside the video tutorial. Go watch the video if you’re having trouble making sense of it.
How to Measure Crochet Gauge for a Certain Stitch Pattern
Let’s face it, all patterns and projects are different. It’s not always going to be as simple as measuring the basic stitches. I wish I could help you with all of the stitches, but if I did we’d be here forever. Here are a few of the best examples I could come up with.
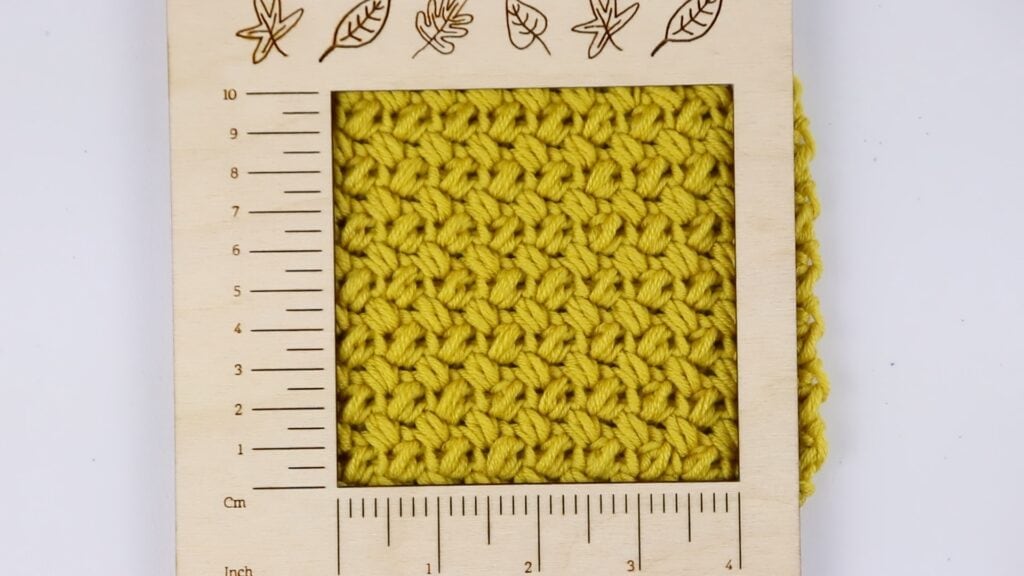
Measuring gauge for the mini bean stitch
Because we’re not using the basic stitches for this stitch pattern, we’ll measure by counting each mini bean. For my gauge, I counted 8 and a half mini beans and 13 and a half rows in 4 inches. If I wrote out my measurement it would look like this:
- 8.5mb x 13.5 rows = 4 inches (10cm)
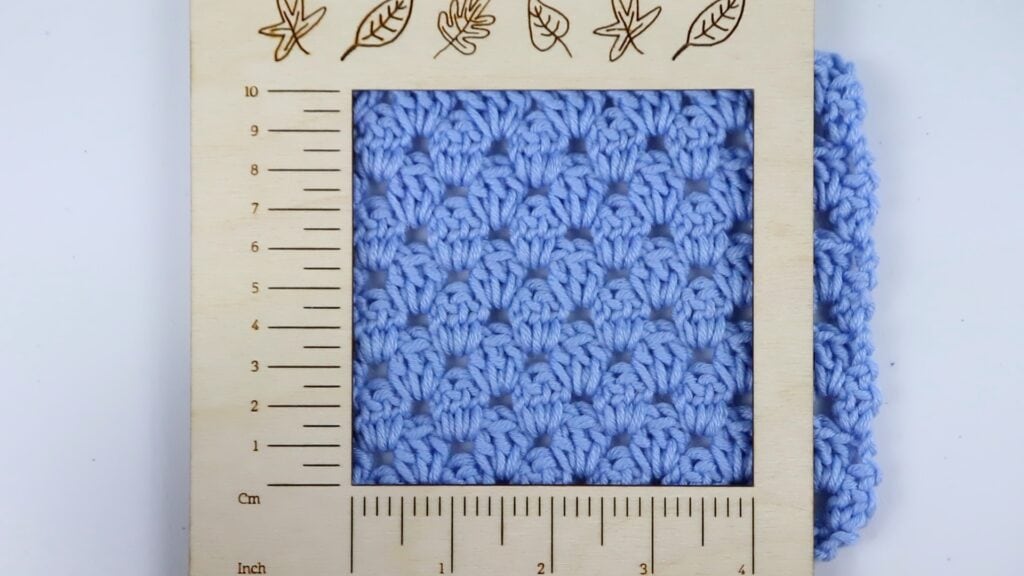
Measuring gauge for the granny stripe stitch
Things get a bit different with the granny stripe stitch. Depending on the pattern you’re following, the gauge could ask for two different measurements. They will either measure by the double crochet or by each cluster. Here’s what I got for each:
- 15dc x 9 rows = 4 inches (10cm)
- 5 clusters x 9 rows = 4 inches (10cm)
Either one of these would be correct depending on the specific project you’re working on.
By the way, if you like these stitches I have a full tutorial on how to crochet these beginner friendly stitches.
12 Additional Tips for Measuring & Adjusting Your Crochet Gauge
Inside the video tutorial where I talked about the importance of gauge, I noted 12 separate tips. These tips were for both measuring and adjusting your gauge. They are extremely helpful and valuable, so make sure you watch through the whole video to spot all 12!
I know it’s not much fun to learn about crochet gauge, but we did it! We’re all done. Today we covered Crochet Gauge 101: Everything You Need To Know. We answered the questions, “What is gauge and why is it important?” and a whole lot more after that. We talked about how to measure gauge, how to adjust stitch gauge AND row gauge, and we learned 12 additional tips for measuring gauge.
If you want to check out this post in video format, you can watch it here.
Did you miss anything that we talked about today? Click your area of interest in the table of contents! If you have any questions, leave them in the comments.
Did this article help you understand crochet gauge a little bit better? I hope so!


What is the gauge working in the round please?
It depends on the pattern. Most patterns will have you measure the diameter of the project after you’ve crocheted a few rounds as your gauge measurement. If your gauge is off, you’ll adjust your hook the same way.