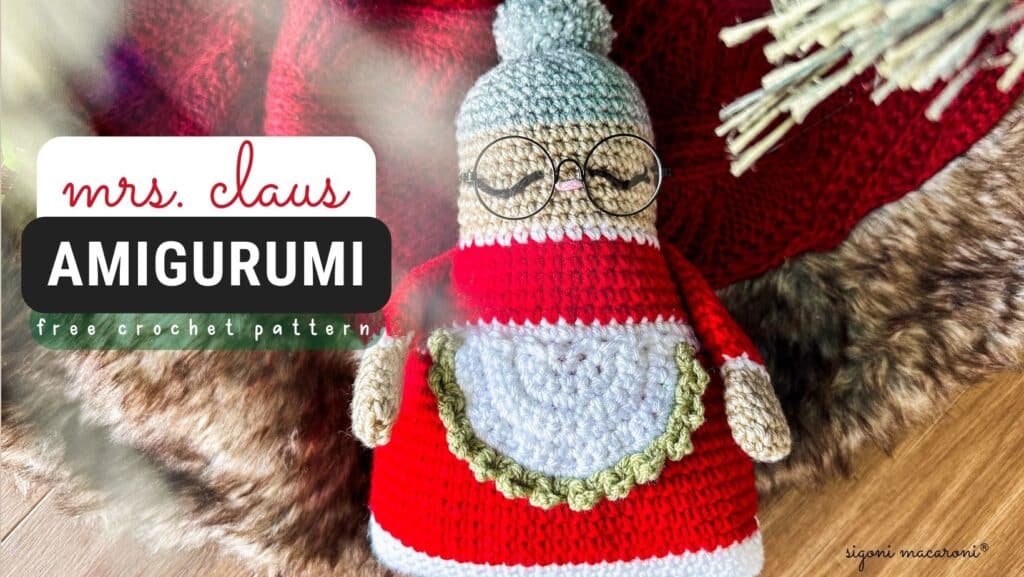
Black Crochet Santa Claus Amigurumi: Free Pattern
Have you been looking for a black crochet Santa to make this holiday season? Well, he’s here! Paired with none other than white Mrs. Claus. I designed this biracial Christmas couple based on my own family (read more below) and I hope this inspires other biracial families out there. After you make this easy crochet Santa Claus amigurumi, go make Mrs Claus too!

Normally I would say I hope you like these patterns as much as I do, but I don’t think it’s possible! Both of these free crochet patterns have a very special place in my heart and seeing them come to life is nothing short of incredible.
Let me tell you the backstory.
Black Crochet Santa: The Design
If you don’t already know, I’m biracial. My dad is black, my mom is white.
Growing up, we had these two dolls we’d put up every year during the Christmas season: a black Santa and a white Mrs. Claus. They were my absolute favorite dolls. They were holding candles and they would dance and sing. I remember it like it was yesterday!
To my devastation, both dolls were somehow lost. 😢 But I never stopped loving them!
For years I’ve looked for similar dolls to have in my own home but could never find the same ones from my childhood. And honestly, I’m surprised to say that NO PLACE that I’ve seen sells mixed race Christmas dolls. If you find one, let me know in the comments!
So because crochet is AMAZING and the possibilities are endless… I decided to make my own!
I wanted them to have a sort of ragdoll style so I drew them out first (you can see my drawing below) and then just went for it!

Of course this took WEEKS of crocheting and frogging and crocheting and frogging to get just right, but I’m absolutely obsessed with the finished result.
I hope you love them too!
If you’d like to purchase the ad-free PDF for both Santa and Mrs. Claus amigurumi patterns, you can grab the bundle HERE.

Skin & Hair Color for Santa
My favorite yarn to use as skin color for amigurumi is Lion Brand Skein Tones. I used Nutmeg for Santa Claus and you can head over here to learn more about Mrs. Claus’ skin color.
Of course, you can use any skin color you’d like! You obviously don’t have to make a mixed race Santa and Mrs. Claus. Just do what suits your family!
And speaking of skin color changes, if you’re going to make a light-skinned Santa I would use white yarn for the hair instead of gray.

Want a printer friendly, ad-free version of this pattern?
The premium PDF includes Santa AND Mrs. Claus as a bundle!
It prints beautifully or can be downloaded to your phone or tablet. Plus, there is a detailed photo tutorial to help you through any tricky bits.
Black Crochet Santa Claus Amigurumi: Free Pattern
This post may contain affiliate links, please view my disclosure policy for details.
Pattern
- PIN this pattern to your Pinterest boards for later HERE.
- Get the premium PDF on Etsy HERE
- PIN this pattern to your Pinterest boards for later HERE.
Skill Level
- Easy – The only stitch you will need for this pattern is single crochet. There is minimal decreasing and not too many body parts to make. You don’t even need to know how to make a magic circle for this pattern.
- Although if that’s something you want to learn, you can find that tutorial here.
Materials
- 5mm Crochet Hook
- Lion Brand Vanna’s Choice (worsted weight yarn #4, 170yds, 100% acrylic) – 1 skein each in:
- Scarlet (red yarn)
- Silver Heather
- Black
- White
- Lion Brand Skein Tones (worsted weight yarn #4, 185yds, 100% acrylic)
- 1 skein in Nutmeg (or the skin color of your choice)
- Small amount of pink yarn for nose
- Polyfil Stuffing
- Clover pom pom maker
- Tapestry Needle
- Sewing Pins
Abbreviations
*All Sigoni Macaroni patterns are written in standard US terms *
- Ch – chain
- BLO – back loop only
- Sc – single crochet
- Sc2tog – sc decrease
- Sl st – slip stitch
- St – stitch
| US Terms | UK Terms |
| Single Crochet (sc) | Double Crochet (dc) |
Finished Measurements
- Santa stands about 10 inches tall with his hat on and his widest area is about 6 inches
Notes
- All pieces are crocheted in continuous rounds. Use a stitch marker to mark the last stitch of each row so you don’t lose track
- The number in the parentheses at the end of each round equals the number of stitches you should have at the end of that round.
- I haven’t found the time to create a video tutorial for this pattern, however, you can find a detailed picture tutorial inside the premium PDF.
Helpful tutorials
Crocheting Through The Emotions
Because these little ones have a special place in my heart, I crocheted them for kindness. I’ve already given away 3 sets, and of course I made some for our family as well!
These amigurumi Christmas characters make wonderful gifts, especially to a biracial family since it’s near impossible to find this sweet couple as a mixed race set.
To learn more about crocheting through the emotions, click here.

Black Crochet Santa Claus Amigurumi: Pattern Instructions
Santa Claus Body
Starting with White, Ch 27
Round 1: Sc in 2nd ch from hook and next 24 ch. 3sc last ch. Turn work so you’re looking at opposite side of foundation row. Sc next 24 ch, 2sc last ch. (54)
*From this point you will be working in continuous rounds (no slip stitching). Use a stitch marker to mark last stitch*
Round 2: 2sc first st, sc next 24 st, 2sc next st, sc next st, 2sc next st, sc next 24 st, 2sc next st, sc last st. (58)
Rounds 3-5: Sc each st around (58)
Switch to Scarlet
Rounds 6-14: Sc each st around (58)
Switch to Black yarn
Round 15: Sc2tog, sc next 24 st, sc2tog, sc next st, sc2tog, sc next 24 st, sc2tog, sc last st (54)
Round 16: Sc each st around (54)
Round 17: Sc2tog, sc next 22 st, sc2tog, sc next st, sc2tog, sc next 22 st, sc2tog, sc last st (50)
Round 18: Sc each st around (50)
Round 19: Sc2tog, sc next 20 st, sc2tog, sc next st, sc2tog, sc next 20 st, sc2tog, sc last st (46)

Switch to Scarlet
Round 20: Sc each st around (46)
Round 21: Sc2tog, sc next 18 st, sc2tog, sc next st, sc2tog, sc next 18 st, sc2tog, sc last st (42)
Round 22: Sc each st around (42)
Round 23: Sc2tog, sc next 16 st, sc2tog, sc next st, sc2tog, sc next 16 st, sc2tog, sc last st (38)
Round 24: Sc each st around (38)
Switch to White
Round 25: Sc2tog, sc next 14 st, sc2tog, sc next st, sc2tog, sc next 14 st, sc2tog, sc last st (34)
*Start stuffing here*
Switch to Nutmeg (or your skin color of choice)
Round 26: 2sc first st, sc next 14 st, 2sc next st, sc next st, 2sc next st, sc next 14 st, 2sc next st, sc last st (38)
Round 27: 2sc first st, sc next 16 st, 2sc next st, sc next st, 2sc next st, sc next 16 st, 2sc next st, sc last st (42)
Rounds 28-32: Sc each st around (42)
Switch to Silver Heather
*As you stuff the body, add as much as you can without overstuffing. You don’t want the stuffing to push apart your stitches but you do want to stuff enough so that it really starts shaping the body and shoulders*
Rounds 33-34: Sc each st around (42)
Round 35: Sc2tog, sc next 16 st, sc2tog, sc next st, sc2tog, sc next 16 st, sc2tog, sc last st (38)
Round 36: Sc2tog, sc next 14 st, sc2tog, sc next st, sc2tog, sc next 14 st, sc2tog, sc last st (34)
Round 37: Sc2tog, sc next 12 st, sc2tog, sc next st, sc2tog, sc next 12 st, sc2tog, sc last st (30)
Round 38: Sc2tog, sc next 10 st, sc2tog, sc next st, sc2tog, sc next 10 st, sc2tog, sc last st (26)
Round 39: Sc2tog, sc next 8 st, sc2tog, sc next st, sc2tog, sc next 8 st, sc2tog, sc last st (22)
Round 40: [sc2tog, sc next st] 7 times. Sc last st. (15)
Tie off yarn and sew shut.
Santa Claus Arms (make 2)
Starting with Nutmeg (or your skin color of choice), Ch 4
Round 1: Sc in 2nd ch from hook, sc next ch, 3sc in last ch, Turn work so you’re looking at opposite side of foundation row. Sc next ch, 2sc last ch. (8)
Round 2: 2sc first st, [sc next st, 2sc next st] 3 times, sc last st. (12)
Rounds 3-5: Sc each st around (12)
Round 6: [sc2tog, sc next st] 4 times. (8)
Switch to White
Round 7: Sc each st around (8)
Switch to Scarlet
Round 8: [2sc, sc next st] 4 times. (12)
Rounds 9-16: Sc each st around (12)
Tie off and sew shut
*I chose not to stuff the arms so they would lay flat but it’s completely your preference*

Santa’s Hat
Starting with White, Ch 5
Row 1: Sc in 2nd ch from hook and next 3 ch (4)
Rows 2-36: Ch 1, turn. Sc in BLO of each st across (4)
Fold in half and sl st both ends to join. Tie off and weave in ends.
Attach Scarlet yarn to brim of hat
Round 1: Sc 36 st evenly around – you should have 1 stitch at the edge of each row
Rounds 2-5: Sc each st around (36)
Round 6: [Sc2tog, sc next 7 st] 4 times around (32)
Round 7: Sc each st around (32)
Round 8: [Sc2tog, sc next 6 st] 4 times around (28)
Round 9: [Sc2tog, sc next 5 st] 4 times around (24)
Round 10: [Sc2tog, sc next 4 st] 4 times around (20)
Round 11: [Sc2tog, sc next 3 st] 4 times around (16)
Round 12: [Sc2tog, sc next 2 st] 4 times around (12)
Round 13: [Sc2tog, sc next st] 4 times around (8)
Rounds 14-20: Sc each st around (8)
Tie off and sew the top shut.
Use smallest pom pom maker in the Clover set (the pink one) to make a pom pom to attach to the top of Santa’s hat
The hat will be a little snug on Santa’s head, but it will stretch. It’s good for the hat to be snug so it doesn’t fall off!

Facial Features
To create the eyes, I followed this really quick video by Theresa’s Crochet Shop. The only difference that I made was pushing my tapestry needle through the back of the head and to the front where I wanted the eyes to be. I also didn’t create the eyelashes for Santa, but I did for Mrs. Claus!
After making the second eye, push the needle back through the head, knot the yarn together and cut it leaving a half inch or so. Use your tapestry needle or crochet hook to push the knot back into the head so you can’t see it. Just make sure you don’t tie the knot too tight or it will mess up the eyes. Do the same with the nose.
I sewed the eyes on the 4th skin color row from the top (right under the gray hairline) with two stitches separating each eye. The nose is placed right in between the eyes.
Arm Assembly
Sew the arms onto the first Scarlet colored row under the White “collar” part on either side. I chose to sew my arms slightly slanted so they angled towards the belly.
You might want to use pins to hold them in place and to make sure the arms are evenly aligned.
Santa’s Beard
*Before you start, these numbers do not have to be exact. I’m only explaining what I did. You can absolutely do your hair differently or style it the way you like.*
For the back of the head you will only need to cover two rows with hair. I used pins to mark each side of the head where I wanted to place the back of the hair in between.
Cut 38 six-inch strands of gray yarn. Insert a smaller hook around the stitch, fold the yarn in half, pull it through the stitch, wrap the yarn around the hook and pull through to tie it.
Repeat the same process with each stitch in the first two rounds below the first gray round.
If you’re having trouble with this part, go grab the premium PDF. It has a step by step tutorial to help!
For the sides of the face, leading down to the beard cut 12 six-inch strands of yarn. Tie them on diagonally towards the front of the face.
Now for the front of the face you’ll want around 32 ten-inch strands. Tie them on to the two bottom skin color rows, right under the nose.
Use scissors to cut the hair evenly in the back.

Share on Socials!
I would love to see your finished projects! Please tag me @sigonimacaroni over on Instagram or join our Facebook group and share your creations there.
If you know someone who would like to make a pair of mixed race dolls, share this post with them!
Make a Crochet Mrs. Claus Doll to Match!
You can’t make Santa without Mrs. Claus! You can find the free crochet pattern for Mrs. Claus here.


I LOVE that you did these!!! I’m white and my husband is black and I too can never find anything cute with mixed races. Thank you so much! Our kiddos(even though they’re a little older, 13-20yo) will love them.😍
beautiful!!!!! thank you for sharing this pattern. perfect for my nieces and their children.