Read our most Frequently Asked Questions!
Read our most Frequently Asked Questions!
Limitless Crochet everyday
With crochet, the possibilities are endless. Throughout 2021, Limitless Crochet Everyday will teach you how to become a better crocheter with new techniques, stitches, and free patterns to go along with them. Crochet is an anxiety reducer for many of us and after a long and stressful 2020 year, I think this is exactly what we need.
Some of the links below are affiliate links. Please see my disclaimer for details.
- WEEK 6 -
“Today’s forecast: 100% chance of me crocheting.“
We have officially hit Month 2 of LCE! I hope you are enjoying everything so far and that you’ve already learned a lot from it. This month we’re going to be talking about project making. It sounds like a broad topic, but we’re going to be dividing into 4 sections.
Today we’re talking about starting a crochet project.
If you missed last weeks topic, it was all about encouragement, learning to understand tension, and ended with a long list of quick-win crochet projects.
READ LAST WEEK’S EMAIL HERE
February Theme:
PROJECT MAKING
Week 6: Starting a Project
February 7th - 13th
Believe it or not, a lot goes into starting a new project. Choosing the best yarn for your project, working in rows vs. rounds, memorizing abbreviations, right side vs. wrong side, and a lot more.
Rows vs. Rounds
There are two ways to start a crochet project.
One where you will be working in the round and another where you will be working in rows.
Working in the round, you will be creating projects like:
- – amigurumi
- – hats
- – baskets
- – market bags
- – cup cozies
Working in rows, you will be creating projects like:
- – blankets
- – scarves
- – washcloths
- – garments
Some of these things you can make in the round AND in rows. It just depends on the pattern.
Next week we’ll talk about working in the round more in depth. This week let’s talk about working in rows.

Slip Knot
In order to start a crochet project in rows, you will first need to know how to create a slip knot. I assume you already know how to do this, but if you are brand new to crochet, here’s a tutorial.
*IMPORTANT NOTE: When you create your slip knot, leave a tail a few inches long so you can weave in that end later. You don’t want to have a short tail that you can’t weave in and have your entire project unravel in the future.
Foundation Chain
After you create a slip knot, you will need to create a foundation chain. This chain is the foundation of your entire project so it’s very important to get right. Here’s a tutorial on how to create a foundation chain and how to count each chain stitch.
Did you know that there are 3 different ways to work into the foundation chain? There is no wrong way, but it’s good to know all three so you can choose which you like the best based on your personal preference or what you’re making.
For example, I usually crochet through the top loop because it’s fast and easy. But when I’m making something without a border, working through the back bump gives you a clean edge.
If you find that your foundation chain is too loose or too tight, click here to read some tips about tension.
Turning Your Work
After you create your first row of stitches into the foundation chain, it’s time to turn your work.
When you turn your work you’re simply flipping your project around and looking at the back side of the row you just worked.
When I reach the end of a row, I create my turning chain first and then I turn my work from right to left. Like flipping the page of a book.
Everyone does things their own way, but this is what works for me. I’ve never had a problem with my yarn getting wrapped up around my hook or my turning chain looking funky.
If you do it a different way and that’s working for you, don’t feel like you have to change the way you do things.
Remember crochet is all about comfortability. It’s about how you want to do things, not how others do it.
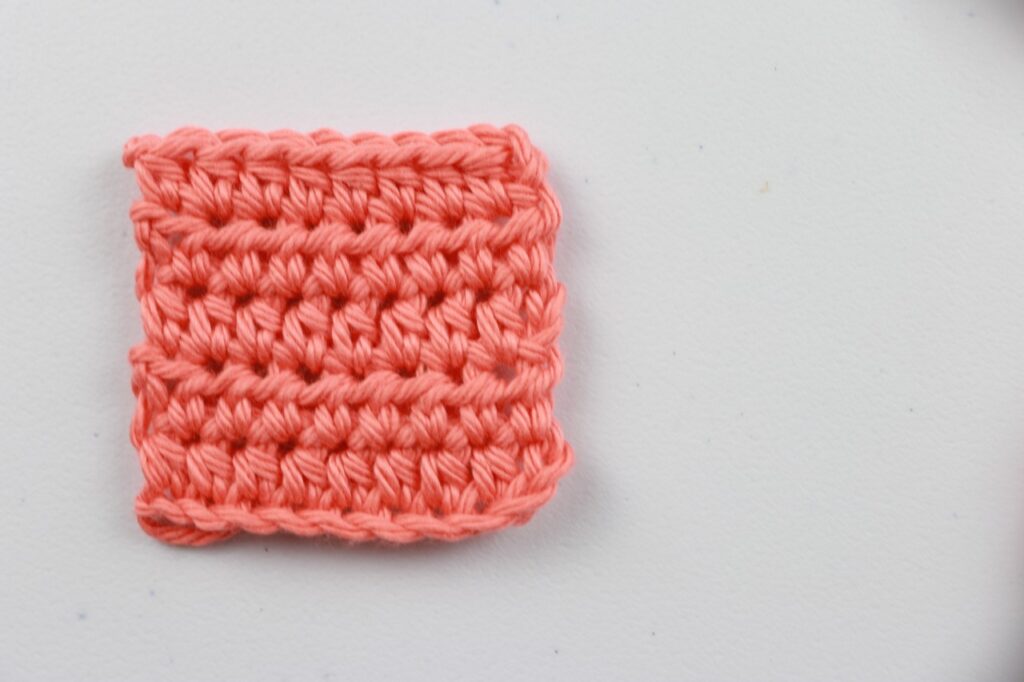
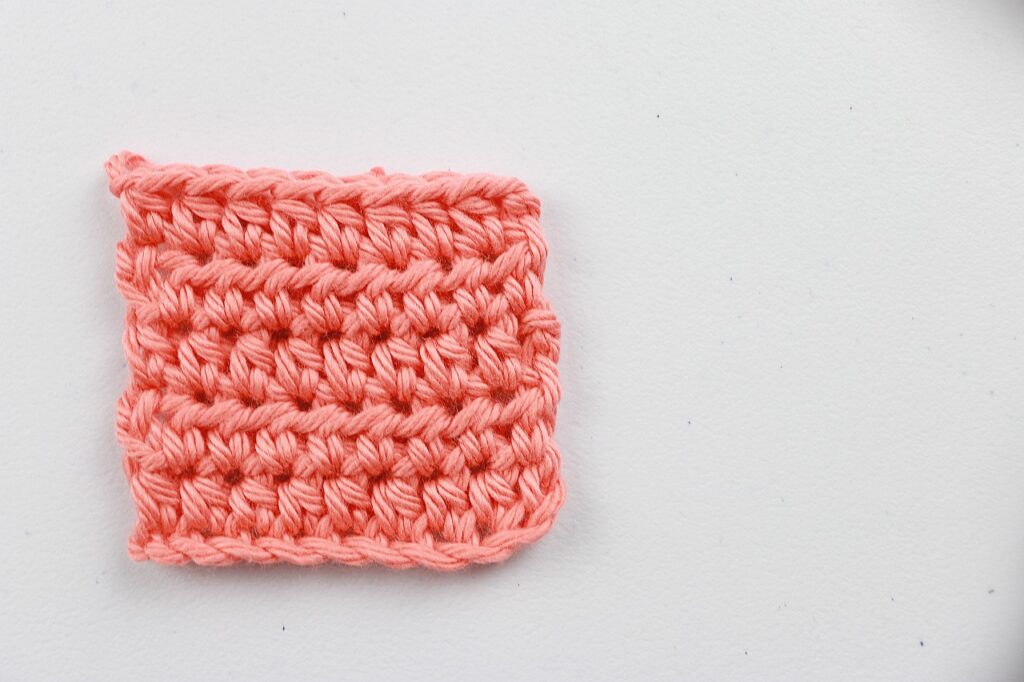
The photo below shows two swatches. The one on the left shows how I turn my work, right to left. The one on the right is turning it from left to right. If you can’t tell, there really isn’t much of a difference.
Wrong Side vs. Right Side
If you ever see the abbreviations WS & RS, they stand for wrong side and right side.
The wrong side of the work is the side that’s supposed to face the inside or the bottom when you’re finished.
The right side is usually the pretty side that sometimes includes added texture.
Not all patterns have a wrong side or a right side. If your finished project looks the same on the back as it does on the front, then it doesn’t matter which one you call the right side.
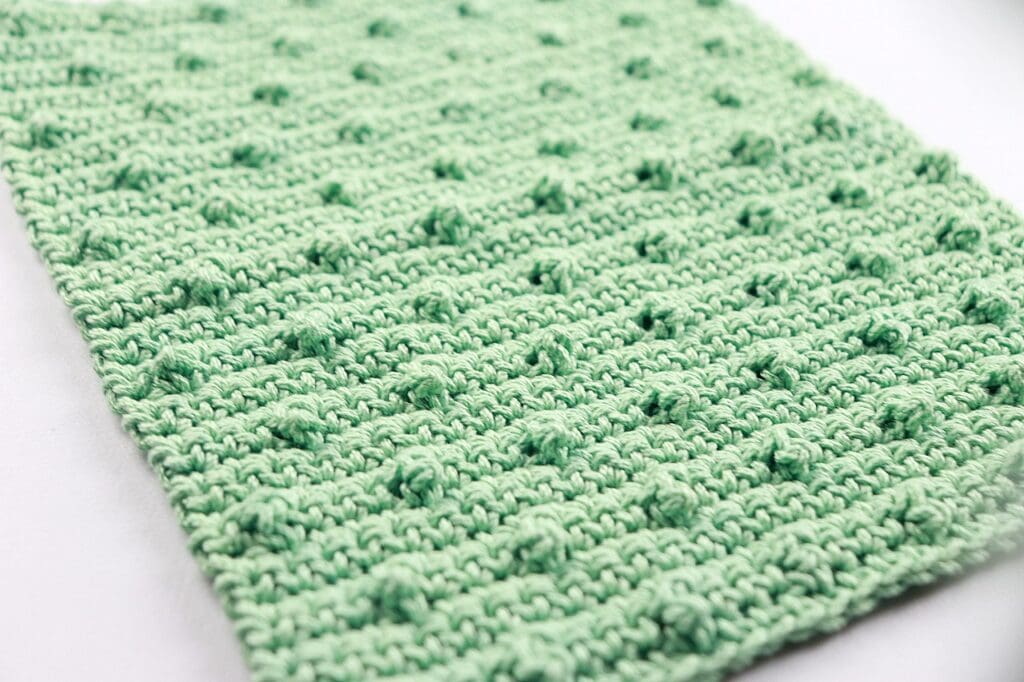
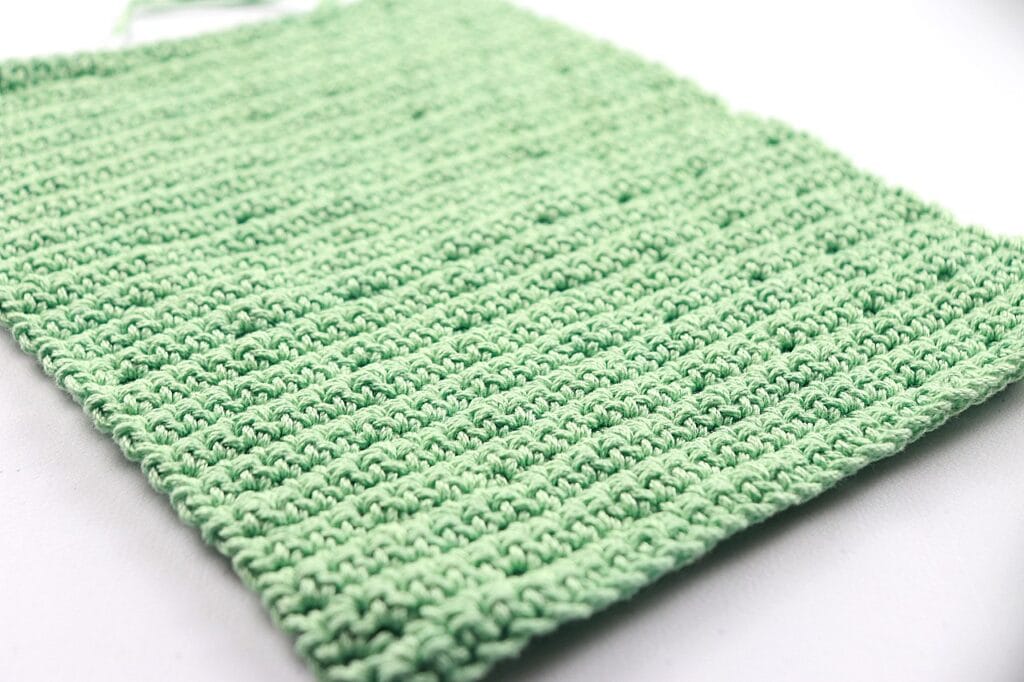
Below you’ll find my Treble Pop Washcloth. On the left you’ll see the side with the bobbles. This is the right side. The right shows the back side or the wrong side of the washcloth.
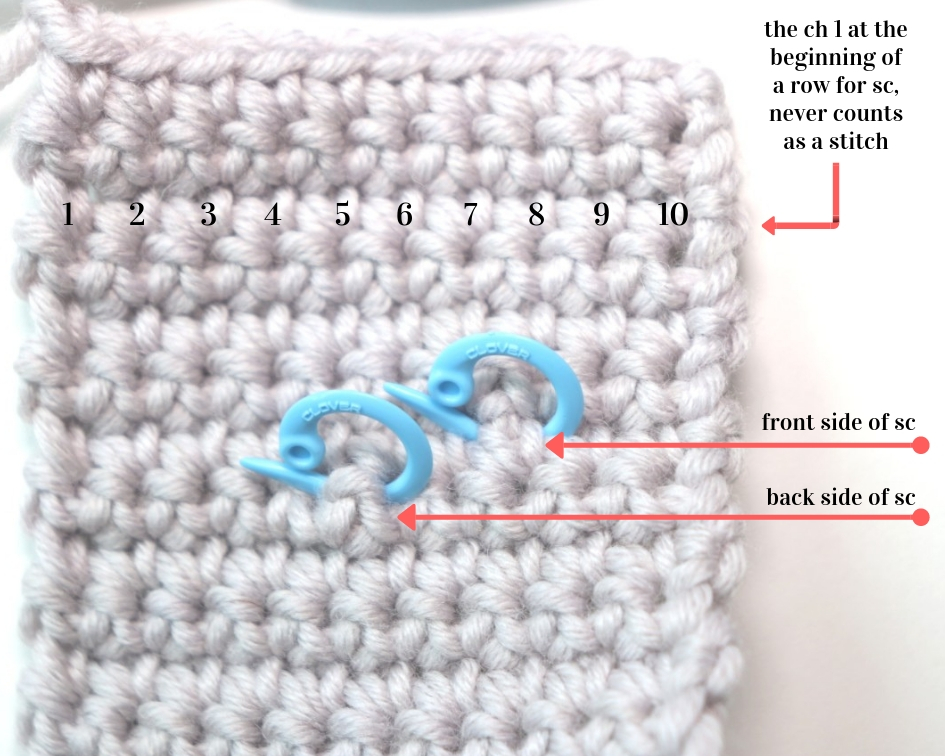
Recognizing Your Stitches
Last week we talked about how counting your stitches can save you from having uneven edges. But there’s more to it than just counting.
You should also learn how to recognize your stitches.
To do this, you really have to take a good look at your crochet swatches. Or I can just show you!
Understanding the construction of your stitches is important because it will help you to:
- – not lose track of where you are
- – keep your edges straight
- – understand turning chains
- – how to better count your stitches and rows
I know it doesn’t sound fun, but in the long run this will help you to become a better crocheter.
You have two options with this one.
First you can read over this article. I’m not going to lie, it is a LONG article.. BUT it is jam-packed with so much good information that it’ll answer most, if not all, of your questions.
You can also watch this video tutorial that basically covers all of the same things. However, it is an older tutorial back when I didn’t know what I was doing 😂 so there’s that. But it’s packed with good information nonetheless.
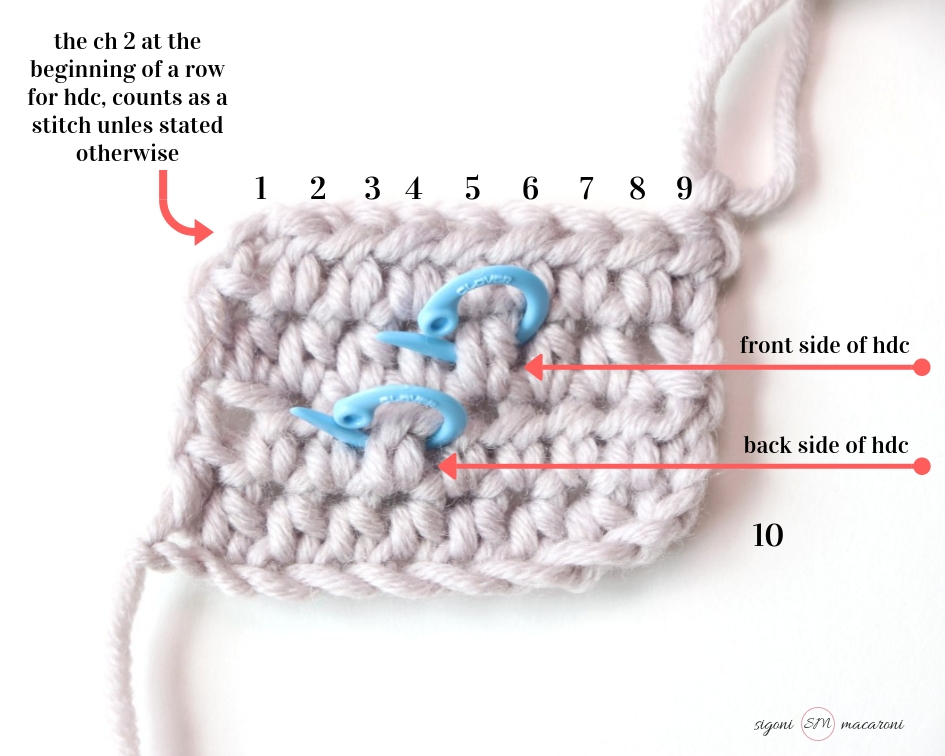
Turning Chains
A turning chain is how much we chain to move up to the next row. The amount that we chain depends on the stitch we’re using. It also depends on the designer who created the pattern you’re working on.
Turning chains can be confusing because depending on where you go, you could hear something different.
Here are the technical answers:
- Single Crochet | Turning Chain = 1 | DOES NOT count as a stitch
- Half Double Crochet | Turning Chain = 2 | DOES NOT count as a stitch
- Double Crochet | Turning Chain = 3 | DOES count as a stitch
- Treble Crochet | Turning Chain = 4 | DOES count as a stitch
To find out where to put your first stitch in a row or any other questions about turning chains, read over this article. It should answer all of your questions.
There’s also a video tutorial included!
Following Patterns
Learning how to read patterns is sort of like learning a new language. Except in my personal opinion, it’s a hell of a lot easier – says the girl who has taken Spanish 3 times and only knows how to count to ten
Before we dive in to reading patterns, let’s cover the three different ways you can follow patterns.
- 1. Video
- 2. Diagrams or graphs
- 3. Written pattern
1. Following a Video
Following videos is a great way to get started because you can see right in front of you how to make the pattern. That makes this the simplest way to follow a pattern.
Eventually though, you’re going to outgrow it. There’s only a limited supply of patterns available through video and when you start getting better, you’ll find that it moves too slow. I can also guarantee that eventually you’ll want to try another pattern that doesn’t have a video available.
Following videos is great in the beginning, but eventually you’re going to want to learn how to read a pattern, both diagrams and written.
2. Diagrams or Graphs
Reading charts and diagrams require using symbols instead of words. You can find all of the chart symbols and meanings over at the Craft Yarn Council.
With graphs, you’ll be following squares. You’ll see this when working withtapestry crochet and C2C – we’ll be talking more about this down the line
Here’s a tutorial on reading crochet diagrams.
3. Written Patterns
Learning how to read patterns is sort of like learning a new language. Except in my personal opinion, it’s a hell of a lot easier – says the girl who has taken Spanish 3 times and only knows how to say numbers, hola, and adios
Before we dive in to reading patterns, let’s cover the three different ways you can read patterns.
The first is by following a video, which isn’t technically reading but I’ll explain how it can help in a minute. The second is by reading charts or diagrams. And the third is by reading a full written pattern.
The best way to learn how to read patterns is to watch a video with the written pattern in front of you so you can follow along.
I have this option inside my Masterclass, but I don’t have any other videos on it. I’m hoping to in the future, but in the meantime you could always search YouTube and see what you find.
The first thing you need to know when learning how to read patterns is to memorize some of the most common abbreviations. Remember that US and UK terms are different.
I have a two-part series on my website talking all about how to read patterns.
The first part talks about everything you need to know before you start the pattern. The second part talks about everything you need to know while you’re working on the pattern.
Choosing the Right Yarn for Your Project
Before you can choose the right yarn for your project, you have to know about the different types of yarn. The yarn you choose will depend on the type of project that you’re going to make.
In Week 3 of LCE, we talked all about yarn and which fibers and weights are good for different types of projects.
If you missed it or need a refresher, you can read all about it here.
Acrylic yarn is usually my go-to because it works well for so many different projects.
My favorite place to get yarn is *LoveCrafts – they have a HUGE variety of yarn, lots of sales, and I’ve never been disappointed.
FREE PATTERN FRIDAY
Today I released the final roundup that I have planned (if you want more, send me an email with the kinds of projects you’re looking for!).
These patterns all use half double crochet stitches. The half double crochet stitch happens to be my favorite stitch.
Free Half Double Crochet Patterns for Beginners
I also have a free pattern coming out this week! We’ll be learning how to make a simple V Stitch Scarf. It’s surprisingly quick to work up – I would say a few hours depending on how long you decide to make it!
The roundup is available now, but the V Stitch scarf won’t be available until Friday 2/12.
I’ll send you an email on Friday when it’s out OR you can subscribe to my YouTube channel and hit the notification bell to be notified as soon as it comes out!
Days
Hours
Minutes
Seconds
JOIN THE LCE FACEBOOK GROUP
The Crochet’dy Bunch // Limitless Crochet Everyday
I created the Facebook Group, The Crochet’dy Bunch as a space for those who love crochet and I’ve decided to group it together with the Limitless Crochet Everyday project. This is a place where we connect, share work, get your questions answered, and support each other. I hope you’ll join us!
Please don’t forget to agree to the group rules! It’s so important to me that this is a supportive, loving community, and I won’t tolerate any negativity.

JOIN THE WEEKLY NEWSLETTER!
Sign up to learn how to crochet through your emotions and gain access to our private Facebook group where you can get answers to all of your questions!
