Read our most Frequently Asked Questions!
Read our most Frequently Asked Questions!
Limitless Crochet everyday
With crochet, the possibilities are endless. Throughout 2021, Limitless Crochet Everyday will teach you how to become a better crocheter with new techniques, stitches, and free patterns to go along with them. Crochet is an anxiety reducer for many of us and after a long and stressful 2020 year, I think this is exactly what we need.
Some of the links below are affiliate links. Please see my disclaimer for details.
- WEEK 2 -
“My doctor said I needed more fiber… so I went to the yarn store.”
I can’t tell you how happy and excited I am that so many of you are eager to learn new things about crochet! Last week we kicked off the Limitless Crochet Everyday project and we’re off to a great start.
If you missed last weeks topic, it was all about getting started with crochet before you actually get started. We talked about the benefits of crochet, reasons why you (or your friend!) should learn, some left handed tips, and ended with a roundup of some great single crochet projects!
READ LAST WEEK’S EMAIL HERE
January Theme:
GETTING STARTED
Week 2: Must-Have Tools
January 10 - 16
There’s no secret what the main tools of the trade are: yarn and a crochet hook. But what tools can you use that will truly improve your crochet? That’s what we’re going to talk about this week.
Beginner Essentials
As we said before, crochet hooks and yarn are the really must-have tools. Because without either of those, you couldn’t do much, could you?
This week I’m going to talk more about hooks and other tools that are important to have. Next week we’ll focus more on the yarn aspect.
—–
I’ve put together a list called Crochet BEGINNER ESSENTIALS over on my Amazon Storefront and you can find everything we’ll talk about today on there. You can also find some of these items at your local craft store if you’d prefer not to purchase online.
Crochet Hooks
Crochet hooks come in many shapes, materials, and sizes. Some of the most popular materials are aluminum, bamboo, plastic, and ergonomic. You can also find handcrafted hooks on places like Etsy.
When you’re ready to purchase some yarn, make sure that you also grab the recommended hook size for that yarn (or make sure that you already have it). It’s listed on the yarn label.
You don’t HAVE to use the hook size that’s recommended on the yarn label. That’s just it. It’s a recommendation. But if you’re just starting out, I suggest following it for now until you become more comfortable.
Sometimes I like to go up a hook size with blankets because it makes the fabric less stiff. And there are other designers who do this for different reasons.
I just wanted to add that in so you understand that a yarn isn’t tethered to its recommended hook size. You are the maker. You do what you want!
I’m not absolutely certain about the difference in sizes based on what country you’re in, but this conversion chart may be useful.
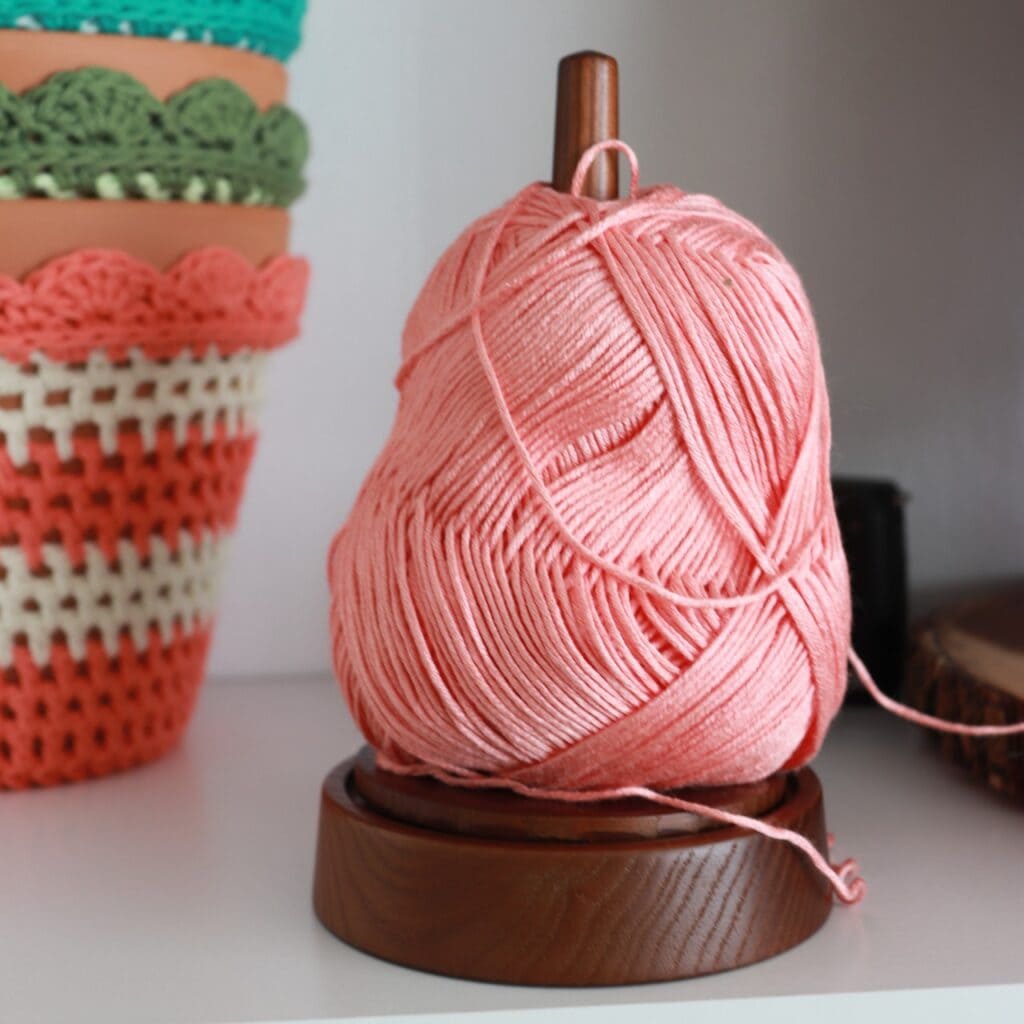
Yarn Dispenser
Although a ball winder is a great tool to have, this isn’t the same thing. Have you ever struggled with finding the center strand inside a skein of yarn? Yeah, I just found your new favorite toy!
A yarn dispenser is so simple, it’s silly that we didn’t think of it sooner. Place the center of the skein into the pole and while you’re working on a project, you pull the outside strand and it spins around as you work. Genius, right?!
I purchased one to test it out for you and I love it! It’s so much fun to work with and it’s so easy. The downfall is that it only really works with smaller skeins but could work better if wound up into a cake first.
I’ve also seen people use toilet paper holders, which is a really great hack especially if you already have one in your house!
This is a must-have tool because yanking and pulling at your yarn while you’re working with it can really mess up your tension so using something like this will make things flow easier.
Stitch Markers
These guys will soon become your best friend if they’re not already. The reason why is because they can be used for so many different reasons.
- – To hold together panels of a garment or blanket project
- – To mark your first and last stitch to ensure straight edges
- – To mark increases when working in the round
- – To hold your place so your WIP doesn’t unravel
- – To keep track of your stitch count when you have a long foundation chain
I could probably list some more, but those were just off the top of my head. They are so useful (& super cheap!) and I highly recommend having some on hand.
**Note: Do not get enclosed, circular stitch markers. These are for knitting.
Tension Regulator
This must-have tool is for those who struggle with having inconsistent tension.
If you are a beginner and you’re struggling with tension, the best thing you can do is practice. But if you’re getting frustrated and just need a win, a tension regulator could really help you get started.
It will help you to feel more confident and allow you to practice without feeling frustrated. Then in a few weeks or months you may not need it anymore.
Sometimes this is just a problem that beginner crocheters have, but there are also some more experienced crocheters who still struggle with this.
If you have arthritis or any other disability related to your hands (or even if you just can’t get the hang of it), I’ve heard from many people that a tension regulator can help to ease the pain.
If you fit into either of these categories, you have two options:
- – Make yourself a tension regulator with this tutorial
- – Splurge a little and buy one – I haven’t tested this one yet, but I’m planning to in the next few weeks. I know someone who loves the way this tension ring looks, fits, and works.

Crochet Hook FAQs
A few weeks ago I asked you in the Crochet’dy Bunch // Limitless Crochet Everyday Facebook group if you had any questions about crochet hooks. Today I’m going to take the time to answer some of those questions for you.
Q1: What’s the difference between American and English hook sizes?
From what I understand, in all countries, hook sizes are identified by a number and/or a letter. Most crochet patterns will go by the number but some include the letter.
I, personally, never pay attention to the letters.
The number (ex. 5mm) is the actual size of the hook. The letter is just the “name” assigned to it. You always want to make you’re you’re using the recommended size, not letter.
Sometimes the same letters are used for different sizes. For example, a 9mm hook and a 10mm hook can both be represented by the letter N. So if you’re only paying attention to the letter, you could use the wrong one and then your finished project will turn out completely different.
Q2: Are ergonomic hooks actually worth the money?
I’m going to answer this with a straight up, ABSOLUTELY! Let me tell you a short story.
When I first started crocheting I did not understand why some hooks were so expensive. For the first few years I used aluminum and plastic hooks and those worked great for me (I did have issues with the plastic but we’ll get to that in another question).
One day I decided that I wanted to test out one Clover Amour hook. I knew there had to be a reason why one hook was $8 when aluminum and plastic hooks are the same price for a whole set.
So I tested it out… The next day, I went and bought the entire pack. They are THAT good.
That was years ago and to this day, Clover Amour hooks are the only hooks I use. Unless I lose one – then I’ll use an extra plastic or aluminum hook that I have on hand.
If you’re happy with the hooks you’re using, you don’t have to go and buy a different brand. BUT if you feel pain while you’re crocheting or you’re just not happy with your hooks, I highly suggest getting these hooks. Even if it’s just to test out one. If you don’t have the extra money, ask for them as a birthday present 😉
Also if you’ve been wanting to level up your crochet, these hooks are for you. They flow smoothly, making things easier on your tension and they help you to crochet faster.
Q3: Which crochet hooks are the best and cheapest to use?
When it comes to cheaper hooks, I would use aluminum, or metal, hooks. Before I got hooked on Clover Amour, I used Boye aluminum crochet hooks and they worked really well for me.
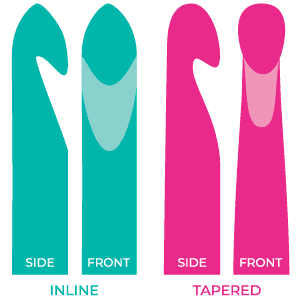
Q4: What is the difference between tapered and inline hooks?
The difference between the two depend on the shape of the “throat” of the crochet hook. Inline hooks have a pointier head and the throat dips down sharper. Tapered hooks have a rounded head with a more shallow throat.
Tapered hooks are what I prefer, but it could be different for you. The best thing to do is to test them out and see which hooks you feel the most comfortable with.
Q5: How can these two styles change the look of your stitch?
According to Crochet.com “…an inline hook helps create uniform-sized stitches and contributes to more consistent tension.”
However, I personally haven’t noticed a difference in the look of stitches based on the style of hook. I’ve also tried inline hooks before and they didn’t help to improve my tension. But again, that’s just me. It could be different for you.
Q6: Which style of hook is best for pencil grip or knife grip?
It’s hard to say what’s best for a pencil grip because I use a knife grip, but I believe it’s the same for anyone. Figuring out which hook will work best for you will take some trial and error. You have to test them out before you really know how they’ll work.
I found this really great article where Dedri (the designer behind the blog), dives deep into different hooks and how to choose the best crochet hook for you. If you’re still not sure, read over what she has to say.
Q7: What is better – metal or plastic hooks?
Overall, I think aluminum wins. These hooks work well in all kinds of ways with different types of fibers. If you get the cheap plastic hooks, they will break while you’re working with them. Especially when you’re working with cotton or multiple strands… 🙋🏻♀️ speaking from experience.
I will say though that I prefer plastic hooks when using bulkier yarn and when I say plastic hooks I’m talking specifically about the Crystallites hook set by Susan Bates. These are the only inline hooks that I like and the only plastic set I use (if my Clover hooks are out of commission)
Set Yourself Up For Success
Getting started with crochet is the hardest part of the process. Everything is new, there are many different things to learn, and it can be a struggle to know where to begin. Whether you are absolutely brand new or you’ve dipped your toes in a little, these tips will help to set yourself up for success.
Because this email is already getting quite long, I’m going to share the first 5 tips with you here and you can read 10 more tips here!
If you plan ahead now, you won’t have as much trouble in the future.
1. Have patience
Having patience is one of the most important things to remember when you’re learning to crochet and that’s why it’s crochet tip number one.
I won’t lie. In the beginning, crochet can feel a bit overwhelming. There are a lot of things to learn, you don’t know where to get started, and you just want to start making. I get it. But also remember that you’re teaching your hands a brand new craft. Even if you’ve always been a crafty person, you have to give yourself time to learn. I’ve known so many people who started and gave up without giving it a real chance. I don’t want that to be you!
2. It’s normal to feel abnormal
This goes hand in hand with having patience. Because you’re teaching your hands something new, it’s going to feel super weird when you’re starting out. The more you practice, the less awkward you’ll feel. There are a few different ways to hold your hook and yarn. Regardless of what anyone else says, there is no “right” way to hold either one of them. All that matters is that it feels comfortable for you. If you feel like something isn’t right or you start to feel a lot of pain, try switching up the way you hold your hook and/or yarn. Eventually you will find the way that suits you best.
3. Start with beginner friendly supplies
For beginners I recommend ergonomic crochet hooks, light-colored yarn, and bent-tip tapestry needles. But before you head off to the yarn store, here are some more tips on choosing the right supplies.
- – If you are ready to commit to learning and you know you’re going to love crochet, then I suggest getting some Clover Amour hooks. They are pricey, but they are AMAZING and the only hooks I use – And if you’re having a hard time justifying the price, test out your most-used hook size and you will see what I mean.
- – Light colored yarn is going to be your best bet. With lighter colors, it’s easier to see your stitches and any potential mistakes.
- – It’s also best to start with a medium or bulky weight yarn (you’ll see the weight on the yarn label – medium is #4 and bulky is #5).
- – Acrylic yarn is great to use, but you get what you pay for. If you use a cheaper acrylic yarn, the fibers tend to get fuzzy and it’s hard to see what you’re working with.
- – Cotton yarn is great at showing beautiful stitch definition so that is a good place to start. However, don’t get the tougher cotton yarn like Lily Sugar ‘n Cream. That brand tends to be hard on the hands so it’s not the best choice for beginners.
4. Learn at least 2 basic stitches before you start working on actual projects
I know you want to jump right in to making, but it would be so beneficial for you if you took the time to practice and get to know these stitches. But before you jump into learning these basic stitches, there are a few techniques you need to learn first. If you don’t already know how to create a slip knot and chain, that’s where you need to start.
After that, the four basic stitches are: single crochet, double crochet, half double crochet, and treble. It would be best to learn them all, but if you’re getting impatient then at least learn the single and double crochet stitches. Once you learn these stitches, you will be able to make hundreds of different kinds patterns. Isn’t that amazing?
5. There’s a difference between US & UK Terminology
Speaking of crochet stitches, did you know that these stitches are named differently in the US versus the UK? I didn’t know this when I first started, but I quickly realized something wasn’t right when I was working on a pattern written in UK terms. The stitches are the same, it’s just the name that’s different.
Within this post, you will find a chart with all of the differences. Write this down on a post-it note so you can always refer to it down the line until you’re able to memorize them.
FREE PATTERN FRIDAY
Last week I put together a roundup of single crochet projects so I thought it would be a good idea to put out a couple more that just uses the basic stitches.
The wonderful thing about crochet is that there are so many ways to make beautiful things. A project doesn’t have to use a complicated stitch in order to be pretty.
This roundup isn’t available yet, but will be released on 1/15/21. I’ll send out another quick email when it’s live!
Days
Hours
Minutes
Seconds
JOIN THE LCE FACEBOOK GROUP
The Crochet’dy Bunch // Limitless Crochet Everyday
I created the Facebook Group, The Crochet’dy Bunch as a space for those who love crochet and I’ve decided to group it together with the Limitless Crochet Everyday project. This is a place where we connect, share work, get your questions answered, and support each other. I hope you’ll join us!
Please don’t forget to agree to the group rules! It’s so important to me that this is a supportive, loving community, and I won’t tolerate any negativity.

JOIN THE WEEKLY NEWSLETTER!
Sign up to learn how to crochet through your emotions and gain access to our private Facebook group where you can get answers to all of your questions!
