Read our most Frequently Asked Questions!
Read our most Frequently Asked Questions!
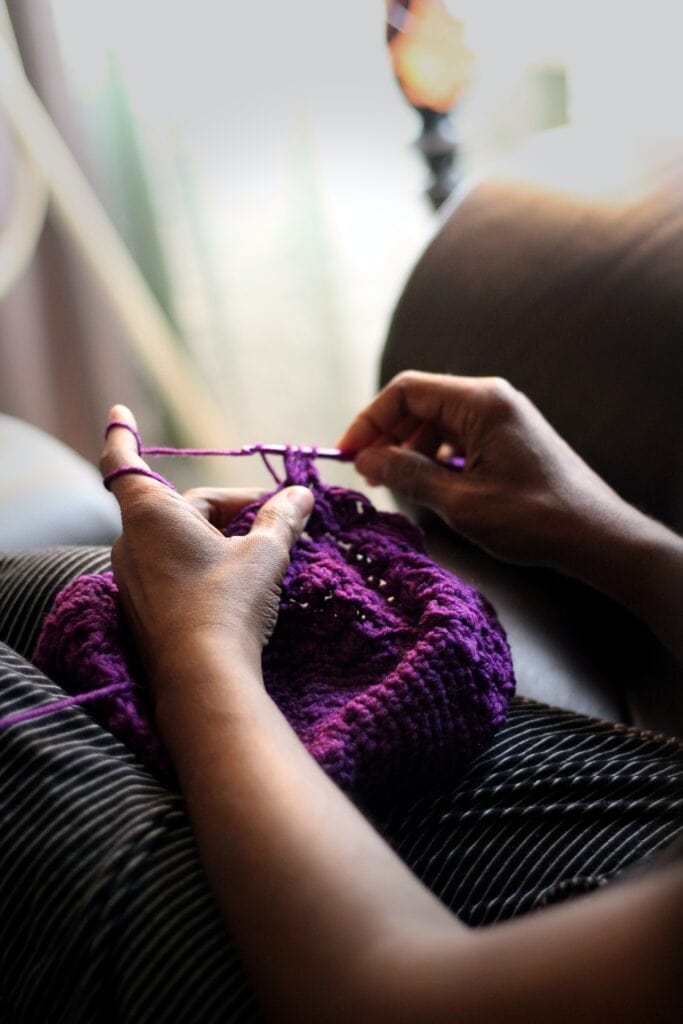
Limitless Crochet everyday
With crochet, the possibilities are endless. Throughout 2021, Limitless Crochet Everyday will teach you how to become a better crocheter with new techniques, stitches, and free patterns to go along with them. Crochet is an anxiety reducer for many of us and after a long and stressful 2020 year, I think this is exactly what we need.
Some of the links below are affiliate links. Please see my disclaimer for details.
- WEEK 4 -
“Be brave enough to be bad at something new.” – Jon Acuff
It’s Week 4 and we’re starting to trickle out of the basics and into some real tricks on turning you into a better crocheter. This week we’ll be covering a lot of things you could be doing wrong and how we can fix it.
If you missed last weeks topic, it was all about yarn. We talked about the different types of yarn, how to choose and substitute yarn, answered some of your most frequently asked questions, and ended with a video tutorial of my most popular pattern!
Read last week’s email here
January Theme:
GETTING STARTED
Week 4: Becoming A Better Crocheter
January 24 - 30
Do you ever get tired of making the same mistakes over and over? While it’s normal to frog your work here and there, it can start to feel exhausting when you keep making mistakes that you don’t know how to fix. So this week we’ll talk about the most common mistakes I see and how to fix them. This, along with some other tips, will help you to become a better crocheter.
Common Mistakes
We’re going to start this week off with a quick win.
If you’ve already gone through my free training, a lot of this will sound familiar but there are a few differences. I decided to turn this into a video tutorial which will release on Friday, 1/29 (with 5 additional mistakes to avoid) and I’m in the process of turning it into an eBook rather than an email training.
The ebook will be available soon
Today I’ll be covering the top three most common mistakes because there’s a lot to get into and these three are important to learn and understand.
Tension, the hobby killer
We’re talking about tension first because it is the number one complaint when learning how to crochet. So if you struggle with tension, you are FAR from alone.
Believe it or not, tension is the culprit for why so many people give up.
But guess what? We’re not going to let that happen because no matter how frustrating, you can do anything you put your mind to.
Plus, I’ll be here for you each step of the way. So let’s talk about this.
—
First, what is tension?
Tension is the stress we apply to our yarn as we use it.
Think about the good ole tale, Goldilocks and the Three Bears. You don’t want your tension to be too loose, yet you don’t want it to be too tight. You want it to be juust right.
Here are some of the issues you could be having with your tension:
If your tension is too loose, your stitches will be loose which could result in a holey project.
If your tension is too tight, it will be hard for you to insert your hook into each stitch and your fabric will be stiff.
Another issue is your foundation chain being too loose or too tight while the rest of your stitches look pretty good.
If your tension is off, your gauge will be off. And if you’re making something that requires a specific finished size, your finished project won’t match up. That’s why it’s important to understand how tension works.
—
Okay, okay. So how do we fix this?
Unfortunately, and you probably already know this, there isn’t a one-and-done type of solution for this issue.
However, I have a few tricks up my sleeves and I’m hoping they’ll help you out.
I’ve put together this guide filled with tips on how to improve your tension. Feel free to print it out and hang it on a cork board (or something similar) as a reminder. Try some of these tools and see if they make a difference.
Click here to download the tension guide
If you need more of an explanation for all of the tips/tools listed inside the tension guide, I’ve written an entire article about it and I’ll be including more tension tips below.
Some of the tips in this guide may not sound like they would improve your tension, but you might be surprised. If you set yourself up for success from the beginning then it will help you even more in the long run.
If the tension guide wasn’t enough, here are a few more tips you can try:
1. Try holding your yarn differently.
I mentioned this in the tension guide, but I thought I would explain it a little more here. Depending on how you hold your yarn, you could be holding it a little too tight or too loose.
– If you feel that your stitches are too loose, try looping the yarn around your pinky, under your ring and middle fingers, and over your pointer. This will help to give you some added tension.
– If you feel that your stitches are too tight, simply hold the yarn in between your pointer and middle finger with the yarn draped over your pointer finger. That way it’s easier to manage your tension.
– To see this in action with even more great tips, watch this video tutorial.
2. If your foundation chain is off, but everything else is looking good, try this:
– If your chain is too loose, use a hook that is one size smaller for the chain, then move back to the original size for the rest of the project
– If your chain is too tight, use a hook that is one size larger for the chain, then move back to the original size for the rest of the project
3. If you’ve continued to practice and practice and it still doesn’t feel right,
try making this tension regulator. This regulator will also really help if you have arthritis, hand pain, trouble closing your hand, etc.
Straight Edges Every Time
Another pain in the butt when learning to crochet is keeping those dang edges straight.
If your work starts to look like a triangle after a few rows, keep reading.
To put things simply, the answer to straight edges is to count your stitches.
I know, it sounds pretty anticlimactic, but it’s true.
The reason why your edges are uneven is because you are either missing a stitch at the end of a row OR you added one somewhere it wasn’t supposed to go.
It could also come down to tension as well.
If you’re counting your stitches, actually implementing these tips, and your edges still aren’t straight, I would guess it’s your tension – more on that later.
Now I know counting your stitches isn’t a very satisfying answer because it’s boring, it takes more time, and you just want to enjoy working on your project without worrying about counting every single stitch.
So there are a few different ways to ensure you have the correct stitch count without actually counting. Let’s cover those first.
Straight Edges Without Counting
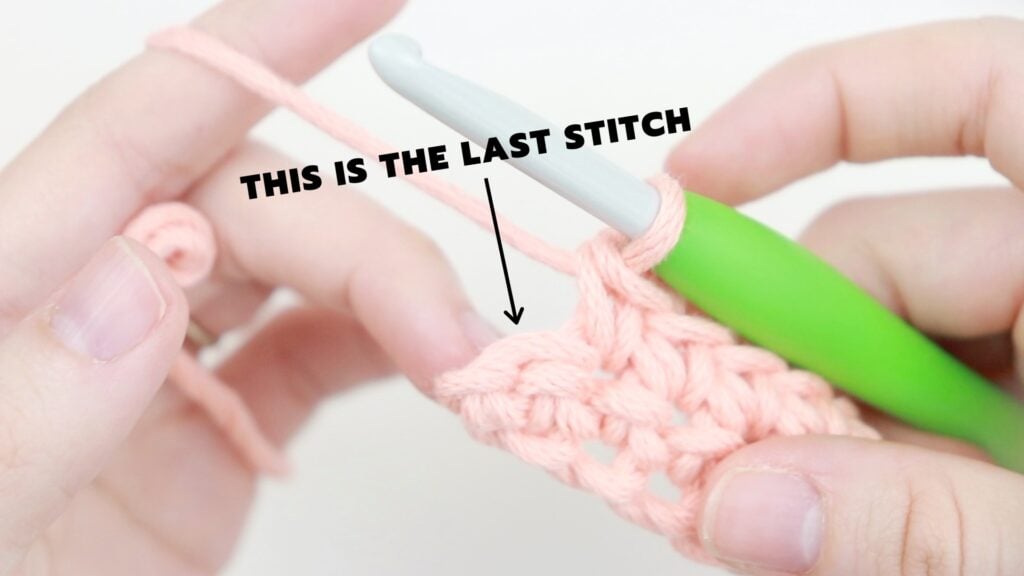
1. Make sure you always catch that last stitch – it can be tricky to spot
The last stitch in a row can be hard to find no matter what stitch you’re using. And it can be even harder if your last stitch is a turning chain and you aren’t sure where to place it.
Turning chains are explained in the video I have linked below.
As for tips on finding the last stitch, just remember that you’re looking for the “v” shape at the top of the stitches. Turn your work towards yourself so you can see the top of the row and look for that last stitch. Sometimes it can be a little more slanted than straight.
2. Use stitch markers to mark your first and last stitch
I could explain this through text, but it’s easier to see in action. Here’s a video tutorial on keeping your edges straight using stitch markers.
3. Learn to understand turning chains
Turning chains are another one of the more confusing things about crochet. Everyone seems to have a different answer and there aren’t any tutorials explaining exactly what they mean. Until now. I created this video to explain all about turning chains, what they mean, and why what you’ve heard can be contradicting.
Sometimes We Gotta Count
Learning to identify individual stitches and rows is important to having straight edges.
If you’re interested in learning exactly how to count each stitch and row, read through this post to get all of your questions answered.
This is a quite a long article, but has so much valuable information. If you’re not up to reading through it, there’s also a video tutorial that you can check out. This will really help you to learn how to count and recognize your stitches and rows so you’re able to pick up where you left off without a problem.
The Unknown Mistake
I’ve called this mistake the unknown mistake because I see it ALL THE TIME but so many beginners continue working like this without realizing it’s wrong. I’ve looked over many different tutorials and I’ve never heard this mistake be mentioned.
So what is it? Working through the front loops only.
So often I receive emails from you guys with photos of swatches that look amazing (and I love seeing them so keep them coming!), but I’ve noticed that 3 out of 4 swatches are worked under the front loop only. You may not even realize you’re doing this and that’s why I have to bring it to light.
If your work looks like the swatch on the right in the photo below, then you’re one of the many people who have made this mistake.
Now, working under the front loop only isn’t a mistake if that’s the look you’re going for. Some patterns do use this technique. But if you’re doing this unintentionally, that’s when you need to know the correct way.
When you’re inserting your hook into a stitch (after the first row) make sure you’re inserting your hook under both loops and not just that front loop.
It seems like a subtle difference, but it doesn’t only change the look of your stitches. It also affects your tension and gauge.
In the photo above, the left swatch has 10 rows of single crochet and the right swatch only has 8…Yet they’re the same height.
If you’re doing this, your projects will come out much larger than the original design. So make sure you correct it!
And there you have it! These are the top 3 common mistakes I see and how to fix them. For 5 more common mistakes and tips, watch the video tutorial that’ll release on Friday, 1/29. Click the button below to subscribe to my channel and be notified of the release!
Fixing Crochet Mistakes | FAQs
Before we get into the FAQs, I wanted to talk a little bit about frogging. Frogging your work is a pain, I understand. But if you made a mistake a few rows back, your best bet is to frog your work and fix the mistake that way. I know it feels like time wasted, but it’s just a lesson learned.
We’ll talk about this more next week but frogging is normal. We all do it. If you made a mistake a few rows back and you’re contemplating going back and fixing it, then go fix it. When you’re finished with your project you will be so much happier with the end result.
Alright so a few weeks ago I asked you in the Crochet’dy Bunch // Limitless Crochet Everyday Facebook group if you had any questions about fixing mistakes in crochet. It’s time to answer those questions!
Q1: Can you correct a skipped stitch, even if you’ve already worked a couple rows before realizing?
If you work to the end of a row and you realize that you skipped a stitch, all you have to do is take out your hook, pull back your yarn to that stitch and add it in.
If you’ve already gone a few rows and you don’t want to go back, there are a few things you can do.
If the stitch you skipped isn’t too noticeable but you need the correct stitch count or you want to even out your rows, just add a stitch somewhere in your row. You won’t notice in the finished piece, I promise.
If it is noticeable, you can add a stitch by inserting your hook into that space and then pulling it up and creating the stitch. So you’re basically working your stitch in the row below. This usually only works if you’re only one row above the skipped stitch.
You can also add a standing crochet stitch like in this tutorial by Mikey from the Crochet Crowd
Q2: What do I do if I added extra stitches a few rows down and I don’t want to frog it back?
This is almost the same as the previous question but the opposite. If you notice that you added a few stitches a few rows back, you can ignore it if stitch count doesn’t have to be perfect.
If you know it’s going to bother you that you made the mistake, then go back and fix it. You don’t want to be unhappy with your project later just because you don’t feel like going back and fixing it now.
If it doesn’t bother you and it’s not really noticeable, I guarantee you won’t be able to see it in the finished piece so I wouldn’t worry too much about it.
Q3: If a few rows later I discover a hole, is that a skipped stitch? How do I fix it?
When you notice a hole a few rows later it’s usually because you skipped a stitch, but I can’t say that’s the case every time.
Read the answer to Q1 to see how to fix a skipped stitch & read the answer to Q7 to see how to fix holes.
Q4: If you are finishing your first row of work and realize that your starting chain had 1 or 2 more/less stitches than you need, is there a way to correct it at that point or do you have to start over?
This depends on the pattern. If you’re working on a simple pattern that doesn’t require fancy stitches like cables or bobbles, you might be able to get away with continuing on without a problem.
If you’re working on a pattern that goes by a specific stitch multiple, you will have to start over. In order for pattern repeats to work, you have to have a certain amount of stitches.
For example, with my Basic Shell Stitch Washcloth there is a stitch multiple of 6+2. If you don’t follow this multiple, the shells won’t line up the way they’re supposed to.
Q5: Is blocking really the best way to fix minor mistakes? (Difference in tension for example)
Yes, blocking is a great way to make your finished project look better, especially when it comes to blankets having wavy edges due to tension.
Blocking isn’t always necessary, but it can help and it doesn’t have to be difficult. All you need is a spray bottle filled with water, some blocking mats, and t-pins. Spread your project out on the mats, pin it down and stretch it out to how you want it to look, and spray away. Let it sit for 24-48 hours, unpin, and you’re done!
Here are some tutorials for different kinds of blocking techniques:
- All About Blocking – Jayda in Stitches – this video doesn’t show you how to block but it’s very informative when it comes to the different types of blocking and which techniques are best for certain types of fibers
- Wet Blocking – Sewrella
- Spray Blocking – CreaCrafts – not crochet, but works just the same
- Steam Blocking – TL Yarn Crafts
Q6: What do I do if I make the starting chain too tight and I don’t want to rip it all out?
The best thing you can do is just rip it out. I know, it stings. But it’ll be so much better in the long run. If you work into a tight foundation chain, two things will happen.
First, you’ll get frustrated trying to get your first row of stitches into that chain. Second, the more you crochet the more your stitches will loosen up and the more noticeable your tight foundation chain becomes.
Do yourself a favor and start over now before you get further and still have to go back frog it anyway.
Q7: What do I do if I find a hole in my finished project due to the strands unraveling?
If you notice a hole after you’re finished with your project, don’t freak out. There are ways to fix this.
Here are some of the best free resources I could find on fixing holes or tears in crochet:
- How To Repair A Hole In A Blanket – The Crafty Co
- Fix Broken Crochet Centers – Hooked by Robin (this video shows how to repair a magic ring that’s unraveling – so helpful!)
- How To Mend A Crochet Blanket – Pony MC Tate
I also really like this article from AllFreeCrochet because not all holes are treated equally. If your project can’t be fixed by using one of the tutorials above, this article will walk you through the steps to fixing your specific problem.
Q8: How do you make the hole in a magic circle smaller?
When you make a magic circle, the only thing closing your circle is the tail end so you have to make sure you pull tight.
After a few rows the center might start loosening up but all you have to do is pull the tail end again so it closes.
If you pull tight and it looks like it’s starting to warp, it will fix itself the more your project grows – as long as your stitch count is right.
If it doesn’t seem to close all the way, just weave in your ends tightly at the end and it will close.
I do have a video tutorial for the magic circle that shows you how to make one, how to tighten it, and the difference between this method and the chain method.
How To Crochet More Efficiently
If you’re new to crochet, you can’t expect to crochet like Jonah Hands right away (Have you seen him crochet? He’s so quick!).
Practice makes perfect. I don’t like saying that often, but in this case it’s true. The more you crochet, the easier it’ll be to catch your mistakes before you make them. And in the end, this will help you become a better, faster crocheter.
Let’s talk about a few other things you can do to crochet more efficiently. In this email I’m going to list 5 different tips, but if you’d like to hear even more, click the button after tip #5.
1. Limit distractions
As a mother of two, I know that limiting distractions isn’t always easy. But when it’s possible, it will absolutely help. Less distractions means less interruptions and your project being finished faster. If the TV is taking too much of your focus, try listening to some music or a podcast.
Also, tell your husband – or wife or partner – to shush right before you start counting stitches (because they always decide to ask a question right in the middle of counting and you end up counting 100 stitches five different times 🤦🏻♀️).
If you’re working on a more complex project, wait until you’re able to sit in a quiet room and concentrate.
2. Hold your yarn or hook differently
Do you normally hold your hook like a pencil? Try the knife grip and see if it changes anything. Do you find that your tension is too tight when you wrap it around your pinky and pointer finger? Try holding it between your middle and pointer finger like I mentioned earlier.
If something isn’t working or feels uncomfortable, change it.
3. Use a bulky yarn or multiple strands
The thicker your yarn and the larger your hook, the faster your project will go. If you’re making a hat with a super bulky yarn, you can be finished in as little as an hour!
For tips on working with multiple strands, read through this tutorial – there’s a video tutorial as well.
4. Try a different stitch
The single crochet is clearly the slowest stitch because it’s the shortest stitch. It’s going to take you a lot longer to crochet a single crochet blanket versus a double crochet blanket.
Try working on a project that uses a fast stitch. I find that working through chain spaces make for the fastest stitches. Stitches like the granny stitch and the v- stitch.
I’ll be coming out with video tutorials for both of these stitches soon!
5. Choose another project that’s more exciting
We’ve all been there. And if you haven’t yet, I guarantee this will happen at least once in your lifetime. We get really excited about a certain project, get halfway through, and it starts to bore us to no end.
If you’re working on a project that you don’t enjoy making, you’re going to dread picking up your hook. And when you do work on it, you’ll only work on a few rows or squares at a time because you’re just not excited about it.
I’ve been there. This is why I’ve never completed a full granny square blanket. I desperately want to because they are so beautiful, yet I can’t bring myself to do all the work. It sounds daunting.
Make things that you absolutely love making! Isn’t that the whole point of having a creative hobby?
FREE TUTORIAL FRIDAY
I don’t have a free pattern for you this week but I do have a really great tutorial. It goes along with everything you learned today about the most common mistakes PLUS five more mistakes.
The video isn’t live yet, but will be on Friday 1/29.
Days
Hours
Minutes
Seconds
JOIN THE FACEBOOK GROUP
The Crochet’dy Bunch // Limitless Crochet Everyday
I created the Facebook Group, The Crochet’dy Bunch as a space for those who love crochet and I’ve decided to group it together with the Limitless Crochet Everyday project. This is a place where we connect, share work, get your questions answered, and support each other. I hope you’ll join us!

Please don’t forget to agree to the group rules! It’s so important to me that this is a supportive, loving community, and I won’t tolerate any negativity.

JOIN THE WEEKLY NEWSLETTER!
Sign up to learn how to crochet through your emotions and gain access to our private Facebook group where you can get answers to all of your questions!
