Chunky Granny Square Blanket Crochet Pattern
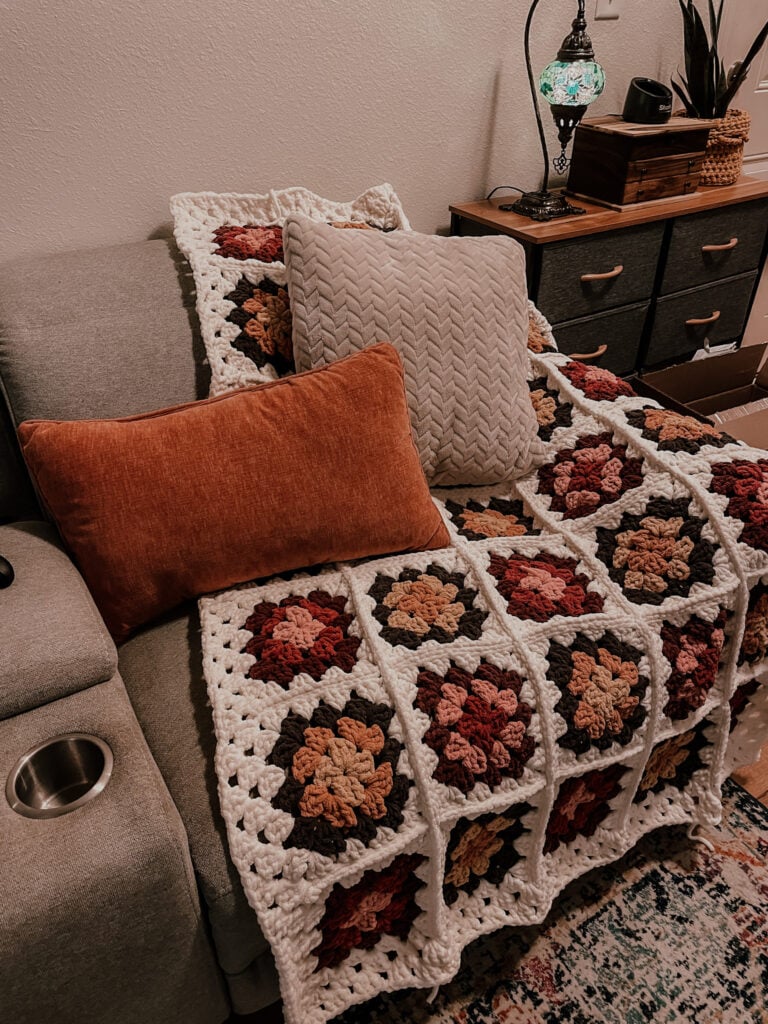
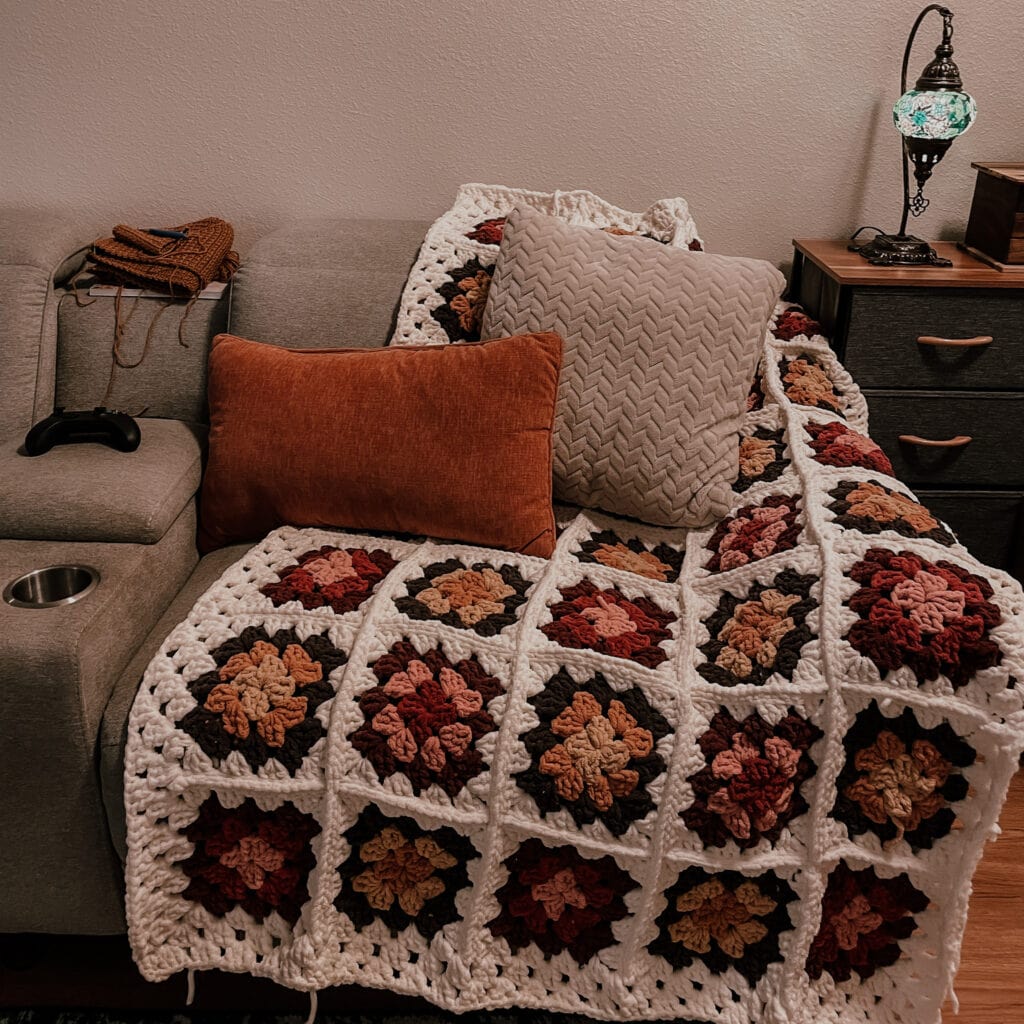
Let’s face it, granny squares are really fun to make but man can they be overwhelming. Not today! For this chunky granny square blanket for beginners, you only need to make 35 squares to make a lapghan. Incredible right? This chunky granny square blanket crochet pattern works up quickly and it is absolutely beginner friendly.
Before we get into the pattern, I wanted to explain a little back story.
I’ve ALWAYS wanted to make a large, beautiful granny square blanket. The kind where you use up your scrap yarn and somehow the colors all work out and it’s just magical. I’ve tried to start a blanket like this multiple times, but three things have stopped me.
- the amount of squares – you have to make HUNDREDS! And keep them all organized. I don’t have the time or the organization 😅
- the amount of unwoven ends – my arch nemesis 😡
- the color choices – I’m already THE WORST at being indecisive. Like, I’m probably the most indecisive person in the world plus being a perfectionist with a hint of OCD… it’s not a good combo. I would stress over every square and how it would look in the end.
Anyway, that’s what sparked this idea.
I decided to try and make something that required less work while still being able to enjoy the beauty of a granny square blanket. But I was still having trouble with colors… until Yarnspirations came out with their O’go yarn and made things 10 times easier!
So let’s talk about the yarn.
How many balls of yarn do I need for a granny square blanket?
For this chunky granny square blanket pattern you will need:
- 2 skeins of Bernat Blanket in Vintage White
- 2 skeins of Bernat Blanket O’go in Copper Coins
- 3 skeins of Bernat Blanket O’go in Shiraz
I chose Bernat Blanket yarn for three reasons:
- It’s super bulky, which means it works up faster.
- The O’go yarn does all of the color choosing for me.
- It’s blanket yarn! So it’s soft and cozy.
The great thing about Bernat Blanket O’go is that they make it super easy to separate your colors and create your own balls of yarn. I show how to do this more in depth inside the video tutorial that you can watch here.
Essentially, all you have to do is wind each color up into a ball and cut the yarn before it reaches the next color. Then repeat the process. It also goes a LOT quick if you have a yarn winder.
How do you crochet a granny square?
If you’ve never crocheted a granny square before, follow this tutorial first. It’s very easy, especially because there is a video tutorial included. It might be easier to follow that tutorial first while using a regular yarn. Using blanket yarn to make a granny square for the first time may be a little more difficult, but it’s not impossible. You got this!
This post may contain affiliate links, please view my disclosure policy for details.
Pattern:
- Get the ad-free, premium PDF (with photos, resizing instructions, and BONUS color charts) on Etsy HERE
- Or on Ravelry HERE
- PIN this pattern to your Pinterest boards for later HERE.
Materials
- Bernat Blanket – super bulky #6 (100% polyester, 220yds / 201m, 10.5oz / 300g)
- Vintage White, 2 skeins
- Bernat Blanket O’go – super bulky #6 (100% polyester, 220yds / 201m, 10.5oz / 300g)
- Shiraz, 3 skeins
- Copper Coins, 2 skeins
- 8mm crochet hook
- Large eyed yarn needle
- Scissors
- Measuring Tape
Abbreviations used:
*All Sigoni Macaroni patterns are written in standard US terms *
- Ch – chain
- Dc – double crochet
- Sl st – slip stitch
| US TERMS | UK TERMS |
| Double Crochet (dc) | Treble Crochet (tr) |
Gauge
- 1 Square = 8” (20cm)
Finished Measurements
- Finished blanket (before border) = 40” wide x 56” long
- Finished blanket (after border) = 44” wide x 60” long
Notes
- When we join squares, we will be using the slip stitch join method. You can use any joining method you prefer.
- Before joining your squares, it’s helpful to lay them out and take a picture of how you want your blanket colors/pattern to be set up.
- Ch-5 at beginning of each round counts as dc and ch-2
- Use a stitch marker to mark the third chain of the chain 5 if you’re having a hard time seeing the chains
- This blanket is made by creating 35 squares using the pattern below, joining them to form a blanket, and then creating the border.
- Pro Tip: If you’re creating your own color pattern, try using Stitch Fiddle to plan out your colors
Helpful Tutorials
Chunky Granny Square Blanket Crochet Pattern
Make 35 squares in the correct color combinations listed below.
- 12 squares in Color Combo 1 (Shiraz)
- Round 1 = light pink; Round 2 = dark pink; Round 3 = maroon; Round 4 = white
- 6 squares in Color Combo 2 (Shiraz)
- Round 1 = dark pink; Round 2 = light pink; Round 3 = maroon; Round 4 = white
- 9 squares in Color Combo 3 (Copper Coins)
- Round 1 = yellow; Round 2 = orange; Round 3 = brown; Round 4 = white
- 8 squares in Color Combo 4 (Copper Coins)
- Round 1 = orange; Round 2 = yellow; Round 3 = brown; Round 4 = white
Making the squares – Chunky Granny Square Blanket Crochet Pattern
Ch 4, sl st to first ch to form circle (alternatively, you can create a magic circle)
Round 1: Ch 5 (counts as dc, ch 2 here and throughout), [3dc into circle, ch 2] three times, 2dc into circle, sl st to 3rd ch of beginning ch 5
– 12dc or 4dc clusters, 4 ch-2 spaces
Sl st to ch-2 sp, changing to next color
Round 2: Ch 5, 3dc into same space, ch 1, *[3dc, ch 2, 3dc] into next ch-2 space, ch 1. Repeat from * 2 more times. 2dc into beginning ch 2 sp, sl st to 3rd ch of ch 5 to join – 24dc or 8dc clusters, 4 ch-2 spaces, 4 ch-1 spaces
Sl st to ch-2 sp, changing to next color
Round 3: Ch 5, 3dc into same space, *ch 1, 3dc next ch-1 space, ch 1, [3dc, ch 2, 3dc] into next ch-2 space. Repeat from * 2 more times. Ch 1, 3dc next ch-1 sp, ch 1, 2dc into beginning ch 2 sp, sl st to 3rd ch of ch 5 to join – 36dc or 12dc clusters, 4 ch-2 spaces, 8 ch-1 spaces
Sl st to ch-2 sp, changing to Vintage White
Round 4: Ch 5, 3dc into same space, *ch 1, [3dc next ch-1 space, ch 1] twice, [3dc, ch 2, 3dc] into next ch-2 space. Repeat from * 2 more times. Ch 1, 3dc next ch-1 sp, ch 1, 2dc into beginning ch 2 sp, sl st to 3rd ch of ch 5 to join – 36dc or 12dc clusters, 4 ch-2 spaces, 8 ch-1 spaces
Tie off and weave in ends
Joining Squares – Chunky Granny Square Blanket Crochet Pattern
I chose to use the slip stitch method of joining for this blanket because I love that each square looks like it’s framed. You can choose whichever method you prefer.
To join by slip stitch:
- Start with the bottom 2 rows of the blanket
- Lay one square on bottom and another above it. Both pieces should be face up – follow your photo or the graph to ensure you’re using the right colors
- Create a slip knot and attach it to your hook. Insert your hook into the back loop of the corner ch-2 space (the ch on the left) and then into the front loop of the ch on the other square. Yarn over, pull that strand through both loops and through the loop on your hook.
- Insert your hook into the back loop of the next dc and into the front loop of the dc on the other square. Yarn over, pull that strand through both loops and through the loop on your hook.
- Repeat this pattern across, adding on new squares as you go.
- Once you reach the end of the row, cut your yarn and tie off your work
- Repeat the next row the same way, starting from the right side adding one square at a time.
- When all horizontal rows are joined, turn your blanket and join each vertical row the same way
Blanket Border – Chunky Granny Square Blanket Crochet Pattern
With Vintage White, join yarn in any chain 1 space around blanket.
Round 1: Ch 3, 2dc in same space, *Ch 1, 3dc next ch-1 space. Repeat * to corner ch-2 space. [3dc, ch 2, 3dc] in corner. Repeat each side and corner space the same way until you reach the last ch-1 space. Ch 1, sl st to beginning chain 3, sl st to ch-1 space
Repeat Round 1 once more.
Tie off and weave in all ends.
I hope you love working on your Chunky Granny Square Blanket as much as I did! I would love to see photos of your blanket. Tag me on Instagram @sigonimacaroni with your photos, both in progress and finished! Join our Facebook group if you haven’t already and share your photos there or ask any questions.
Happy hooking!