Read our most Frequently Asked Questions!
Read our most Frequently Asked Questions!
Limitless Crochet everyday
With crochet, the possibilities are endless. Throughout 2021, Limitless Crochet Everyday will teach you how to become a better crocheter with new techniques, stitches, and free patterns to go along with them. Crochet is an anxiety reducer for many of us and after a long and stressful 2020 year, I think this is exactly what we need.
Some of the links below are affiliate links. Please see my disclaimer for details.
- WEEK 9 -
“We lose ourselves in the things we love. We find ourselves there, too“ – Kristin Martz
Finally, we’re learning about finishing crochet projects. We have so much to talk about this week so let’s get started.
If you missed last weeks topic, it was all about problems we face in the middle of a project. We talked about the different ways to join yarn, what to do when we come across yarn with flaws, and losing motivation to finish a project.
READ LAST WEEK’S EMAIL HERE
February Theme:
PROJECT MAKING
Week 9: Finishing a Project
February 28th - March 6th
There are many things that go into finishing a crochet project. We’re going to talk about fastening off your work, weaving in ends, seaming garments, blocking projects, and even making borders.
You can find all of the products I mention today in my Amazon Shop under “LCE Week 9“
Finishing A Project
There are many things that go into finishing a crochet project. Some things you’ll need to do for every project and other things you will only have to do for certain projects. The one thing you have to do for all projects is to fasten off your work and weave in your ends. Let’s talk about those first.
The “Must-Do”s
Fastening Off
Fastening off your work means to tie a knot in order to secure all of your hard work.
If you don’t tie your work off with a knot then your project will unravel as you pull on it. So as you can imagine, this is a very important step!
If you’ve knitted previously, you might be more familiar with the term“binding off”.
You may already know how to fasten off your work, but I’m going to explain a few different ways that you may not have heard of and give you some tips along the way.
Here’s how to fasten off your project:
- – When working in rows: After you make your last stitch, cut your yarn leaving at least 5-6 inches (15cm) to weave in your ends, yarn over your hook, and pull that strand all the way through. Pull tight to secure.
- – When working in the round: After you make your last stitch, whether you’re working in continuous or joined rounds, slip stitch to the next stitch, cut your yarn leaving at least 5-6 inches (15cm) to weave in your ends, yarn over your hook, and pull that strand all the way through. Pull tight to secure.
That’s all there is to it!
Make sure you leave at least 5 inches of a tail at the beginning of your project as well (when you first tie your slip knot) because you’ll need to weave in that end too.
If you cut it too close to the knot, you won’t be able to weave them in and your work could come apart.
Weaving in Ends
The first step to keeping your ends secure without the fear of unravelling is fastening off your work. The second is weaving in your ends. Both of these steps go hand in hand.
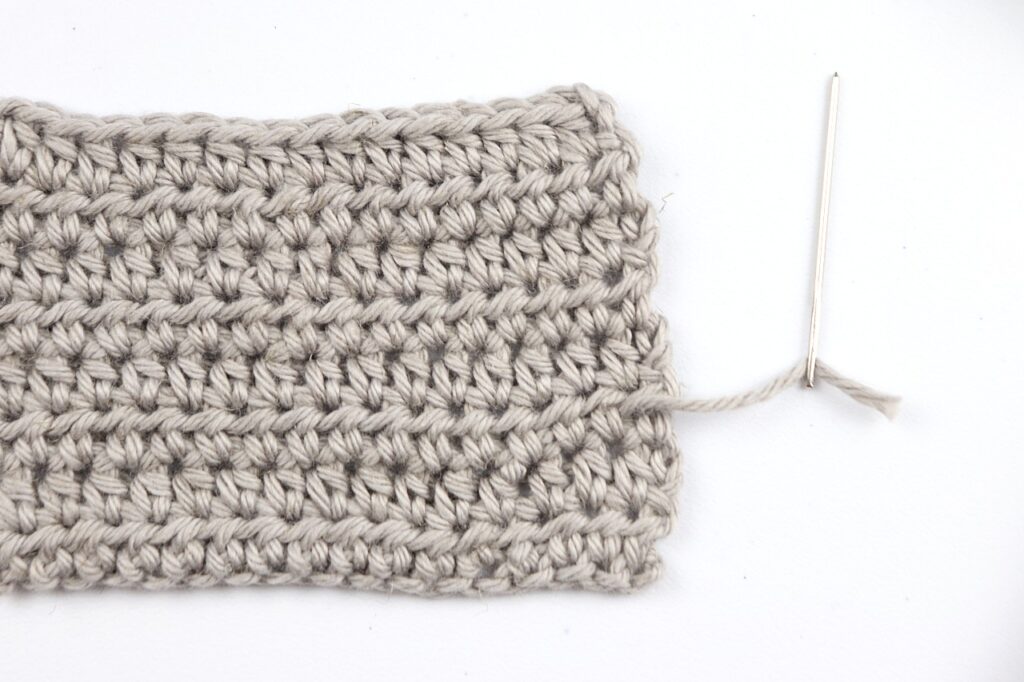
For this step you’ll want to make sure you have a set of tapestry needles. There are ways to weave in your ends without one, but using a tapestry needle is the most common way and you will most likely need one at some point anyway.
Now back to the different ways to weave in your ends. You can:
- 1. Use a tapestry needle
- 2. Use a crochet hook
- 3. Weave them in as you go
1. Tapestry Needles
When you purchase tapestry needles, they usually come in a set with different sizes. The needle with the large eye is for thicker weight yarns and vice versa.
**Quick note: Tapestry needles and sewing needles are not the same thing. A tapestry needle has a soft tip. A sewing needle has a sharp tip and can split your yarn as you’re weaving in the ends.
When we were talking about fastening off yarn, I told you to leave yourself a 5-6 inch tail. Thread your tapestry needle with that tail and you’re ready to go.
My first big tip for sewing in ends: Weave them in three different directions.
This will ensure that your ends won’t come undone on their own or in the wash.
To weave in your ends with a tapestry needle:
- 1. Thread the needle with the tail
- 2. Weave in your ends in three different directions (to the left, up/down another row, and to the right
- 3. Cut off excess yarn
2. Crochet Hook
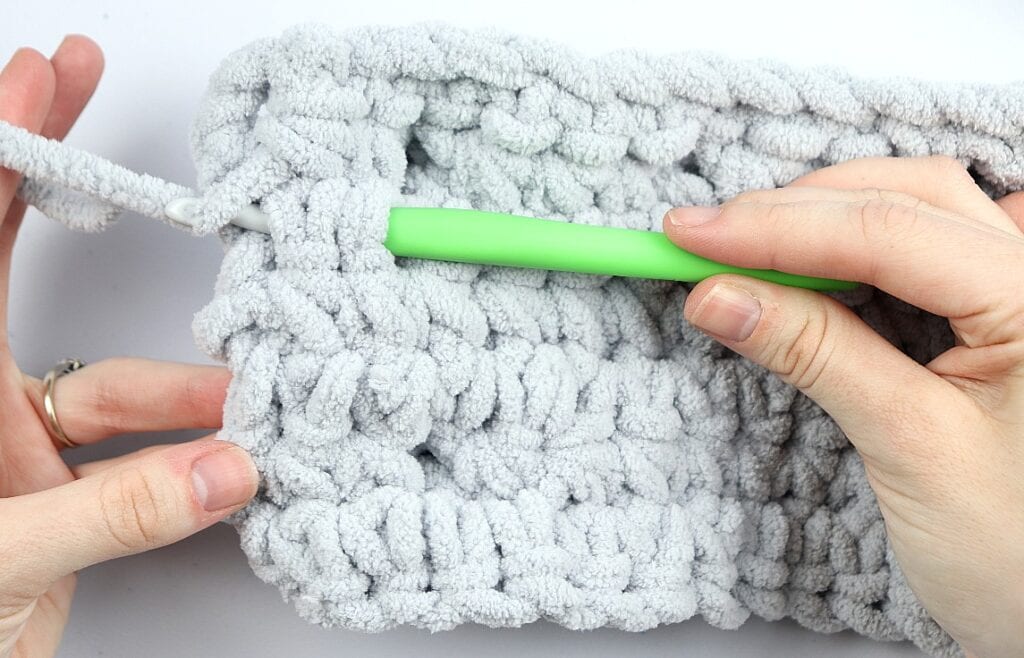
If you don’t have a tapestry needle on hand or you’re working with a thicker weight yarn, you can also use your crochet hook to weave in your ends.
No matter what yarn weight you’re working with, you’ll want to make sure that you use a smaller hook to weave in your ends so you don’t hurt the fabric.
To weave in your ends with a crochet hook:
- 1. Grab a smaller hook than you used for the project
- 2. Find the first place you want to weave in your end and insert your hook
- 3. Wrap the yarn around your hook and pull it through the stitch
- 4. Repeat steps 2-3 in three different directions until you feel like they’re nice and secure
- 5. Cut off excess yarn
3. As You Go
Another way to weave in your ends is to crochet them in as you go. Here are a few ways you can do this.
a.) Crochet OVER ends
If you change your yarn the traditional way I explained last week, you can crochet over your ends as you go down the row. I show how to do this in this video tutorial.
I still suggest that you go back and weave in your ends in a different direction to make them more secure. In the end it will still take less time doing it this way because you already wove your ends in one direction.
b.) Crochet WITH ends
I shared a tutorial last week by Hooked by Robin where she showed how to crochet with your ends as you go. There’s no need to weave them in at the end because you’ve already done the work. It’s a pretty neat trick!
You can find the full tutorial here and I’ll also show a brief how-to in the video I’ll be releasing on Friday.
c.) Take breaks
You can do this with any project, but here’s an example.
To make the Cheaters Gingham Blanket you have to create 7 separate panels and then sew them together in the end to form the blanket. There are quite a few color changes involved as well so lots of ends to weave in.
The suggestion I give for this blanket is to make the first set of panels and weave those ends in before moving on to the next set of panels.
This is so important.
If you don’t take a break from crocheting to weave in those ends, you’re going to get your blanket together and the feeling of overwhelm will set in when you see all of those unwoven ends.
Then you will either a.) not finish the blanket or b.) the ends will stay unwoven and you won’t be as excited to show off your new blanket.
If you’re working on a project with lots of color changes and/or lots of ends (like with granny squares), take breaks every few rows (or every few granny squares) to weave in any ends.
Blanket Borders
Blankets aren’t the only projects that require borders, but they’re probably the most common so that’s what we’re going to talk about.
There are hundreds of different ways to create borders around blankets. My favorite border book is Around the Corner Crochet Borders by Edie Eckman.
But you can also find plenty of free tutorials on YouTube or Pinterest.
I don’t put borders around all of my blankets because I don’t think they’re always necessary. But if you want to give your blanket that finishing touch or cover up a few uneven edges, a border is great to have.
First let’s talk about making a simple border.
To crochet a border, you’ll be working all around your blanket. I like to start every border by first crocheting a base row of single crochet.
For the top and bottom rows of your blanket, you’ll just go through the tops of the stitches as usual.
For the sides of the blanket, you’ll want to make sure you crochet evenly so that the sides don’t get scrunched up. Then make sure you crochet the same amount of stitches on the other side of the blanket.
Here’s a general rule you can follow:
- When working SC rows: 1sc on the side of each row
- When working HDC rows: 1sc at the end of one row, 2sc at the end of the next, and repeat
- When working DC rows: 2sc at the end of every row.
**Here’s a video by Winding Road Crochet that I found after writing this and happens to explain exactly what I’m talking about 😆**
When you reach the corner, you can do 1 of 2 things:
- Place 3 or 4 stitches in the corner stitch so that it naturally curves and you’re able to work along the bottom without your corners curling.
- [Sc, ch 2, sc] in each corner and use that chain space to place your corner stitches in in the next round.
Then, of course, slip stitch to your first stitch of the round.
If you’re following a pattern, not all patterns will tell you to start with a round of SC. It’s not required. It’s just something I like to do so it’s easier when I go to create my actual border.
Again, this book by Edie Eckman is soo good when it comes to learning how to crochet borders. Not only does it come with 150 different borders, but in the beginning of the book she explains how to crochet along the sides of your blankets with photos to reference.
Aside from that book, here are some of my favorite border tutorials for blankets:
- – Easy Blanket Border by Winding Road Crochet
- – Granny Style Blanket Border by ME! (this isn’t a border-specific tutorial, but it’s a simple border that I use for all of my Forever Blankets and I personally love the look of it.)
- – Treble Scallop Edging by Cypress Textiles
- – Ribbed Blanket Border by Daisy Farm Crafts
Seaming
What is seaming?
Seaming is when you have squares, panels, or garment pieces that you need to sew together to form the finished project.
To seam together a project, you will need a tapestry needle or a crochet hook. Also, locking stitch markers make it easy to hold pieces together as you sew.
The tool you use will depend on the type of seam, the look you’re going for, or what the pattern states.
Here are some examples:
For the Cheaters Gingham Blanket, we seamed together the panels using a tapestry needle and the whip stitch. If you want to see how that’s done, here’s the video.
For my Dreamsicle Tee, I used a tapestry needle and the mattress stitch to seam together the panels of this summer top (this is beginner friendly if you’re looking to make a top anytime soon)
Here are a few more ways you can seam your project with a tapestry needle:
- – Sewing with Crochet Tips by Naztazia
- – Invisible Seam for Granny Squares by Bella Coco
Here are a few different ways you can seam your project with a crochet hook:
- – Slip Stitch Join by Bella Coco
- – Joining Granny Squares 3 Ways by Sirin’s Crochet
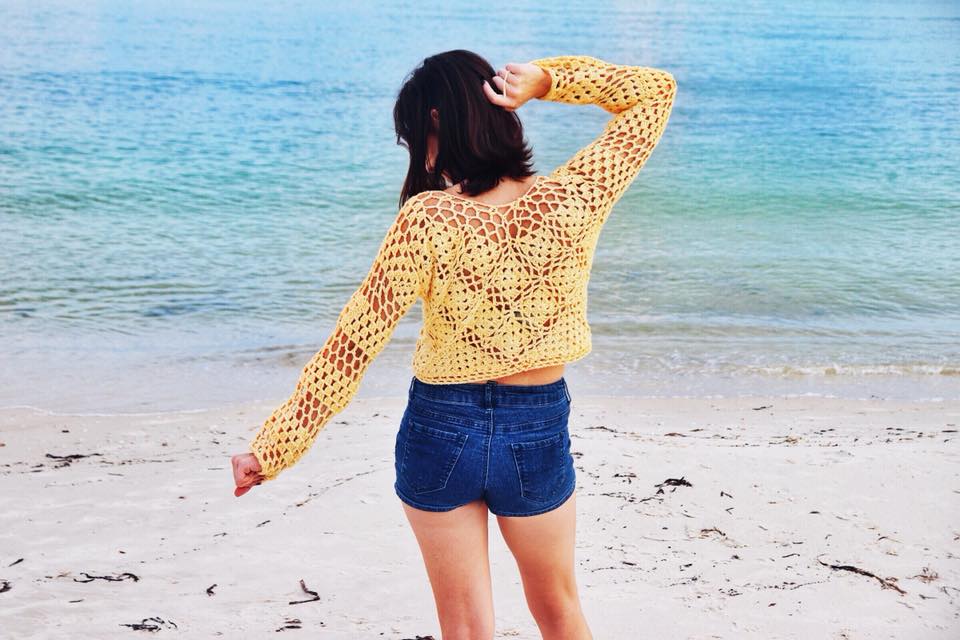
There are also a few techniques where you can crochet and seam granny squares as you go. This eliminates the hassle of making all of those squares and then having to sew them together.
I tried the join as you go method with a top that I made from a friend’s design – the Pamlico Beach Pullover* – and loved it! (photo below)
Here are a few tutorials for joining squares as you go (both by Hooked by Robin):
Joining Crochet Motifs
There are many other ways to seam together granny squares in particular, but I couldn’t find many free resources.
If you love to make granny squares, there is an online class through Craftsy called Joining Crochet Motifs* by Edie Eckman (the same lady who wrote the book I told you about earlier!) that covers everything you need to know.
In this class, Edie covers:
- – joining as you go
- – simple seams
- – combination seams
- – the join as you go hybrid
- – and joining motifs that are different shapes!
So if you like to make lots of projects with motifs, I highly recommend this class.
You can get 70% off this particular class* with the code GRATEFUL70 or you can sign up for their $8 monthly membership and access all of the classes they offer in many different categories.
Blocking
Blocking isn’t something you’ll have to do for every project. I rarely block any of my projects, but there are cases where it can be important. Some examples are:
- – Granny squares
- – Garments (if stated in the pattern)
- – Lace shawls
- – To fix curling or to hide uneven edges
I’ve been crocheting for 4 years and I’ve only blocked a handful of projects. When I do block, I usually spray block because it’s the easiest but the technique really depends on the fiber you’re working with.
Here’s how to spray block your project:
- 1.) Gather your supplies:
- – Spray bottle filled with water
- – Some blocking mats
- – T-pins
- 2.) Spread your project out on the mats
- 3.) Stretch it out to how you want it to look
- 4.) Pin it down with t-pins (make sure they’re rust-proof)
- 5.) Spray away!
- 6.) Let it sit for 24-48 hours, unpin, and you’re done!
My suggestion is to purchase the blocking mats and t-pins as a bundle. I added the set I currently have in my Amazon shop under LCE Week 9. But there are many different kinds.
You can also find beautiful granny square blocking boards* on Etsy.
Blocking Resources
A few weeks ago we talked about blocking and I listed some really great resources to learn how to do each kind so I’m going to share them again today.
This first video by Jayda explains the different types of blocking methods and which techniques are best for certain types of fibers. It’s a very informative video so if your thinking about blocking or you just want to broaden your knowledge of blocking I highly recommend watching this video.
Here are some tutorials for different kinds of blocking techniques:
- – All About Blocking – Jayda in Stitches
- – Wet Blocking – Sewrella
- – Spray Blocking – CreaCrafts – not crochet, but works just the same
- – Steam Blocking – TL Yarn Crafts
Laundering Finished Items
We’re finally into the last topic of discussion today: Laundering our finished fabric.
The way you wash a finished project will depend on the yarn you used to make it.
Here’s a rundown of what you should and should not do for each fiber (via The Spruce):
- – Acrylic yarn: Washer and dryer safe
- – Cotton/Linen: Washer and dryer on delicate/gentle setting; Cold or warm water
- – Super wash wool: Hand or machine washed in gentle cycle; Cold water
- – Regular wool: Must be washed by hand in cold water to avoid felting and shrinking. Choose a detergent formula developed for wool or a mild baby shampoo. Specialty detergents containing lanolin, such as Eucalan, help preserve wool fibers and increase the water-resistance of wool.
Here’s the full article from The Spruce Crafts on how to clean and care for your crochet plus some additional tips.
The first Forever Blanket pattern that I released was made by a family friend over 20 years ago. I still have this blanket and I’ve washed it plenty of times. And because it uses acrylic yarn (Red Heart Super Saver to be exact) it is seriously in FANTASTIC shape. Like, I’m super impressed.
So acrylic is a great yarn to use when you want something to last a long time.
Also, Red Heart Super Saver gets a bad rep sometimes when it comes to scratchiness. And although I agree that it can be scratchy, the more you wash this yarn, the softer it gets. I can attest to that through this blanket.
Also, one more thing. If you’re gifting a finished item, make sure you tell them how to care for it. You don’t want to put all of your love and hard work into something for it to be improperly taken care of.
FREE TUTORIAL FRIDAY
Today we’ve been talking all about finishing crochet projects so naturally, I have to create a tutorial for you. On Friday I’ll be releasing a full tutorial on fastening off and the different ways to weave in ends.
JOIN THE LCE FACEBOOK GROUP
The Crochet’dy Bunch // Limitless Crochet Everyday
I created the Facebook Group, The Crochet’dy Bunch as a space for those who love crochet and I’ve decided to group it together with the Limitless Crochet Everyday project. This is a place where we connect, share work, get your questions answered, and support each other. I hope you’ll join us!
Please don’t forget to agree to the group rules! It’s so important to me that this is a supportive, loving community, and I won’t tolerate any negativity.


JOIN THE WEEKLY NEWSLETTER!
Sign up to learn how to crochet through your emotions and gain access to our private Facebook group where you can get answers to all of your questions!
