How to Crochet in the Round – A Step-by-Step Picture Tutorial
It’s about time I add some more tutorials for you beginners! Crocheting in the round can be difficult when you’re first starting out. The first thing you need to know is that there are two ways to crochet in the round. One way is to close the round with a slip stitch and the second is to work continuously in the round. Today I will show you How to Crochet in the Round BOTH ways and I promise it’ll be easy peasy.
Before we get into the tutorial though, I wanted to make a little announcement. Recently, I created a Facebook Group just for you! We’re calling ourselves the Crochet’dy Bunch and I would love for you to join. Once the group gets going, we will be talking about all things crochet, diving deeper into tutorials, and sharing tons of laughs! So if you join the group and have any questions about this post or would like me to go over something I didn’t cover, feel free to leave a question on the wall or send me a message!
Click here to join The Crochet’dy Bunch!
Okay enough of that. Let’s get back to crocheting in the round!
There are a variety of projects that start off crocheting in the round. Amigurumi and hats are the most common, but you can also crochet a rug or blanket this way as well!
As I stated previously, there are two ways to crochet in the round. One way requires a stitch marker, so make sure you have some of those! When you start off, you can either create a magic circle OR you can chain 3 (for hdc) and work your stitches into the first stitch.
I’m going to write the tutorial as if you’re creating a magic circle. If you’re not sure how to do this, I have an easy to learn step-by-step picture tutorial waiting for you right here!
Before we get into the tutorial, there are a few things you should know about crocheting in the round.
A few things you should know first
- The stitch you choose will determine how many stitches you will begin with. (I learned this from BHooked Crochet)
- Single Crochet – begin with 6 stitches
- Half Double Crochet – begin with 8 stitches
- Double Crochet – begin with 10 stitches
- An increase is when you make two hdc stitches (or any other st) into the SAME stitch.
- In order for your circle to remain flat, you have to evenly space out your increases. You’ll start to understand the pattern more when you go over the tutorial! The pattern will be the same for every stitch.
- If you start with 6 stitches, your total stitch count will increase by 6 after each round. If you start with 8 stitches, your total stitch count will increase by 8 after each round. And so on.
Abbreviations Used:
- Sl St – Slip Stitch
- Hdc – Half Double Crochet
- Ch – Chain
- Yo – Yarn over
- Rep – Repeat
Notes:
- Ch 2 at the beginning of round counts as hdc
- Photo tutorials will immediately follow the written instructions.
- Find the full video tutorial here
How to Crochet in the Round – Slip Stitching
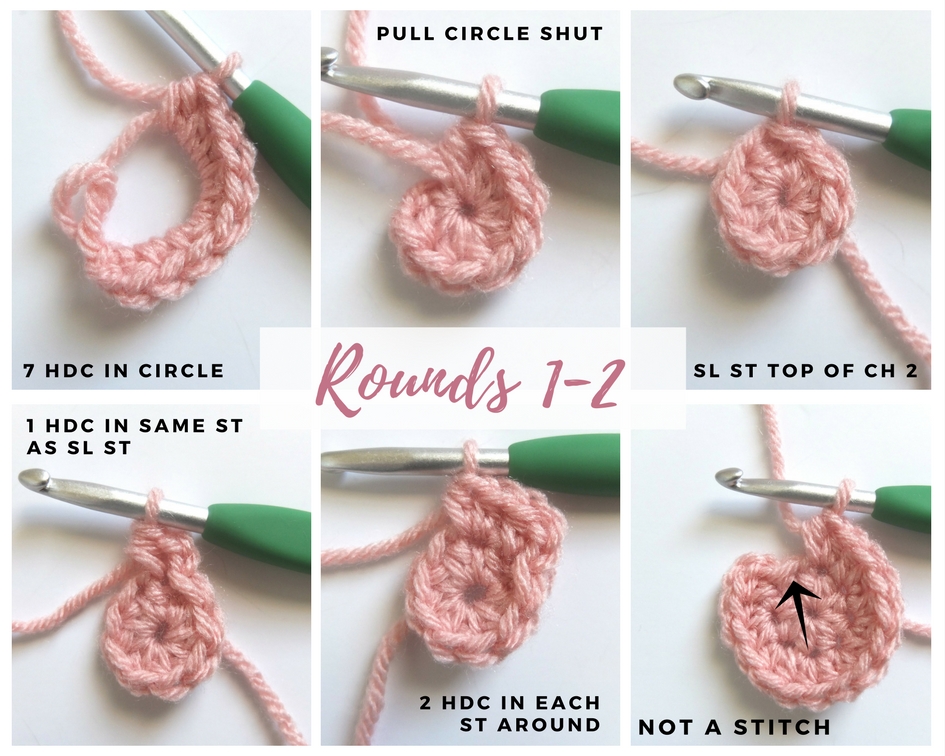
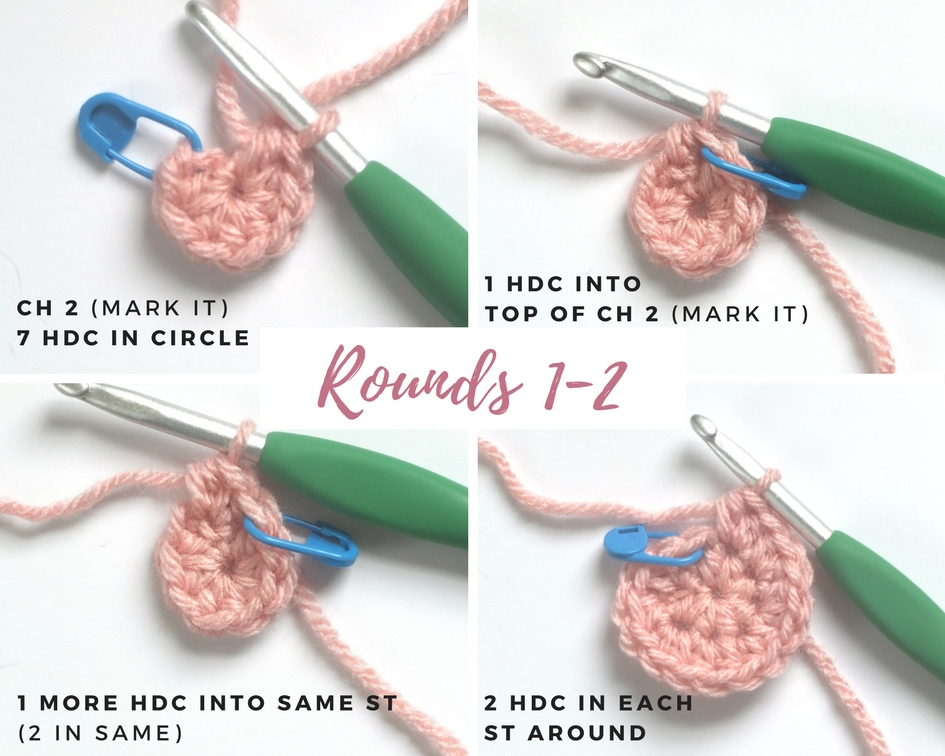
Create your magic circle, ch 2 (the ch 2 counts as a hdc).
Round 1: 7 hdc into your circle. (You will have 8 hdc total including the ch 2)
Pull the tail to close the circle. Sl st to the top of the ch 2. (Insert your hook into the top of ch 2, yo pull loop through st AND through the loop on your hook.)
Round 2: Ch 2, 1 hdc into the same st as your sl st. [1 hdc into the very next st. Then repeat another hdc into the SAME st. (You will have 2 hdc in the same st – in some patterns, the designer will label this as an increase). Continue with 2 hdc into the next st and in each st around. Sl st to the top of ch 2. (16 st)
If you take a look at the picture, you will see that the last “stitch” in the round looks like a stitch, but it really isn’t. It is the sl st you created in the previous round. Do not hdc into this st.
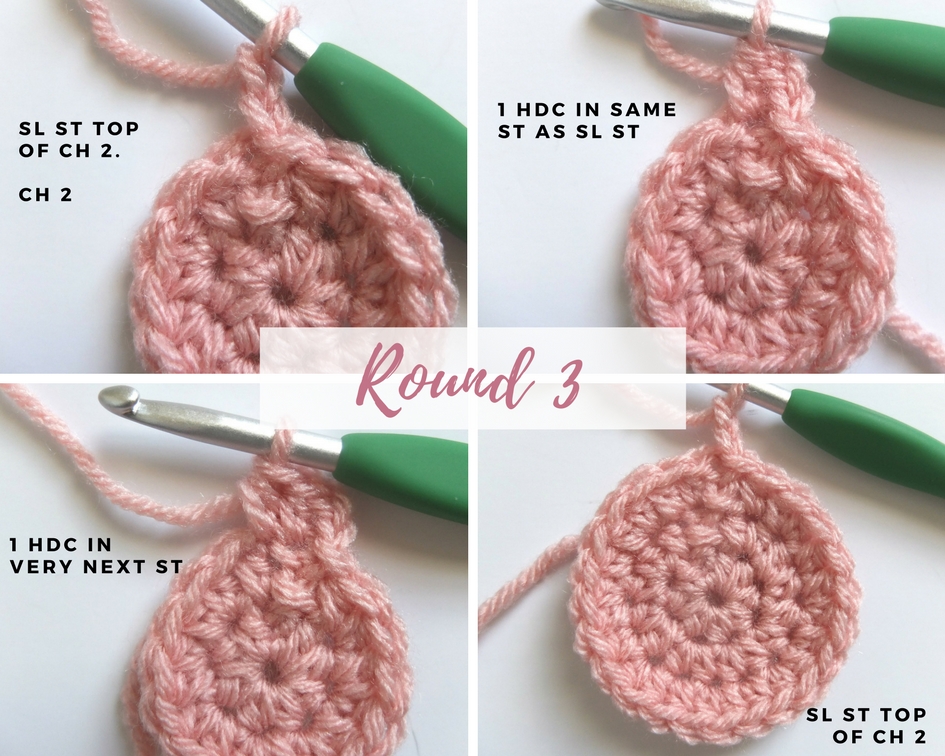
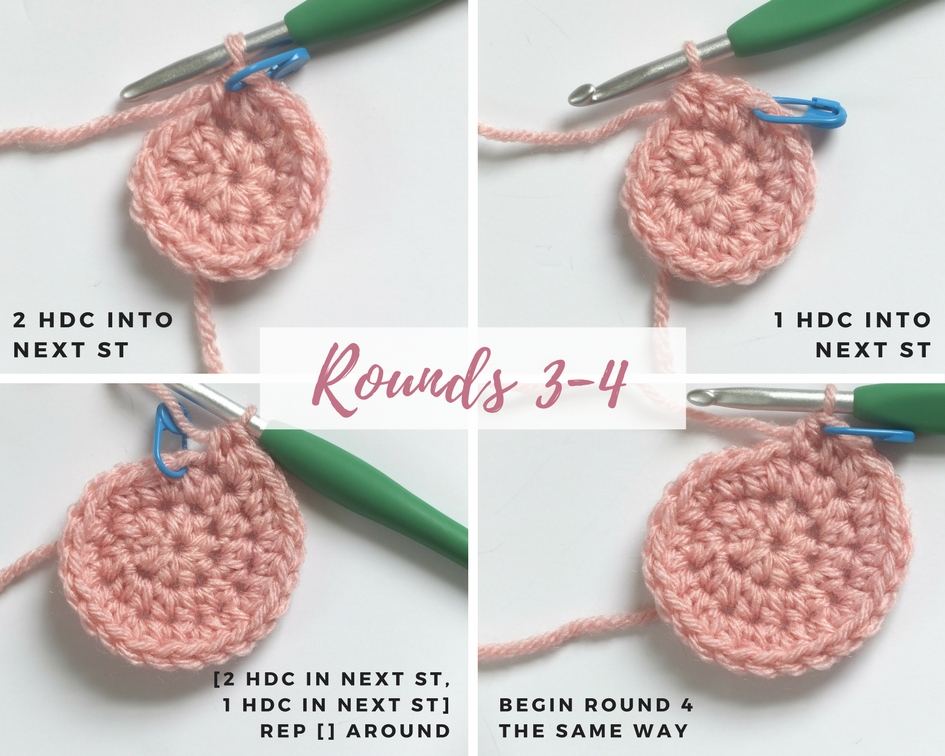
Round 3: Ch 2, 1 hdc into the same st as sl st. 1 hdc into the next st. [2 hdc into the next st. 1 hdc into the next]. Rep [ ] around. Sl st to top of ch 2. (24 st)
Round 4: Ch 2, 1 hdc into the same st as sl st. 1 hdc into EACH of the next two st. [2 hdc into the next st. 1 hdc into EACH of the next two st]. Rep [ ] around. Sl st to top of ch 2. (32 st)
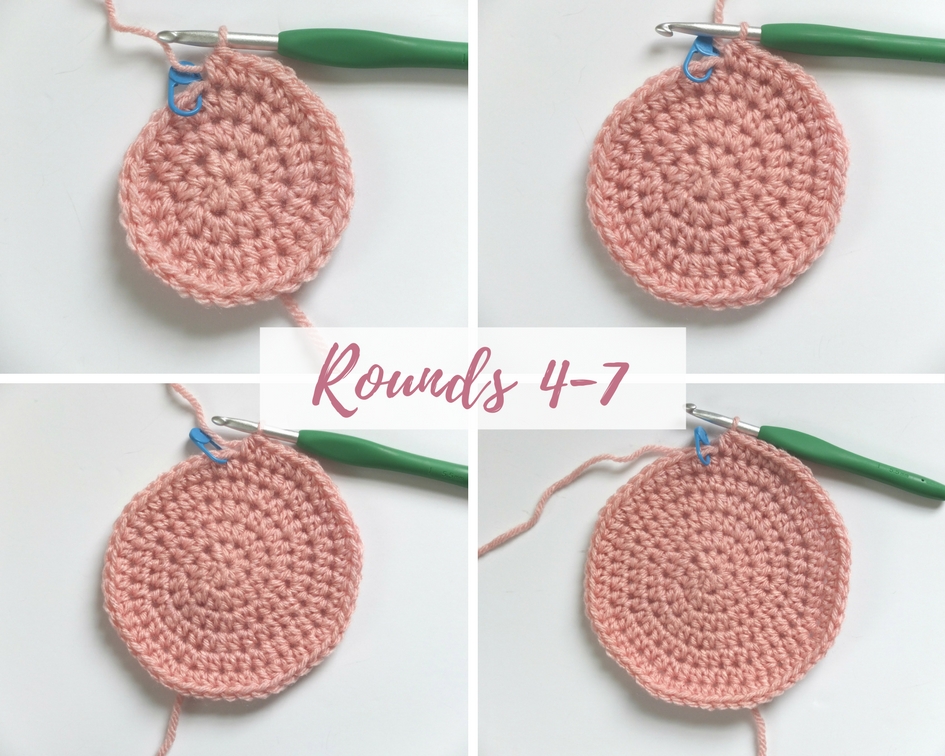
Round 5: Ch 2, 1 hdc into the same st as sl st. 1 hdc into EACH of the next three st. [2 hdc into the next st. 1 hdc into EACH of the next three st]. Rep [ ] around. Sl st to top of ch 2. (40 st)
Round 6: Ch 2, 1 hdc into the same st as sl st. 1 hdc into EACH of the next four st. [2 hdc into the next st. 1 hdc into EACH of the next four st]. Rep [ ] around. Sl st to top of ch 2. (48 st)
Round 7: Ch 2, 1 hdc into the same st as sl st. 1 hdc into EACH of the next five st. [2 hdc into the next st. 1 hdc into EACH of the next five st]. Rep [ ] around. Sl st to top of ch 2. (56 st)
Are you starting to see the pattern? Continue increasing each round in this fashion until you feel comfortable crocheting in the round!
How to Crochet in the Round – Continuously
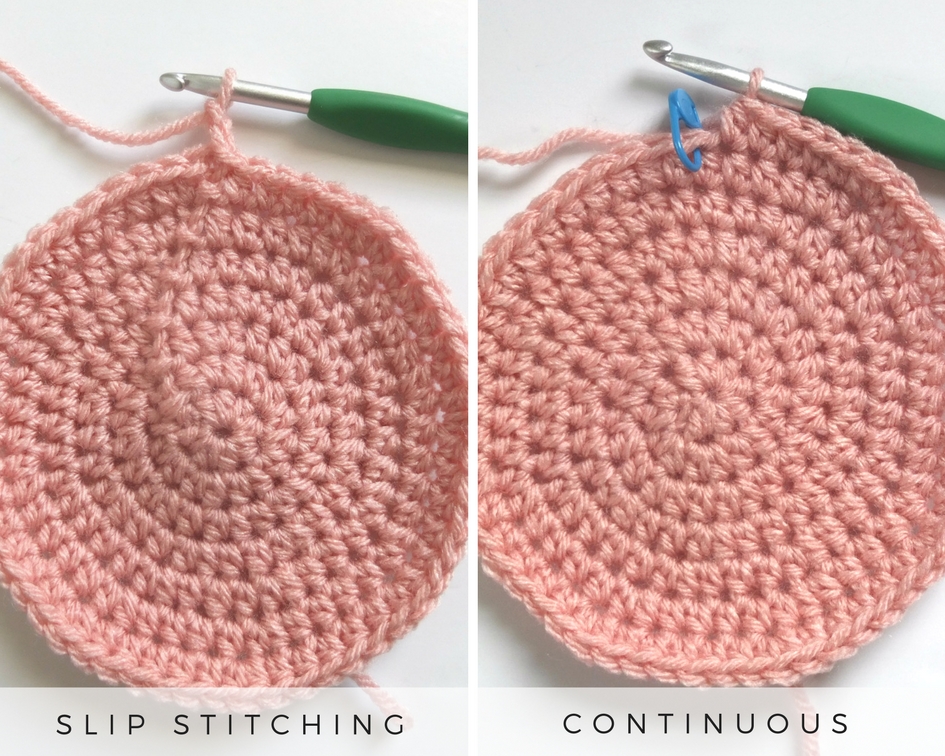
Some patterns require that you do not close your circle at the end of each round. This is based on personal preference, but I believe a lot of people do this because there is no visible seam (I will show a side by side comparison of each below). There’s a slight difference as you can see. It is the same pattern I showed you above, except we will be using a stitch marker and we will not be slip stitching OR chaining!
If you don’t have any stitch markers, I suggest you buy some here or you can use something like a paper clip or another strand of yarn to keep your place. But be careful to make sure it doesn’t fall out! That’s why my favorite stitch markers are the ones that snap shut!
And here we go…
Create a magic circle, ch 2 (counts as hdc).
Round 1: 7 hdc into magic circle. Pull your tail tight to close circle. DO NOT SL ST OR CH. (8)
Round 2: 1 hdc into the very next st. Clip your stitch marker onto this stitch to mark as your first stitch. Now rep one more hdc into the SAME ST (2 hdc in same st). Repeat 2 hdc into the next st and each st around. (16)
Round 3: Take out your st marker, 1 hdc into that next st. Replace st marker to st you just made. 1 hdc into the SAME st. 1 hdc into the next st. [2 hdc into the next st. 1 hdc into the next]. Rep [ ] around. (24)
Round 4: Take out your st marker, 1 hdc into that next st. Replace st marker to st you just made. 1 hdc into the SAME st. 1 hdc into each of the next two st. [2 hdc into the next st. 1 hdc into each of the next two st]. Rep [ ] around. (32)
Round 5: Take out your st marker, 1 hdc into that next st. Replace st marker to st you just made. 1 hdc into the SAME st. 1 hdc into each of the next three st. [2 hdc into the next st. 1 hdc into each of the next three st]. Rep [ ] around. (40)
Round 6: Take out your st marker, 1 hdc into that next st. Replace st marker to st you just made. 1 hdc into the SAME st. 1 hdc into each of the next four st. [2 hdc into the next st. 1 hdc into each of the next four st]. Rep [ ] around. (48)
As you can see, it’s the same pattern. All you have to do is get the hang of taking out and replacing your stitch marker and NO SLIP STITCHING OR CHAINING!
I don’t really have a preference on my favorite method. I do like like that working continuously in the round creates an invisible seam, but if I don’t have a stitch marker on hand, the seam doesn’t bother me too much. However, it drives some people crazy and I completely understand why. Which is why I say it’s personal preference 🙂 I would go with whatever the pattern tells you and if you start designing one day then you’ll find you’re own preference!
If you have ANY questions at all, please don’t hesitate to ask! Leave a comment below or shoot me an email and I will be happy to help you along!
Next in the Learn to Crochet the Easy Way Series:
- Basic Materials
- How to Hold Your Crochet Hook and Yarn
- How to Make a Slip Knot
- Chain Stitch
- Magic Circle Crochet Tutorial
- Single Crochet Stitch
- Half Double Crochet Stitch
- Double Crochet Stitch
- Treble Crochet Stitch
- How to Crochet in the Round
- How to Read Crochet Patterns